This topic provides an example of how to create a new entity using one of the sample application entities to illustrate the process.
A key piece of database schema in the Motor Loaner System is the Rental Agreements entities. The need for this entity is documented as DR6: Rental Agreements Form Information in the "Motor Loaner System Requirements" on page 31 About the Data Requirements for the Sample Application topic and the design for this entity is described in About the Entity Creation section of the "Motor Loaner System Design Specifications" on page 41Entities for the Sample Application.
After a careful review of the design of the entire application, the developer created the entities for the Motor Loaner system. (Note that you should carefully design your entity and application before creating new records in the Entities service.) The developer followed these steps to design the Rental Agreements entity in Aptify: Info:
| Info |
|---|
Rental Agreements was one of the last entities to be created for the Motor Loaner System since it includes links to the Vehicles (which in turn links to numerous other entities), Associates, and Customers entities. These other entities needed to exist prior to the Rental Agreements entity so the appropriate links could be created. |
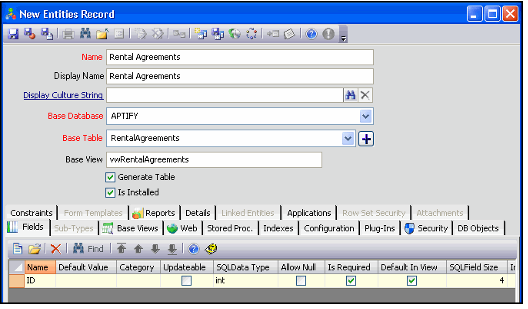
- Open a new record from the Entities service.
- The ID field is added to the Fields tab automatically.
- The ID field is added to the Fields tab automatically.
- Enter Rental Agreements in the Name field.
- This follows Aptify's naming convention to use a plural entity name with the appropriate spaces.
- The Display Name field is automatically populated with the entity name.
- Specify RentalAgreement as the Base Table.
- This follows Aptify's naming convention to use the singular form of the entity's name without spaces as the Base Table's name.
- This follows Aptify's naming convention to use the singular form of the entity's name without spaces as the Base Table's name.
- Specify vwRentalAgreements as the Base View.
- This follows Aptify's naming convention to use a vw prefix with the entity's name without spaces as the Base View's name.
...
- Click the New icon in the Fields tab's toolbar to open a new Fields record.
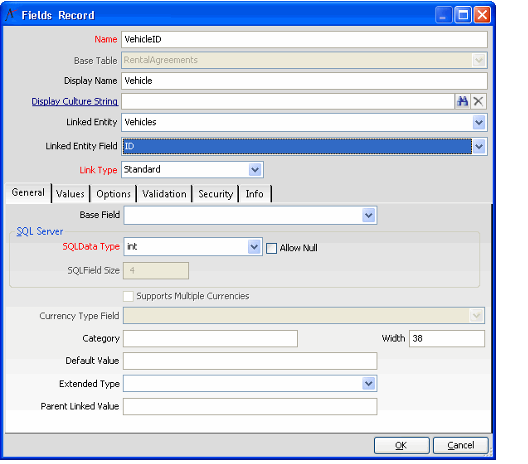
- The first field to add is the VehicleID linked field to create a foreign key between Rental Agreements and Vehicles. This field will store the vehicle rented by the customer. It is configured as a Link Box, using the following settings:
- Name: VehicleID (following Aptify's convention for linked fields).
- Display Name: Vehicle (remove the "ID" portion)
- Linked Entity: Vehicles entity
- Linked Entity Field: ID field in Vehicles entity
- Link Type: Leave as Standard (this is not an embedded link)
- General Tab Fields: The system automatically sets the necessarily fields in this case when the linked field attributes are specified in the top area of the form:
- SQL Data Type/Size: Since the link is to an ID field, the system automatically sets the data type and size to int(4).
- Allow Null: The system assumes that links to another entity's ID field are required so the Allow Null box is unchecked automatically.
- Width: The system automatically calculates the default column width for an int(4) field and populates this field.
...
- Validation Tab Fields: The system automatically
...
- selects the Is Required
...
- option since it assumes that links to another entity's ID field are required.
Info Tab > Help Text: Enter text in the Help Text field on the Info tab to provide field level help for this item (such as "Vehicle to be rented by the Customer (Vehicle's Year, Manufacturer, Model and VIN) (Required field during Check-Out Process)").
...
Info Note that when populated with a Vehicles record, this link box displays the value from the field in the Vehicles entity that has the Is Name Field option checked. In this case, that is the YearMfrModelVIN, which is a calculated virtual field that aggregates the Manufacturer/Model/Year field from the Vehicle Models entity with the Vehicle's VIN.
Also, note that since Rental Agreements is a transaction-based entity, its records will be identified by ID number, so none of the fields will have the Is Name Field check box
...
selected.
- Click OK to save and close the Fields record.
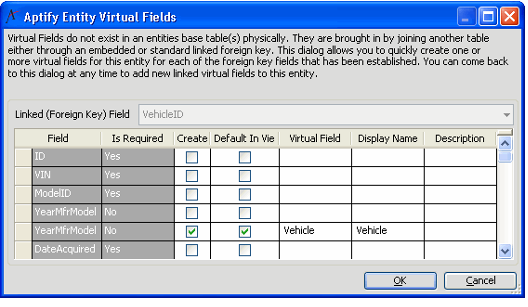
- When prompted, click OK to open the Aptify Entity Virtual Fields wizard (as described in
...
...
- ).
- In general, you want to create at least one virtual field for each link to an entity that has an identified Is Name field so users can see the record's name in the view rather than an ID (which is typically meaningless to the end user).
- Check the Create box for the YearMfrModelVIN field in the Vehicles entity. The wizard also automatically checks selects the Default In View check box (since most virtual fields are added for the purpose of displaying a value in a view).
- Enter a Name for the virtual field (such as Vehicle or VehicleID_Name) and enter the Description for the field as it will be displayed in a view's column heading (such as Vehicle). Creating the Vehicle Virtual Field
- Click OK to save and close the Entity Virtual Fields wizard.
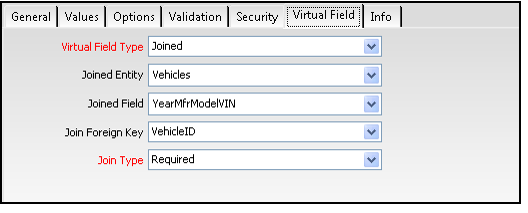
- Aptify automatically adds a new, fully configured joined virtual field record for this item. This field adopts the data type of the underlying field it is linked to and the virtual field's Join Type is automatically set to Required since the corresponding VehicleID field is required.
...
Following the same process used to create the VehicleID field and virtual field, add two additional sets of Linked Fields/Virtual Fields for CheckOutClerkID (identifies the Associate who initiated the rental check-out) and CustomerID (the customer who is renting/rented the vehicle). Additional details on these fields appear in the following table:
Field Name
Field Type
Notes
CheckOutClerkID
Link Box
Required field. Link to Associates entity's ID field.
CheckOutClerk
Joined Virtual Field
Full name of associate who performed check-out procedure.
CustomerID
Link Box
Required field. Link to Customers entity's ID field.
CustomerName
Joined Virtual Field
Full name of the customer renting the vehicle.
Add the remaining fields related to the check-out portion of the rental agreement, as identified in the table below:
Field Name
Field Type
Notes
RentalDate
Date Selection Field
Required field. Use a Default Value of GETDATE() to automatically populate this field with the current date when opening new records.
ExpectedReturn
Date Selection Field
Required field. The expected return date of the rental.
StartingMileage
Standard Text Field
Required field. This is a number-based field; use a data type of int(4).
StartingFuelLevel
Standard Combo Drop-down List
Required field. Use a data type of nvarchar(50) and specify the following static values:
...
- Empty
- 1/
...
- 4
- 1/
...
- 2
- 3/
...
- 4
...
Full
Note that as a required field, the first record in the value list (Empty, in this case) is the de facto default when a Default Value is not specified.
...
StartingCondition
Standard Combo Drop-down List
Required field. Use a data type of nvarchar(50) and specify the following static values:
...
- Acceptable
Existing
...
Damage
Note that as a required field, the first record in the value list (Acceptable, in this case) is the de facto default when a Default Value is not specified.
...
CheckOutComments
Multi-Line Text Field
This field is not required. Use nvarchar(max) as the data type. Enter
...
Check-Out Comments
...
as both the Display Name and as the Category to add a Check-Out Comments tab to the generated Rental Agreements form.
- Add the fields related to the check-in process to the entity.
Note that none of these fields are required in the entity definition. In other words, none of these fields require a value to save a new Rental Agreements record, since a new record is typically saved with check-out details only. However, most of these fields are required when completing a vehicle check-in. The Rental Agreements entity object will handle this type of validation (see
...
...
).
Field Name
Field Type
Notes
CheckInClerkID
Link Box
Not required. Link to Associates entity's ID field.
CheckInClerk
Joined Virtual Field
Full name of associate who performed check-in procedure. Note the Join Type is Optional since CheckInClerkID is not required.
ReturnDate
Date Selection Field
ReturnMileage
Standard Text Field
This is a number-based field; use a data type of int(4).
ReturnFuelLevel
Standard Combo Drop-down List
Use a data type of nvarchar(50) and specify the following static values:
...
- Empty
- 1/
...
- 4
- 1/
...
- 2
- 3/
...
- 4
Full
...
ReturnCondition
Standard Combo Drop-down List
Use a data type of nvarchar(50) and specify the following static values:
- Acceptable (Same as Rented)
Damaged (Repairs Needed)
In the design for this application, a Process Flow will automatically create a Service Ticket for vehicles identified as "Damaged (Repairs Needed) following a vehicle check-in. See "Service Ticket Generation Process Flow" on page 47.
...
CheckInComments
Multi-Line Text Field
Use nvarchar(max) as the data type. Enter "Check-In Comments" as both the Display Name and as the Category to add a Check-In Comments tab to the generated Rental Agreements form.
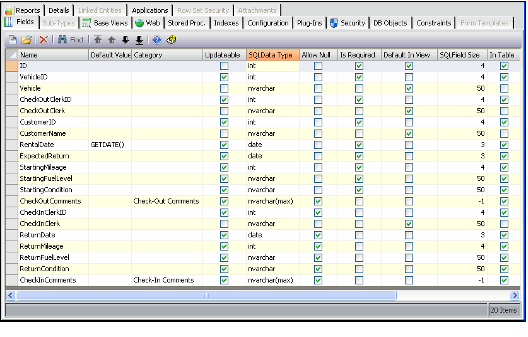
When finished, the Entities record's Fields tab looks like this:
...
...
Info The Rental Agreements entity included with the sample application also includes one additional virtual field not displayed in the figure above: YearMfrModel, which is a virtual field via the VehicleID to the Vehicles entity's YearMfrModel field. This virtual field was created for use within
...
the Top 5 Rented Vehicles in Last Month
...
view in the Manager's Dashboard.
- Click the Security tab and add the permission set for users and groups who need to access this entity based on the application's security design.
...
- See Administering Security for Entities for information on Aptify's security features.
- For the Rental Agreements entity, the security design specifies the following access permissions shown
...
- below:
- Users: Read, Create, and Edit access. No Delete permissions.
- Managers: Read, Create, Edit, Delete, and Merging permissions.
- Administrators: Same permissions as Managers plus the ability to view record data in the Object Viewer (which is an alternative method for access record information — see
- below:
...
- Using the Object Viewer for details).
- Using the Object Viewer for details).
...
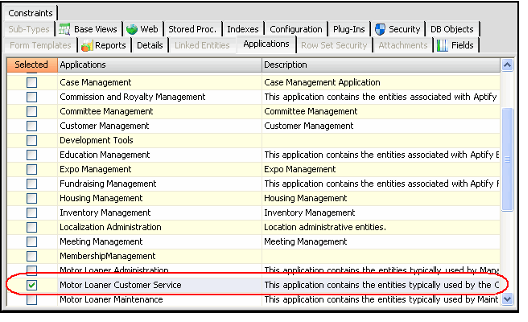
- Click the Applications tab and select the check box next to the Motor Loaner Customer Service application.
- An Application groups together related entities within the Aptify user interface. An entity can be included in more than one application as needed. Also, you can create an application later and then add the entities to that application from the Applications record itself rather than from the Entities record.
...
- Save the Entities record to automatically generate the Base Table, Base View, Stored Procedures, Form Templates, and CRUD (Create, Read, Update, and Delete) process components for the entity.
- Since this entity includes a sub-type to track rental options per the design specifications (see "Entity Creation" on page 41 Developing for Entities), click the Sub-Types tab and open a new sub-type Entities record.
- Create and save the RentalAgreementRentalOptions sub-type entity.
- See
...
- Developing for Entities and review the RentalAgreementRentalOptions entity itself in the sample application for details of this entity.
- Saving the sub-type entity also regenerates the necessary objects for the top-level entity required to support the sub-type.
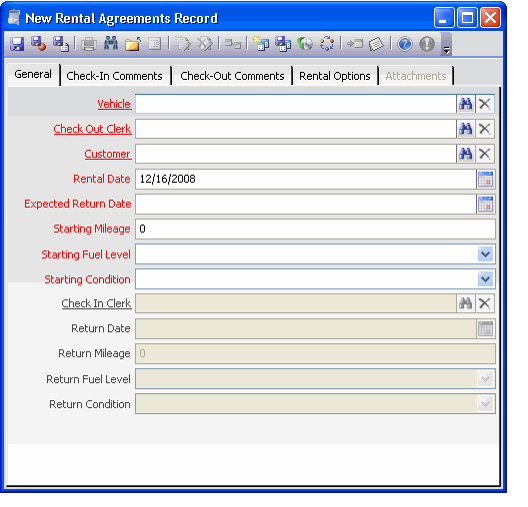
- Subscribe to the Motor Loaner Customer Service application within Aptify (if it does not already appear in your Folder List) and open a new Rental Agreements record to review the form design and confirm all fields are present as intended. A sample Rental Agreements record is shown in Figure 8.42.
Anchor RTF33313632383a204361707469 RTF33313632383a204361707469 Rental Agreements Record
...
- below.
| Info |
|---|
The Rental Agreements entity in the sample application also includes two code-based configurations: an Entity Object and a Layout Control. |
See "Creating Developing Entity Plug-in Objects" on page 227 for for information on the Entity Object. See "Designing Developing Form Templates" on page 277 for for information on the Layout Control. Note that part of the functionality of the Layout Control is to disable Check-In related fields for new Rental Agreements record.
