Metadata generation is used to generate the respective metadata (HTML, etc.) so that changes appear in the Aptify Web interface. For example, if we add a new currency type then we need to generate Web UI Part Metadata Items to get the respective changes to reflect in web (after we clear cache and local storage). Starting with 5.5.4.4000, Aptify enhances the metadata generation framework to reduce the times in which users need to manually generate metadata when changes are made to entities, form templates, dashboard or any UI Part metadata from the desktop or web clients. To support this feature, Aptify includes a new entity called Metadata Generator Configurations and by default includes a number of metadata configurations for common scenarios, including adding a new currency type. To automate the generation, Aptify includes a new process flow called MetaDataGeneratorProcessFlow that it used by your application server to trigger the metadata generation at the appropriate time.
This feature utilizes Aptify's application server to run the necessary generators automatically. See Installing Application Servers in the Product Knowledge site for more information about setting up and running an application server. |
This topic contains the following sub-topics:
By default all Metadata Generator Configurations records delivered with Aptify are inactive as well as their corresponding event handlers. See Enabling Default Metadata Generators Configurations for more details. |
Below is a list of the metadata configurations that are included by default.
You can only have one Metadata Configurations record per entity per metadata generator process flow per event. This will ensure that the generation happens only once. If you attempt to create a record with the same entity, process flow and event, an error is generated and you will not be able to save the record. |
| Entity Name | Process Flow Name | Event Name |
|---|---|---|
| Calendar Views | Generate HTML5 Web View Metadata | AfterSave |
| Chart View Functions | Generate HTML5 Web UI Part Metadata Items | AfterSave |
| Chart View Types | Generate HTML5 Web UI Part Metadata Items | AfterSave |
| Chart Views | Generate HTML5 Web View Metadata | AfterSave |
| Currency Types | Generate HTML5 Web UI Part Metadata Items | AfterSave |
| Currency Types | Generate HTML5 Web Form Template UI Parts | AfterSave |
| Dashboard Areas | Generate HTML5 Web Dashboard UI Parts | AfterSave |
| Dashboard Parts | Generate HTML5 Web Dashboard UI Parts | AfterSave |
| Dashboards | Generate HTML5 Web Dashboard UI Parts | AfterSave |
| Entities | Generate HTML5 Web Entity Metadata | AfterEntitySaveCompleted |
| Filter Rule Types | Generate HTML5 Web UI Part Metadata Items | AfterSave |
| Filter Rules | Generate HTML5 Web UI Part Metadata Items | AfterSave |
| Form Template Parts | Generate HTML5 Web Form Template UI Parts | AfterSave |
| Form Templates | Generate HTML5 Web Form Template UI Parts | AfterSave |
| List Types | Generate HTML5 Web Entity Metadata | AfterSave |
| Member Types | Generate HTML5 Web UI Part Metadata Items | AfterSave |
| Member Types | Generate HTML5 Web Form Template UI Parts | AfterSave |
| Order Sources | Generate HTML5 Web Form Template UI Parts | AfterSave |
| Order Status Types | Generate HTML5 Web Form Template UI Parts | AfterSave |
| Payment Types | Generate HTML5 Web Form Template UI Parts | AfterSave |
| Process Components | Generate HTML5 Web UI Part Metadata Items | AfterSave |
| Product Types | Generate HTML5 Web UI Part Metadata Items | AfterSave |
| Product Types | Generate HTML5 Web Form Template UI Parts | AfterSave |
| Products | Generate HTML5 Web Form Template UI Parts | AfterSave |
| Shipment Types | Generate HTML5 Web UI Part Metadata Items | AfterSave |
| Shipment Types | Generate HTML5 Web Form Template UI Parts | AfterSave |
| Timeline Activities | Generate HTML5 Web UI Part Metadata Items | AfterSave |
| TokenProviders | Generate HTML5 Web UI Part Metadata Items | AfterSave |
| UI Part Metadata Items | Generate HTML5 Web UI Part Metadata Items | AfterSave |
| Views | Generate HTML5 Web View Metadata | AfterSave |
| Wizards | Generate HTML5 Web UI Part Metadata Items | AfterSave |
By default all Metadata Generator Configurations records delivered with Aptify are inactive as well as their corresponding event handlers. Below are steps to enable all of the default configurations in one go using an Entity Bulk Operation (EBO) that is also included as stock.
If you have existing event handlers that generate metadata, this Entity Bulk Operation will attempt to identify duplicate event handler records and inactivate them automatically without manual intervention. Aptify recommends confirming that only one event handler is active per entity per event so that duplicate process flow runs are not fired. |
Look for an existing metadata configuration before continue. See Delivered Metadata Configurations for more details. |
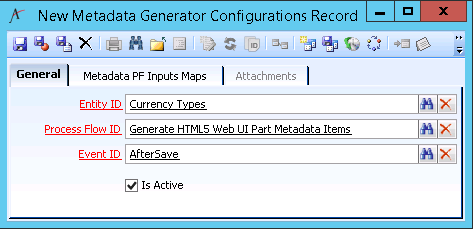
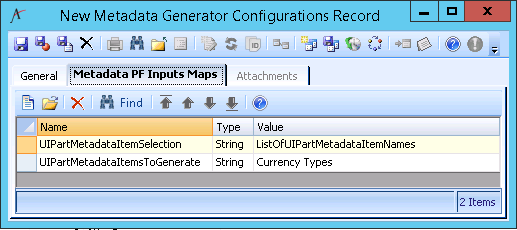
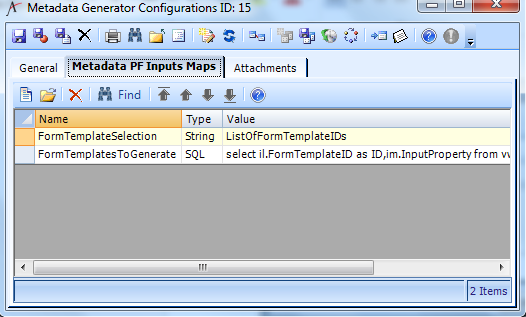
Once you have determine that there is not an existing metadata configuration that meets your needs, you can create a new metadata configuration with the following steps.


select il.FormTemplateID as ID,im.InputProperty,source from vwFormTemplatePartInputMap im
inner join
vwFormTemplatePartLinks il
on im.FormTemplatePartID=il.FormTemplatePartID
where source like '%shiptypes%'
and im.InputProperty = 'DisplaySQL'

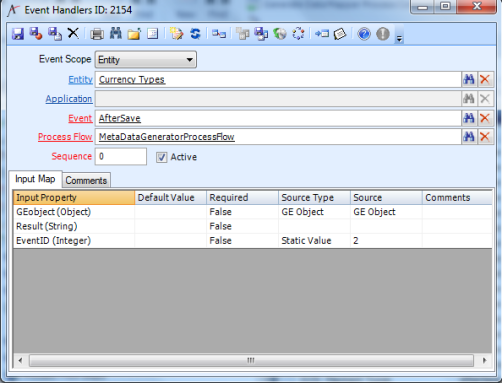
By default, Aptify includes a process flow called MetaDataGeneratorProcessFlow that is used to generate the necessary metadata. If you want to change the process flow that is used, you can do so by modifying the ProcessFlowName attribute (found on the Configurations > Attributes sub-tab) on the Metadata Configurations entity.