Installing the Web Version of the Aptify Add-in for Microsoft Outlook
This is the Web Version of the Outlook Add-in
If your users are accessing Aptify through the desktop interface, you will want to review the Installing the Desktop Version of the Aptify Add-in for Microsoft Outlook. If your users are accessing Aptify through the web interface and are using a web-based version of Outlook, for example Outlook.com (formerly known as Hotmail) or Outlook 365 or a desktop-based version of Outlook (with Microsoft Exchange 2013 or higher), you will want to review this topic.
For information about using this add-in, see Using the Web Version of the Aptify Outlook Add-In for more details.
Aptify includes an add-in setup for Microsoft Outlook.com and Office 365 that lets users create Contact Log records directly within Outlook without having to access an open Aptify session. You can also search for (and open as needed) Persons, Companies, and Committee members to add to an email. Once the email is sent, a Contact log is automatically created with the appropriate links.
Aptify Requirements and Where to Find the Outlook Add-in Installer
This add-in requires Aptify 5.5.5 and higher. It is a separate Windows installer that must be installed on your server where Aptify SOA is installed. The add-in can be found in the Include > WebOutlookAddin folder of the Aptify_555_Web distribution file. The installer name is SetupOutlookAddin.
To install the Aptify add-in, refer to the topics below:
- Installing the Aptify Outlook Add-in
- Copying and Configuring the Outlook Add-in Config File
- Verifying the Local Aptify Outlook Add-in Installation
Installing the Aptify Outlook Add-in
- Locate the AptifyOutlookAddIn installer.
- The add-in can be found in the Utilties > WebOutlookAddin folder of the Aptify_555_Web distribution file. The installer name is SetupOutlookAddin.
- The add-in can be found in the Utilties > WebOutlookAddin folder of the Aptify_555_Web distribution file. The installer name is SetupOutlookAddin.
- Copy the installer to your web server where Aptify web and Aptify web services is installed.
- Double-click the SetupOutlookAddin to launch the installer.
- Click Next on the welcome screen.
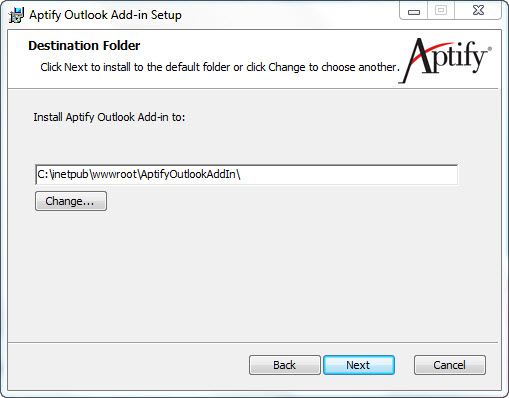
- Select the location where you want to Outlook Add-in to be installed or click Next to use the default location.
- The default location is c:\inetpub\wwwroot\OutlookAddIn\
- The default location is c:\inetpub\wwwroot\OutlookAddIn\
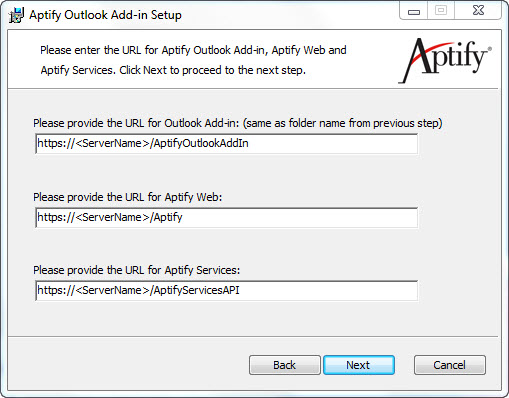
- Specify the URL for the Outlook Add-In by replacing <ServerName> with the name of your web server.
- The folder specified should be the same as the previous step.
- The folder specified should be the same as the previous step.
- Specify the URL for your Aptify website.
- If using the default location, simply replace <ServerName> with the name of your web server.
- If using the default location, simply replace <ServerName> with the name of your web server.
- Specify the URL for your Aptify services site (SOA).
- If using the default location, simply replace <ServerName> with the name of your web server.
- If using the default location, simply replace <ServerName> with the name of your web server.
- Click Next.
- Click Install.
- Click Finish when the setup is complete.
Copying and Configuring the Outlook Add-in
Once the setup has been installed, users will need to configure their outlook instance using the AptifyOutlook XML file generated by installing the Outlook Add-in on your web server.
The following steps described how to copy and configure the add-in with Outlook.com. See the help files for your version of Outlook for information on how to install an add-in from a file.
- Navigate to the locations where the add-in was installed, see Step 5 of the previous step.
- The default location is c:\inetpub\wwwroot\OutlookAddIn\
Copy the AptifyOutlook XML file to your local machine (or a location on the network where your Outlook users can access it).
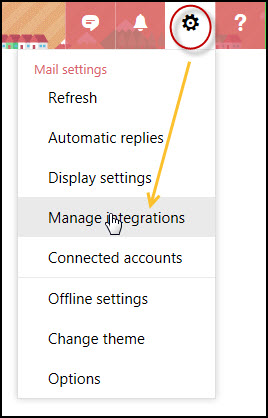
Log into Outlook.com, click the Settings option in the top-right corner and then select Manage Integrations.
Select Click here to add a customer add-in.
Select Add from file...
Navigate to and select the AptifyOutlook XML file.
Review the Warning dialog and then click Install if you wish to continue.
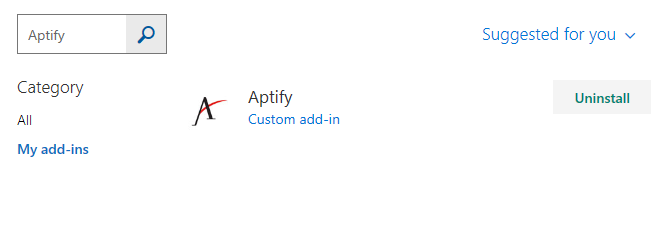
Once installed, the add-in will appear in your list of add-ins as Aptify.
To remove the add-in, navigate to (or use the Search field) the Aptify add-in and select the Uninstall option.
Copyright © 2014-2019 Aptify - Confidential and Proprietary


