Installing the Desktop Version of the Aptify Add-in for Microsoft Outlook
This is the Desktop Version of the Outlook Add-in
If your users are accessing Aptify through the web interface and are using a web-based version of Outlook, for example Outlook.com (formerly known as Hotmail) or Outlook 365 or a desktop-based version of Outlook (with Microsoft Exchange 2013 or higher), you will want to review Installing the Web Version of the Aptify Add-in for Microsoft Outlook. If your users are accessing Aptify through the desktop interface, you will want to review this topic.
For information about using this version of the add-in, see Using the Desktop Version of the Aptify Outlook Add-In for more details.
Aptify includes an add-in plugin for Microsoft Outlook (versions 2007, 2010, 2013, and 2016) that lets users create Aptify Persons and Contact Logs records directly within Outlook without having to access an open Aptify session. You can also configure the add-plugin to automatically create contact logs when a particular account receives or sends an email, which is useful for automated mailboxes.
Outlook Add-in Installer
The add-in has a separate installation program. You can find the latest version of this installer (which includes the version that supports Outlook 2016), in your organization's Aptify FTP folder (typically under the Version_50 folder). The installer is called OutlookAptifyAddinSetup.zip.
To install the Aptify add-in, refer to the topics below:
- Installing the Aptify Outlook Add-in
- Copying and Configuring the Outlook Add-in Config File
- Verifying the Local Aptify Outlook Add-in Installation
Installing the Aptify Outlook Add-in
- Locate the AptifyOutlookAddIn installer.
- You can find the installer in your organization's Aptify FTP folder (typically under the Version_60 folder). The installer name is OutlookAptifyAddinSetup.zip.
- You can also find a copy of the installer in the Aptify Database distribution folder under the Utilities sub-folder.
- Select the appropriate installed for your version of Outlook. Options are:
- Outlook2016AptifyIntegrationSetup: for 64-bit versions of Outlook 2016 and Outlook 2013
- Outlook2013AptifyIntegrationSetup: for 32-bit versions of Outlook 2016 and Outlook 2013
- Outlook2007_2010AptifyIntegrationSetup: for Outlook 2010 and 2007
- Outlook2016AptifyIntegrationSetup: for 64-bit versions of Outlook 2016 and Outlook 2013
- Double-click the appropriate AptifyOutlookAddIn to launch the installer.
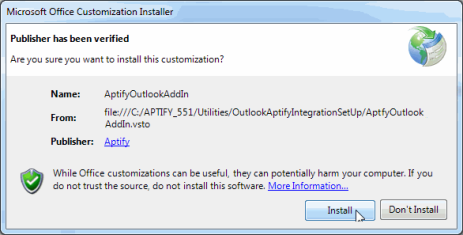
- Once the Publisher has been verified, click Install to install the add-in.
- Click Close and confirm successful installation of the AptifyOutlookAddIn.
Once the feature is installed, an Aptify drop-down menu will be available via the Add-Ins tab on the Outlook Ribbon bar (and through Outlook's right-click context menu for Outlook 2010 and 2007). With a properly configured OutlookAddinConfiguration file, when opening Outlook, the add-in is logged into Aptify automatically as shown below (unless Outlook is configured to disable certain or all add-ins). See Copying and Configuring the OutlookAddinConfiguration Config File for configuring the Aptify Outlook Add-In for use. 
Config File Must Be Configured and In Appropriate Location
The add-in will not work as expected until the OutlookAddinConfiguration file is configured and copied to the local Aptify installation (and in some cases, it needs to be copied to the C: drive as well). See Copying and Configuring the OutlookAddinConfiguration Config File for configuring the Aptify Outlook Add-In for use.
Copying and Configuring the Outlook Add-in Config File
Once the add-in has been installed, you need to copy the OutlookAddinConfiguration XML file to the baseline path of your local Aptify installation and then configure it appropriately.
Follow the steps below to copy and configure the OutlookAddinConfiguration file:
- Locate the AptifyOutlookAddIn config file.
- You can find a copy of the file in the appropriate sub-folder (based on your Outlook version) in the OutlookAptifyAddinSetup distribution file,
- You can also find a copy of the file in the Aptify Database setup distribution folder under the Utilities > OutlookAptifyIntegrationSetUp sub-folder.
Copy the file to the baseline path of the Aptify client on the local machine.
Concerning Multiple Instances of Aptify
The Aptify Outlook Add-In assumes that the configuration file is placed in the baseline path of the Aptify client on the local machine, which is, by default, the instance that was last installed. If you have installed more than one instance of the Aptify client on the current machine, you should verify which instance is specified as the default path and modify as needed. You may also find you need to copy the config file to another location (like the root of the C: drive). See Verifying the Local Aptify Installation for more information.Right-click and select edit to modify the attributes as needed, as shown below. Below is a description of each attribute:
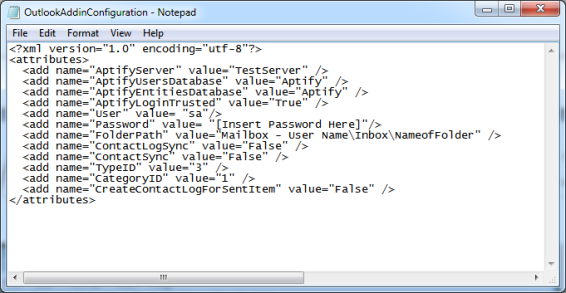
- AptifyServer: Specifies the server in which the user is connecting to the Aptify database.
- AptifyUserDatabase: Specifies the database that stores record data. By default, this value is set to Aptify.
- AptifyEntitiesDatabase: Specifies the database that contains the entity definitions. By default, this value is set to Aptify.
AptifyLoginTrusted: Specifies whether or not Windows Integrated Security (or a trusted connection) is used. By default, this option is set to True and the connection between outlook that the Aptify database is established via a trusted connection.
Trusted User Account Recommendations
Aptify recommends uses a trusted account to establish a connection between Outlook and the Aptify database.
- User: Can be used to specify a username when AptifyLoginTrusted is set to False.
- Password: Can be used to specify a password when AptifyLoginTrusted is set to False.
FolderPath: When ContactLogSync is set to True, the full path to the Outlook mail folder in which contact logs will automatically be created.
Must Specify Full Path to Mail Folder
The full path to the mail folder is the name of the folder preceded by the E-Mail Delivery Location found under Outlook's Accounting Settings > E-mail tab. For example, Mailbox - User Name\Inbox\NameofFolder OR testuser@domain.com\Inbox\NameofFolder.

- ContactLogSync: When set to True, contact logs are created automatically for messages that are found in the Outlook mail folder location specified with the FolderPath attribute. When set to False, contact logs are not created automatically and the manual option is enabled.
- ContactSync: When set to True, new or updated contacts that do not exist in Aptify are automatically created as Persons records or existing Persons records are updated if applicable. When set to False, a user can create and update Persons records manually by using the Create Aptify Person or Show Person in Aptify options.
- TypeID: Specifies the record ID of type of contact (Contact Log Type). By default, this value is 3, which is E-mail in a standard Aptify installation.
- CategoryID: Specifies the record ID of the Contact Log Category. By default, this value is 1, which is Sales in a standard Aptify installation.
- CreateContactLogForSentItem: When set to True, contact logs are created for all outgoing emails. When set to False, no Contact Logs records are created for outgoing messages.
Verifying the Local Aptify Add-in Installation
Note
The below steps are typically only required if there is more than one instance installed on the current machine. However, you can also use the below steps to troubleshooting connection issue.
Once the add-in has been installed, you need to configure and copy the OutlookAddinConfiguration XML file to the baseline path of your local Aptify installation. By default, the baseline path is the last instance of Aptify installed on your local machine, however, if you have multiple Aptify instances, you should verify which instance is specified as the default path and modify as needed.
To locate your baseline path a user or administrator can review the following registry key path in the Registry Editor on the local machine:
- 64 bit hardware:
- HKEY_LOCAL_MACHINE\SOFTWARE\Wow6432Node\Aptify\LatestInstallDirectory
- 32 bit hardware:
- HKEY_LOCAL_MACHINE\SOFTWARE\Aptify\LatestInstallDirectory
If the value specified for LatestInstallDirectory is not the path in which you plan to interact with your Aptify client, you can modify the value by:
- Open the Registry Editor on the local machine (regedit)
- Double-clicking LatestInstallDIrectory.
- Specifying the appropriate path.
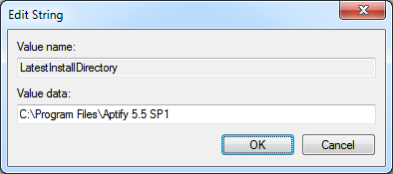
- Click OK to save the changes.
If Outlook is Still Not Connecting to Aptify....
If after verifying the configuration and location of the location OutlookAddinConfiguration XML file, Outlook still does not connect to Aptify. Review the Application Event Logs on the current machine. You may find an entry that indicates that the add-in is looking for the config file in a different location (like the root of the C: drive). Try copying the file to the location specified. If that does not work, contact Aptify Technical Support for further assistance.
Copyright © 2014-2019 Aptify - Confidential and Proprietary