Defining When Process Flows are Run for a Wizard
If desired, you can configure the wizard to run a Process Flow when a user either finishes or cancels a wizard. For example, when the user completes a wizard, it can automatically run a process flow to generate a related record, such as a Contact Log or Task.
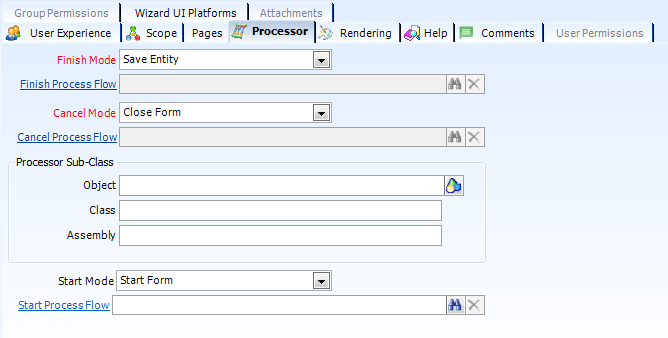
These settings are specified in the top area of the Wizards record's Processor tab.
See How to Create a Process Pipeline for information on how to create Process Flows in Aptify.
Follow these steps to configure when a wizard runs a process flow:
- Open the Wizards record.
- Click the Processor tab.
- Configure the Finish Mode to specify what action to take when a user clicks the Finish button on the wizard. The available options are:
- Save Entity: Save the record that the user is creating or updating via this wizard.
- Run Process Flow: Run the specified Finish Process Flow. When this step is selected, the new or existing record loaded into the wizard is not saved before running the process flow. In this case, the process flow will perform a save operation to commit information to the database (based on the wizard's design).
- Note that if you select this option, the specified process flow must save the record stored in the wizard's GE Object (to successfully create or update the record). For example, you could use the Run Process Flow option to execute a process flow that creates a sub-type record for the wizard's record (via a standard Aptify sub-type CRUD (Create, Read, Update, and Delete) component) and then saves the top level record as part of that operation.
- If you select the Run Process Flow option, the final step of the Process Flow should close the wizard using a Set Wizard Result step. The wizard will not close automatically.
- Save and Run Process Flow: Save the record that user is creating or updating via this wizard first and then run the specified Finish Process Flow.
- If you selected a Finish Mode of Run Process Flow or Save and Run Process Flow, enter the process flow to execute when a user clicks the Finish button on the wizard in the Finish Process Flow field.
- The wizard can pass its GE object, which contains all user inputs, to the process flow as an Input Property called GEObject. A process flow can then retrieve these values and use them as needed (such as to populate other records).
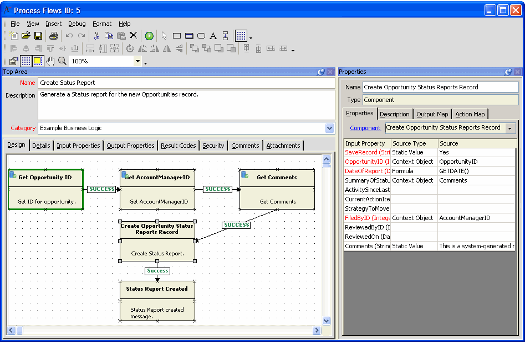
- For example, an organization might want to generate a Status Report when a new Opportunities record is generated from a New Opportunity wizard. In this case, using the wizard's GEObject as an input property, the Generate Status Report process flow can use a rule or the Value Retriever component to obtain the Opportunity ID, AccountManagerID, and other fields to pass into the Create Opportunity Status Report Component. See the example below.
- Configure the Cancel Mode to specify what action to take when a user clicks the Cancel button on the wizard. The available options are:
- Close Form: Close the wizard without performing any additional actions.
- Run Process Flow: Run the specified Cancel Process Flow. When this step is selected, the process flow runs before the wizard is closed.
- Close Form and Run Process Flow: Close the wizard and then run the specified Cancel Process Flow.
- If you selected a Cancel Mode of Run Process Flow or Close Form and Run Process Flow, enter the process flow to execute when a user clicks the Cancel button on the wizard in the Cancel Process Flow field.
- As with the Finish Process Flow, the wizard can pass its GE object, which contains all user inputs up to the point when it was cancelled, to the process flow as an Input Property called GEObject. A process flow can then retrieve these values and use them as needed.
- As with the Finish Process Flow, the wizard can pass its GE object, which contains all user inputs up to the point when it was cancelled, to the process flow as an Input Property called GEObject. A process flow can then retrieve these values and use them as needed.
- You can define a processor sub-class for the wizard. If you need to define a processor sub-class, enter information the following fields in the Processor Sub-Class area:
- In the Object field, specify the Object Repository location of a wizard-specific or organization-specific processor.
- Aptify includes a standard processor that provides the business logic for the wizard (this logic applies regardless of whether the wizard is run from the Windows application or the Aptify web interface).
If necessary, a developer can implement his or her own processor object to change any of this logic.
Any new processor object should be a sub-class of the base AptifyWizardProcessor object. See the Aptify Software Development Kit (SDK) for information on this object.
- In the Class field, specify the fully qualified namespace/class name that provides the processor logic contained in the Processor Object.
- In the Assembly field, specify the name of the Processor Object's assembly.
- In the Object field, specify the Object Repository location of a wizard-specific or organization-specific processor.
- You can configure the Start Mode to specify what action to take when a user clicks the Start button on the wizard. The available options are:
- Start Form: Start the wizard without performing any additional actions.
- Run Process Flow: Run the specified Start Process Flow. When this step is selected, the process flow runs before the wizard is started.
- Start and Run Process Flow: Start the wizard and then run the specified Start Process Flow.
- If you selected a Start Mode of Run Process Flow or Start and Run Process Flow, enter the process flow to execute when a user clicks the Start button on the wizard in the Start Process Flow field.
The wizard can pass its GE object, which contains all user inputs, to the process flow as an Input Property called GEObject. A process flow can then retrieve these values and use them as needed (such as to populate other records).
- Save the Wizards record.
Copyright © 2014-2019 Aptify - Confidential and Proprietary

