Creating New Import Source Types
Aptify provides three default Import Source Types:
- Tab-delimited Text File: Import from a text file with field data separated by a tab.
- Excel File: Import from an Excel file.
- Access Database: Import from an Access database.
If you want to import data that is not in one of these formats, you need to create a new Import Source Type. Follow these steps:
- A developer writes and compiles code that implements Aptify's IImportSourceReader interface to create an import process for the desired file type.
- The developer writes and compiles code that implements Aptify's IImportSourceTypePropPage to specify the properties for the new source type.
- The Prop Page specifies an input map control that appears in the Generic Import wizard and on the Import Runs record's Input Maps tab.
- Creating new code is beyond the scope of this document. Refer to the Aptify Software Development Kit (SDK) for information on these interfaces.
- The developer or an administrator adds the source reader and property page object files to the Object Repository.
- See Creating Object Repository Objects for more information on adding new items to the repository.
- See Creating Object Repository Objects for more information on adding new items to the repository.
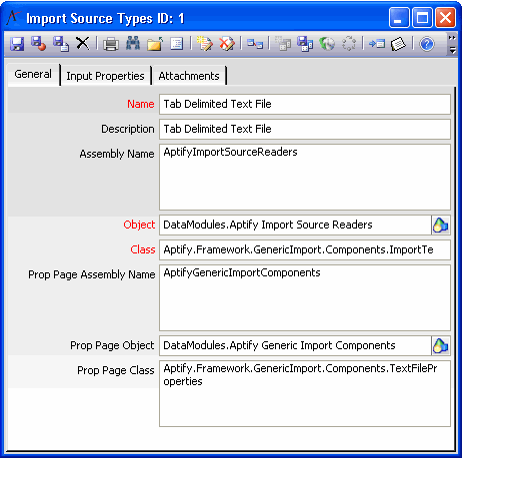
- Open a new record from the Import Source Types service (found under the Aptify Framework Administration application).
- Specify the new source type's Name and Description in the fields provided.
- Enter the .NET assembly name for the SourceReader file in the Assembly Name field.
- Enter the Object Repository location of the SourceReader's object in the Object field.
- Alternatively, you can click the plus (Emoticon: plus) icon to the right of the field to open the Select Object Repository Object dialog. You can use this dialog to browse for an existing object or to add a new object to the repository (if you have not done so already). See Creating Object Repository Objects for details.
- Alternatively, you can click the plus (Emoticon: plus) icon to the right of the field to open the Select Object Repository Object dialog. You can use this dialog to browse for an existing object or to add a new object to the repository (if you have not done so already). See Creating Object Repository Objects for details.
- Enter the class within the .NET assembly that corresponds to the SourceReader functionality in the Class field.
- Enter the .NET assembly name for the source's PropPage file in the Prop Page Assembly Name field.
- Enter the Object Repository location of the PropPage's object in the Prop Page Object field.
- Alternatively, you can click the plus (Emoticon: plus) icon to the right of the field to open the Select Object Repository Object dialog. You can use this dialog to browse for an existing object or to add a new object to the repository (if you have not done so already). See Creating Object Repository Objects for details.
- Alternatively, you can click the plus (Emoticon: plus) icon to the right of the field to open the Select Object Repository Object dialog. You can use this dialog to browse for an existing object or to add a new object to the repository (if you have not done so already). See Creating Object Repository Objects for details.
- Enter the class within the .NET assembly that corresponds to the PropPage for this source type in the Prop Page Class field.
- Click the Input Properties tab.
- Define a sub-type record for each property required by the Input Source Type.
- This includes properties such as Filename and HasHeader.
- See the three default source types for sample Input Properties.
- Specify the property in the Name field, select the data Type from the drop-down list (such as String), and select the Is Required option, if the property is required to successfully perform the import operation.
- See About the Input Properties Form for information on the Input Properties form.
- See About the Input Properties Form for information on the Input Properties form.
- Save and close the Import Source Types record.
Copyright © 2014-2019 Aptify - Confidential and Proprietary

