Archiving List and Record History Data
This topic describes the steps necessary to archive data using the Archive Runs service.
Follow these steps to archive List or Record History data:
- If you are copying or archiving data to a new location, create or designate a destination database for storing the data. The destination database should be located on a SQL server on your network.
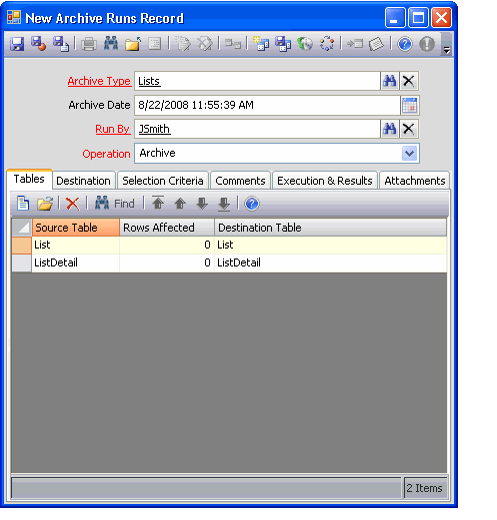
- Open a new record from the Archive Runs service.
- Only sa or system administrators (that is, members of the Aptify Administrators group who are also system administrators on the SQL server) can access the Archive Runs service and run an archive operation.
- The current date populates the Archive Date Create field automatically. The time is added when the record is saved and the archive operation begins.
- The name of the current user who opened the Archive Runs record appears in the Run By field automatically.
- Enter an Archive Type. This field links to the Archive Types service.
- There are two Archive Types by default: one for Lists and one for Record History.
- The Tables tab automatically populates with a list of tables based on the selected Archive Type.
- Select an Operation type from the drop-down menu.
- The Archive option indicates that the archive procedure will first copy the selected data to the destination server and then delete it from the Aptify server.
- The Copy option indicates that the archive procedure will only copy the selected data to the destination server. The data also remains on the Aptify server.
- The Delete option removes the selected data from the Aptify server without copying it to another server. Aptify strongly recommends that you archive data rather than delete it.
- Under the Tables tab, change the name of one or more Destination Tables, if necessary.
- The Destination Table identifies the name of the table in the destination server's database to which the archive data will be copied. The archive process can create this table within the destination database, if necessary.
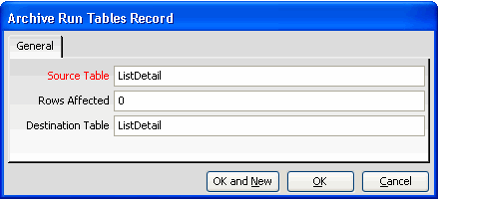
- To change the name of a Destination Table, double-click an entry in the Table list and enter a new name for the Destination Table.
- Do not change the name of the Source Table.
- Do not change the Rows Affected value. This field is updated automatically during the Archive process.
- Click the Destination tab.
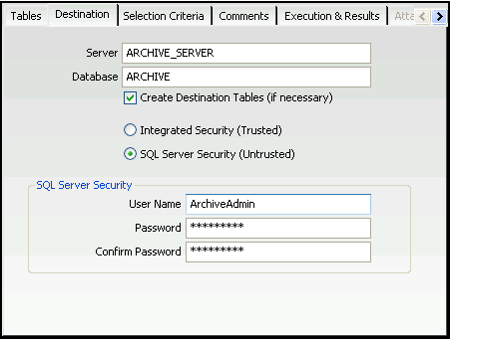
- Enter the name of the Server to which you want to copy the data.
- You can archive data to the SQL server that already hosts the Aptify database. This will remove the data from the Aptify system but the data will still take up disk space on the server.
- Aptify recommends that you archive data to a different server.
- Enter the name of the Database on the destination server to which you want to copy the data.
- You need to create this database on the destination server if it does not already exist, as described in Step #1 above. You can use Microsoft SQL Server Management Studio to create a new database.
- You need to create this database on the destination server if it does not already exist, as described in Step #1 above. You can use Microsoft SQL Server Management Studio to create a new database.
- Select the Create Destination Tables (if necessary) option if you want Aptify to create the tables specified in the Tables tab in the destination database.
- This option is enabled by default and Aptify will create the destination tables if they do not already exist.
- Note that Archive and Copy operations will fail if you disable this option and the tables do not already exist in the destination database.
- Select a login method for the destination server. The selected login must have system administrator privileges on the SQL server to execute the archive operation.
- Select Integrated Security (Trusted) if you are a trusted user on the destination server who has system administrator privileges.
- Select SQL Server Security (Untrusted) if you are using an untrusted user account to perform the archive operation.
- If you select SQL Server Security (Untrusted), enter the untrusted user's User Name and Password in the fields provided.
- Note that this security information is only used to login to the destination server. This information is not stored in the Archive Run record or with the archived data.
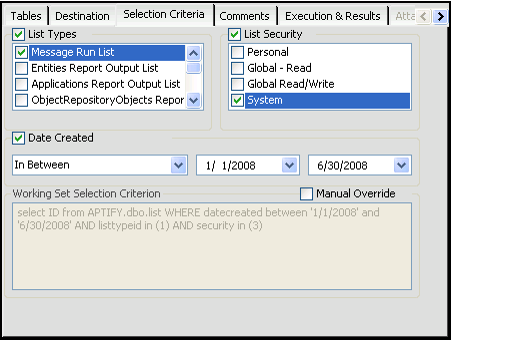
- Click the Selection Criteria tab to create a SQL statement that defines the data to archive.
- The available criteria options vary based on the Archive Type.
- If you are archiving Lists, you can select records to archive using one or more of the following categories:
- List Types: You can select records to archive based on one or more List Types.
- List Security: You can select records based on one or more security types (Personal, Global - Read, Global - Read/Write, and/or System).
Date Created: You can select records based on the date on which the list was created (available options include before the specified date, after the specified date, on the specified date, and between two specified dates).
If you select multiple categories, these categories are separated with an AND operators by default. You can override this default behavior as necessary by manually modifying the Working Set Selection SQL statement.
- If you are archiving Record History, you can select records to archive using the following selection criteria:
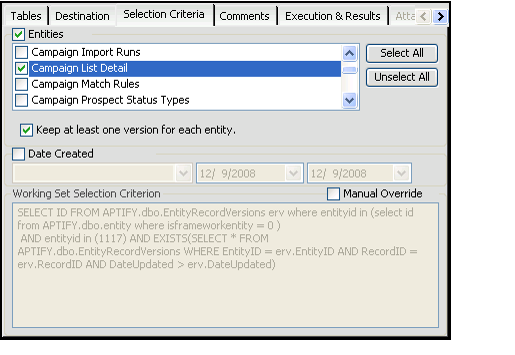
- Entities: Specify one or more Entities whose Record History versions you want to archive. You can use the Select All and Unselect All buttons as necessary to select records. Note that Aptify Framework entities (such as Lists, Entities, Views, etc.) do not appear on this list. To archive these entities, you need to manually override the Working Set Selection Criterion.
- Keep at least one version for each entity: Select this option to keep the latest Record History version for each record in an entity. When this option is cleared, the system archives all Record History data for a record.
- Date Created: You can select Record History versions based on the date on which the version was -created (available options include before the specified date, after the specified date, on the specified date, and between two specified dates).
- To enable a selection criteria, select the criteria check box and select one or more options from the list provided. A check mark appears next to each selected option.
- The Working Set Selection Criteria SQL statement updates automatically as you enable selection criteria.
- If you want to modify the SQL statement, select the Manual Override option and edit the Working Set Selection Criteria (SQL) field as necessary.
- Note that the default Working Set Selection Criteria automatically excludes all Framework entities from Archive Runs, but an administrator can override the default criteria.
- In the event that you decide to override default criteria, you should retain the "where entityid in (select id from Aptify.dbo.entity where isframeworkentity = 0)" phrase in the SQL statement to ensure that Record History for Framework entities is not archived.
- To identify the set of entities that are flagged as Framework entities, create a view of the Entities service that filters on the IsFrameworkEntity field.
- If desired, click the Comments tab and enter any information about the archive run that you want to save for future reference.
- Click the Execution & Results tab.
- If desired, specify a Batch Size. If you leave this field blank, the system uses a default Batch Size of 50.
- Records are broken into transaction batches for processing.
- The records in each batch are treated as one transaction. If the archive operation encounters a problem while processing a particular batch, all batches that have been processed up to that point are archived. Any records in the current batch that were processed before the failure occurred are rolled back to the pre-archive state.
If you want all records to be processed in a single transaction batch, select the Single Transaction option.
Aptify recommends that you leave the Single Transaction option disabled.
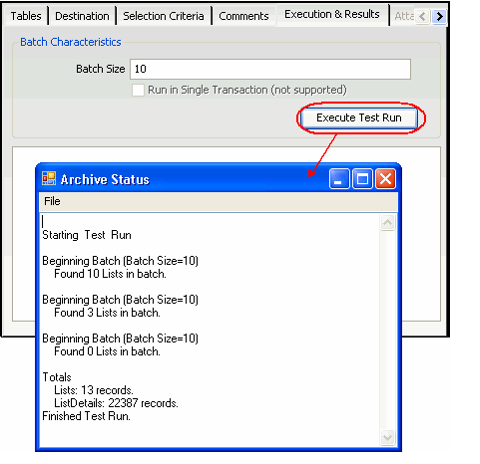
- Click the Execute Test Run button to review the results of your selection criteria.
- This option lets you see how many records will be affected before you commit to running the archive operation.
- This option lets you see how many records will be affected before you commit to running the archive operation.
- Make any necessary changes to the selection criteria based on the results of the test run.
- Click Save when you are ready to begin the archive operation.
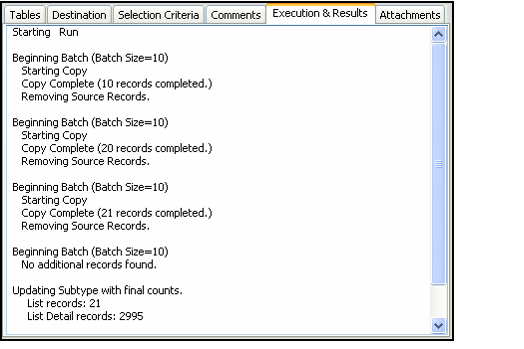
- The Archive Status window appears and displays the progress of the archive operation.
- The Archive Status window appears and displays the progress of the archive operation.
- Close the Archive Status window when the archive operation is complete.
- The information from the Archive Status window appears under the Execution & Results tab.
- The Selection Criteria tab displays the SQL statement used to identify the records that were archived by this run.
- The Rows Affected column in the Tables tab displays the number of rows that were added to the listed tables.
- You cannot change any of the values on the Archive Run form.
- Close the Archive Runs record.
- If you archived lists, open the Lists service and confirm that the archived records no longer appear in the system.
- Access the destination server and confirm that the data has been copied to the database into the table you specified.
Copyright © 2014-2019 Aptify - Confidential and Proprietary
