Installing Aptify Web for Aptify 5.5.6
This topic describes how to install the Aptify site on a web server so users with valid user accounts in Aptify can access the system using a supported web browser.
To do this, perform the following steps:
Note
The Aptify web interface should be installed and tested on a non-production environment first before applying to a production web server, just as if you were installing an Aptify Service Pack.
Be sure to back up the server where you will install the production Aptify web server, to provide a fall-back option, in case a problem occurs during the Aptify website installation.
If you have an Existing Site
Confirm that the database server has the same version of Aptify as the version you are installing on the web server (i.e., the database server has Aptify 5.5.6, and you are installing the Aptify 5.5.6 on the web server). This is a pre-requisite before you can install the Aptify site.
If you have recently upgraded to 5.5.6 from an earlier version of Aptify that did not support the Web interface (such as 5.5.1 or earlier), check your SQL Server instance to confirm that the Full-Text Search components are installed. This is an optional selection when installing Microsoft SQL Server, but the Aptify Web interface requires that your server support full text indexes.
- Identify the web server that will host Aptify. This server must meet the requirements specified in Server Requirements for the Aptify Web Interface.
- Confirm your web server has all of the IIS options enabled that are listed in Server Requirements for the Aptify Web Interface. This includes the IIS 6 Management Compatibility, IIS 6 Metabase Compatibility, and HTTP Compression options.
- If the web server is installed on a different computer than the database server and you have chosen to use Windows Authentication, confirm that your network is configured to support delegation. See Aptify Site and Network Delegation for details.
For web servers that will be available over the public Internet, you should install and test the Aptify site within the firewall first before moving the web server outside your organization's firewall.
For web servers that will be available on the public Internet, you must secure the site using HTTP over a Secure Socket Layer (SSL) to create an HTTPS site. The default installation of the Aptify site requires SSL. The site will not load successfully unless the site is configured to use SSL. See Securing the Aptify Web Site Using SSL for additional information.
Create a new domain account or identify an existing domain with a valid end user license account to use on the Aptify web server.
The Aptify web interface does not currently support the authentication of users from multiple domains from a single website. If your environment supports users in multiple domains, contact Aptify Technical Support for assistance.
- This is the user account that Aptify (SOA layer) uses to communicate with the Aptify database server.
The account must be a trusted user with a valid end user license (elevated permissions are not required) to the Aptify database server with the appropriate privileges to conduct Aptify activity. The SOA user should also be in the Users group.
During the setup process, the SOA user is added to the AptifySOAAppPoolGroup. This group is only intended for the SOA user and ensure user tokens are secure.
Per packaging requirements for this version, the Application Pool Identity used by the Aptify website is set to LocalSystem and the identity used by the AptifyServiceAPI (SOA layer) site is set to run as the user specified in the setup program.
Log into the web server using an account with administrative privileges.
Aptify recommends that you log into the web server with a Windows domain user with administrative privileges. There are certain updates related to the authentication model with the Aptify browser-based interface that requires a domain user with access to the database server. If you do choose to install as a local administrative, these updates must be done manually. See Choosing an Authentication Method for more details.
It is highly recommended that the user account used for the SOA layer is not used to log into the Aptify web server. If the SOA layer user account is used to log into the web server and then logs out, you may need to reset Microsoft IIS to restore features such as reporting.
- If you have an existing Aptify site, perform a backup of the site. If selecting the same location as the existing site, you will want to delete the website folder before starting the install. See Updating an Existing Aptify Website for more details.
- Determine whether the web server has the following software installed:
- Aptify Desktop client
- Microsoft .NET Framework 4.5
- ASP .NET MVC 4
- If the Aptify Desktop client is not installed on the web server, install it. See Installing the Aptify Desktop Client.
- The client application provides the active Aptify Object Repository service used during the installation process.
- The client application provides the active Aptify Object Repository service used during the installation process.
- If Microsoft .NET Framework 4.5 is not installed on the web server, download and install it from the following URL:
http://www.microsoft.com/en-in/download/details.aspx?id=30653 - If ASP.NET MVC 4 is not installed on the web server, download and install it from the following URL:
http://www.asp.net/mvc/mvc4
- Download the Aptify installation ZIP file to a folder on the web server and unzip its contents.
- Run the installation program locally on the web server that will host the Aptify site; do not run it over the network.
- Run the installation program locally on the web server that will host the Aptify site; do not run it over the network.
- Browse to the location of the installation files, right-click the Setup application file, and select the Run As Administrator option to launch the installation program.
- On Windows Server 2008, the Run as Administrator option bypasses the server's User Access Control (UAC) for the duration of the installation.
- On Windows Server 2008, the Run as Administrator option bypasses the server's User Access Control (UAC) for the duration of the installation.
- Review the set of requirements to install. If your environment does not meet one or more of the specified requirements, click Cancel to abort the installation. Otherwise, click Next to continue.
- See Server Requirements for the Aptify Web Interface for more information on the Aptify site requirements.
- See Server Requirements for the Aptify Web Interface for more information on the Aptify site requirements.
- Click Next to continue.
When prompted, enter login information for the database server, specifying an installation account with system administrator privileges to both the Aptify database and SQL Server. The installation user should also be tied to a Developer license to ensure that the setup can perform such tasks as entity creation when needed.
Selecting the System Administrator option when creating a user in the Aptify database (through the Aptify User Administration wizard) sets the user to a dbowner in SQL Server. It does not add the user to the sysadmin role. You will need to manually add the user to the sysadmin role in SQL Server through SQL Management Studio. If in doubt, check the user's permissions in the Security > Logins area of SQL Management Studio before proceeding with the installation.
- Click OK to continue.
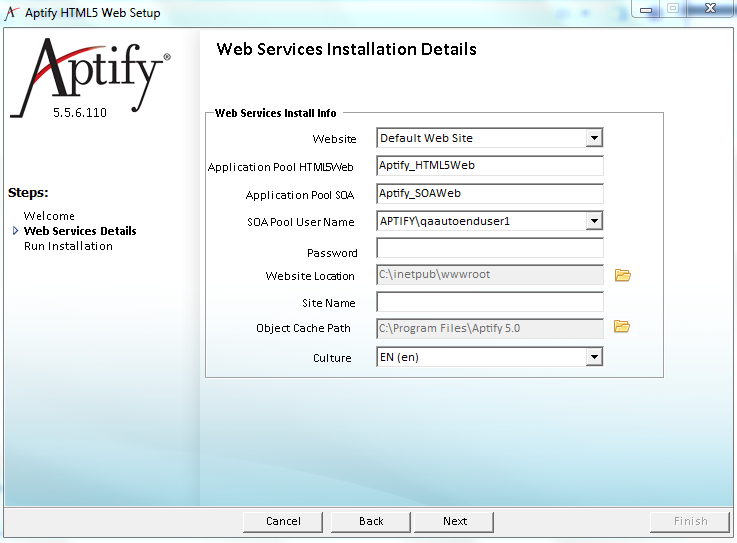
- In the Website field, select the name under which the Aptify site will be hosted.
- Default Website is selected by default, however you can host the Aptify website under another site. The site must be manually created through the IIS Manager prior to running the Aptify website setup.
- Default Website is selected by default, however you can host the Aptify website under another site. The site must be manually created through the IIS Manager prior to running the Aptify website setup.
- In the Application Pool HTML5Web field, enter the name to be used for the Aptify website.
- The default application pool name is Aptify_HTML5Web
- Per packaging requirements for this version, the Application Pool Identity used by the Aptify website is set to LocalSystem.
- In the Application Pool SOA field, enter the name to be used for the Aptify SOA site.
- The default application pool name is Aptify_SOAWeb
- The default application pool name is Aptify_SOAWeb
- In the SOA Pool User Name field, specify the trusted user account that you want to use for the Aptify website.
- This is the user the identified in Step 3.
- This is the user the identified in Step 3.
- In the Password field, enter the password for this user.
- In the Website Location field, specify the location where the Aptify website files should be installed on the web server.
The default installation path is c:\inetpub\wwwroot and the Aptify sub-folder is created automatically.
For example, if you want to use the location c:\inetpub\wwwroot\myorg to install the website files, the path to the Aptify sub-folder would be c:\inetpub\wwwroot\myorg\aptify.
Note Concerning Aptify SOA Site
The default installation path of the Aptify SOA layer is c:\inetpub\wwwroot\ and the web folder is AptifyServicesAPI. The path and location can be modified manually once the Aptify website is installed.
- In the Site Name field, enter the name of the website to be used in creating URLs.
- It is not necessary to include the protocol prefix (https://) in the site name as Aptify appends it automatically.
- This is the site name for the website that user will enter to browse this site. For example, enter MyOrg.org, if users will browse to https://MyOrg.org to connect to the server.
This field can be left blank, and the setup program uses the server host name and domain name to create URLs.
Some additional configuration needs to be done to support the site name entered. Microsoft IIS must be updated with the new site name, and the host file at c:\windows\system 32\Drivers\etc\host must to be updated to include the web server’s IP address and the site name.
- In the Object Cache Path field, select the location in which the Aptify Desktop client is installed.
The default location is C:\Program Files\Aptify 5.0.
Select the Culture that your users will be using from the drop-down list.
Selecting the appropriate culture will ensure localization of date/time format is reflected in the web interface.
Note: Only one culture per instance of the Aptify web interface is supported at this time.
See Using Localization Administration for more information on Cultures and Localization.
- Click Next to continue and review your installation options.
- Click Finish to begin the installation process.
- If the setup detects that the server does not have Crystal Reports 32-bit and 64-bit installed, a dialog appears alerting the user that an installer will run to address this. Clicking Run starts the installer and closes the dialog.

- If the setup detects that the server does not have the Microsoft Access Database Engine installed, a dialog appears alerting the user that an installer will run to address this. Clicking Run starts the installer and closes the dialog.

- Click OK when prompted that Aptify has been successfully installed to close the installer.
- If a problem occurs during the installation, the Aptify Installer will notify you that an error occurred. See What to Do If the Aptify Site Is Not Installed Correctly if the install is not successful.
- If a problem occurs during the installation, the Aptify Installer will notify you that an error occurred. See What to Do If the Aptify Site Is Not Installed Correctly if the install is not successful.
- Restart the IIS service.
- Although technically not required, restarting the IIS service will ensure that all existing sessions connected to the web server are terminated before the website is used.
- You can restart the IIS service from either the Internet Information Service (IIS) Manager or from the Windows Services dialog.
- If you want to support both trusted (Windows users) and untrusted (SQL server) users, you will need to make updates to the Aptify.Framework.Configuration.External.js file to support this. See Configuring Alternate Authentication Methods for more details.
If your environment contains over 10,000 products (or if you expect that it will exceed this amount), you may want to increase the value of the maxProductCount attribute. See Defining the Products Attribute for Aptify Web for more information.
In Aptify 5.5.5, the maximum product count functionality changes so that when a product ID that is greater than the MaxProductCount attribute value, the system polls the database, obtains the associated product data, and adds that information to the productInfoCache to allow this product to be added to an orderline.
- Connect to the Aptify website to confirm that it loads properly using a supported web browser.
- By default, this step assumes that you have a user account (trusted or untrusted) with a valid license in Aptify.
- If connecting to Aptify directly from a web server that is in a nested (hierarchical) domain, you must address it with the fully qualified domain, such as: http://server.teir2.teir1.com/aptify
- If connecting from another computer on the network, then enter http://[server name]/aptify in the browser window.
- If your environment does not securely serve Aptify Services over HTTPS, Aptify recommends that your environment be configured to serve Aptify Services only over HTTPS. As of Aptify 5.5.4, the HTTP GET requests to Services are not automatically redirected to the HTTPS version of the end point. This is meant to reinforce the need to secure the Microsoft IIS configuration, since the redirect can leak sensitive information over the insecure connection without an indication that this is happening.
If your environment contains customer-made Search Configuration records and they are used in service applications other than the HTML5 Web service application, you need to update these records to point to the correct Service Application. As of Aptify 5.5.4, the Search Configuration entity has a required field for service application. This field associates a Search Configuration with a particular instance of Aptify Services. By default, the installer program assigns all Search Configurations to the HTML5 Web service application.
If your environment contains customer-made Service Application records should review the security-related entities under the Web Services application. As of Aptify 5.5.4, the RestrictViews field on the Service Application entity is enabled by default and will stop your application from executing any views not enabled under Service Application Views, and the entities for those views must have read access under Service Application entities.
If your environment contains customer-created Service Data Objects (SDOs) records, you should validate that they are assigned to the correct database objects and to the correct Service Application records. As of Aptify 5.5.4, this is a mandatory assignment. The installer program attempts to match existing SDOs to existing database objects. If an appropriate match is not found, the SDO is assigned to the database objectsp554UpgradePlaceHolderStoredProcedure. Any SDO assigned to this database object needs to be updated to point to the correct database object. The installer program cannot assign customer-created SDOs to Service Applications, as it cannot determine which Service Applications should be allowed. Any customer-created SDOs will not be assigned a Service Application, and therefore will not execute after the upgrade. Each SDO must identify the Service Applications that are allowed to execute it.
- If you are updating from an Aptify 5.5.3 environment, and your environment builds against any of the following assemblies, you need to recompile them, as since Aptify 5.5.4, these files are signed with a strong name. :
- Aptify.Services.Framework.BasicCreateReadUpdateDelete.dll
- Aptify.Services.Framework.Endpoints.BasicEntityCreateUpdateDeleteRecord.dll
- SignalHub.dll
- Aptify 5.5.5 adds the ability for the availability of wizards to be controlled in the Aptify web interface. In previous releases, wizards are always available in the web interface. If your environment uses the Run From options in the Scope tab of the Wizards record to control the availability of wizards, you should verify that the correct Run From options are selected, as your wizards may not be available as expected. See Defining the Wizard Scope Tab for more information.
Aptify 5.5.5 updates the version (from version 6 to version 9) of the Newtonsoft JSON DLL used to support changes to the Aptify form template metadata generator. This update changes the strong name of the DLL, so any assemblies, websites, and executables that reference the Newtonsoft.Json.dll, even indirectly, may issue errors about not being able to find version 6 of the DLL. Aptify recommends that the projects directly referencing Newtonsoft.Json.dll be recompiled against version 9, or websites and assemblies must employ a binding redirect to point to version 9 in their web.config or app.config files, respectively:
<dependentAssembly>
<assemblyIdentity name="Newtonsoft.Json" publicKeyToken="30ad4fe6b2a6aeed" culture="neutral" />
<bindingRedirect oldVersion="0.0.0.0-9.0.0.0" newVersion="9.0.0.0" />
</dependentAssembly>
Copyright © 2014-2017 Aptify - Confidential and Proprietary