Installing e-Business 6.3
This topic describes how to install the Aptify e-Business 6.3 site on a web server.
To do this, perform the following steps:
Note
This setup is e-Business 6.3 version and should be installed on Aptify 6.3 and tested first only in a non-production environment.
Please take a backup copy of the database and website folder before starting the installation.
If upgrading an existing Aptify e-Business 6.0+ installation, rename the existing UI and SOA folders so that the installer installs to clean directories. After the installer executes, run a file compare utility, such as WinMerge, to identify any custom dlls or file modifications to the web.config, index.html, or other files that must be transferred or reimplemented for existing configurations to function.
For specific database which has customization done on process flow : 'eBusiness Login Cart Conversion for Anonymous Users', it has been observed that the changes done was replaced with the stock process flow changes. To minimize the errors, please take a copy of this process flow so that the custom changes can manually be updated on the process flow once e-Business is installed successfully.
Confirm that the database server is running Aptify 6.3 (see Server requirements for e-Business 6.3). Please note that e-Business 6.3 is supported only on the Aptify 6.3 version.
Identify the web server that will host Aptify e-Business 6.3. This server must meet the required hardware and software requirements: (see Server requirements for e-Business 6.3.)
For web servers that will be available on the public Internet, you must secure the site using HTTP over a Secure Socket Layer (SSL) to create an HTTPS site. The default installation of the Aptify site requires SSL. The site will not load successfully unless the site is configured to use SSL. For more information on how to secure the site will SSL, see Securing the Aptify Web Site Using SSL.
Create a new domain account or identify an existing domain with a valid end user license account to use on the Aptify e-Business 6.3 web server. If you have Aptify Web installed on the Web server, then you can use the same SOA App Pool user for e-Business 6.3 and Aptify Web. For more information on how to create a user, see Creating User Accounts.
The account must be a trusted user with a valid end user license (elevated permissions are not required) with the appropriate privileges to conduct the e-Business 6.3 activity. The SOA user should also be in the Users group.
During the setup process, the SOA user is added to the AptifySOAAppPoolGroup. This group is only intended for the SOA user and ensure user tokens are secure.
Log into the web server using an account with administrative privileges.
It is highly recommended that the user account used for the SOA layer is not used to log into the Aptify web server.
- Download the Aptify 6.3 Service Pack Installer ZIP file to a folder and unzip its contents. This Zip file has installer for Aptify Database installer, Aptify Web Installer and Aptify eBusiness6 installer. Copy the APTIFY_eBusiness6.3 ZIP file to a folder on the web server and unzip its contents.
- Right-click the Setup application file, and select the Run As Administrator option to launch the installation program.
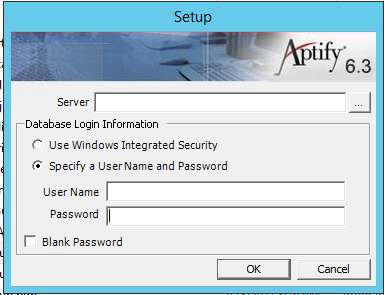
When prompted, enter login information for the database server, specifying an installation account with system administrator privileges to both the Aptify database and SQL Server. The installation user should also be tied to a Developer license to ensure that the setup can perform such tasks as entity creation when needed.
Selecting the System Administrator option when creating a user in the Aptify database (through the Aptify User Administration wizard) sets the user to a dbowner in SQL Server. It does not add the user to the sysadmin role. You will need to manually add the user to the sysadmin role in SQL Server through SQL Management Studio. If in doubt, check the user's permissions in the Security > Logins area of SQL Management Studio before proceeding with the installation.
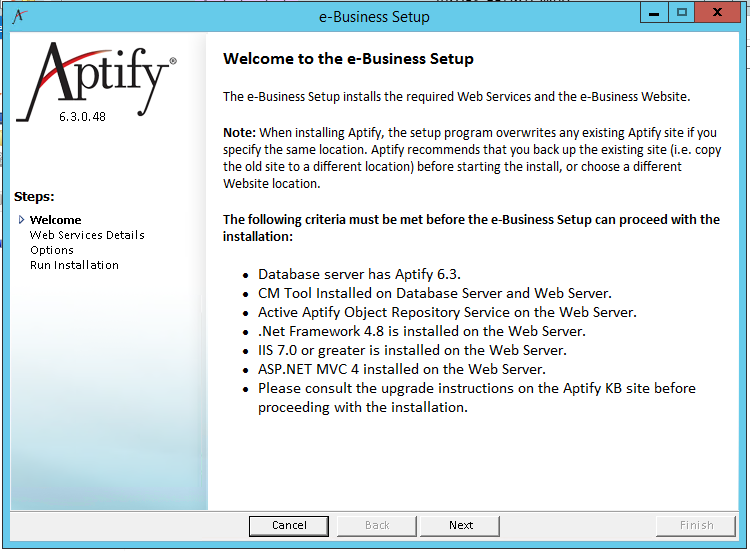
- Click OK to continue. On the Welcome page, review the set of requirements to install. If your environment does not meet one or more of the specified requirements, click Cancel to abort the installation. See Server requirements for e-Business 6.3 for more information on the pre-requisites.
- On the Web services Details page, enter the Web services Installation information as detailed below:
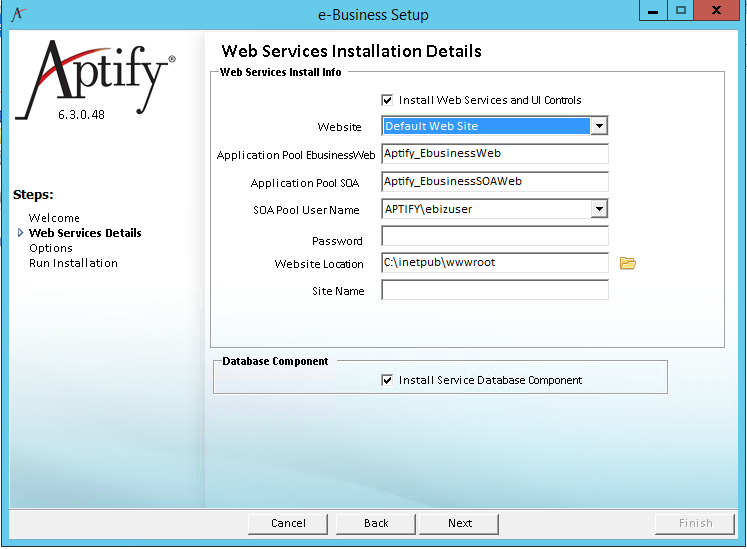
In the Website field, select the name under which the e-Business 6.3 site will be hosted. The recommended deployment for Aptify Web and e-Business 6.3 is on separate servers or at least separate domains under different websites on the same web server.
Note
Default Website is selected by default for e-Business installation. However, you should host the e-Business website under another site and not on the same site where Aptify Web is installed.
If Aptify Web has been installed on a different website other than the default, then e-Business 6.3 can be installed on the 'Default Website'. The new site must be manually created through the IIS Manager prior to running the e-Business website setup. A valid port should be assigned to the Website which will be different for Aptify Web as well as for e-Business site. For additional steps to be followed on Aptify Web 6.3 after the e-Business 6.3 installation, see Installation of Aptify Web 6.3 and e-Business 6.3 on same DB instance.
Note
The Aptify e-Business 6.3 site has been successfully tested on a cloud in following distributed environment set up:
- Aptify Web 6.3 and eBusiness 6.3 installed on two different cloud servers and pointing to a database server on a different server.
- Aptify Web 6.3 and eBusiness 6.3 on the same cloud server where both websites are installed separately, one on default site and another on non-default site respectively.
- e-Business 6.3 SOA and e-Business 6.3 Web UI installed on different cloud servers.
- In the Application Pool EbusinessWeb field, enter the application pool name to be used for the Aptify e-Business website.
- The default application pool name is Aptify_EbusinessWeb
- In the Application Pool SOA field, enter the application pool name to be used for the Aptify e-Business SOA site.
- The default application pool name is Aptify_EbusinessSOAWeb
- In the SOA Pool User Name field, specify the trusted user account that you want to use as the SOA App Pool user for the Aptify e-Business website.
- This is the user identified in Step 4.
In the Password field, enter the password for this user.
The setup program, at this step, is unable to validate the user credentials entered. Make sure that the username and password entered are correct.
- In the Website Location field, specify the location where the Aptify e-Business website files should be installed on the web server.
The default path is c:\inetpub\wwwroot.
For example, if you have selected 'Website' of a non-default path then the same path should be mentioned in the Website location as well.
- In the Site Name field, enter the name of the website to be used in creating URLs.
- It is not necessary to include the protocol prefix (https://) in the site name as Aptify appends it automatically.
- This is the site name for the website that user will enter to browse this site. For example, enter MyOrg.org, if users will browse to https://MyOrg.org to connect to the server.
This field can be left blank, and the setup program uses the server hostname and domain name to create URLs.
Additional configuration needs to be done to support the site name entered. Microsoft IIS must be updated with the new site name, and the host file at c:\windows\system 32\Drivers\etc\host must be updated to include the web server’s IP address and the site name.
To install the e-Business Database server components, ensure that the Install Database Component option is selected.
This option installs the e-Business specific necessary entities and metadata on your database server.
While you can run the installer multiple times to create multiple Aptify sites that communicate with the same database server, you should only install the necessary entities and metadata on your database server once.
To install only the Aptify e-business site, ensure that the Install Database Component option is cleared. This option is only applicable if you have previously installed the e-Business Database Components on the Aptify database server.
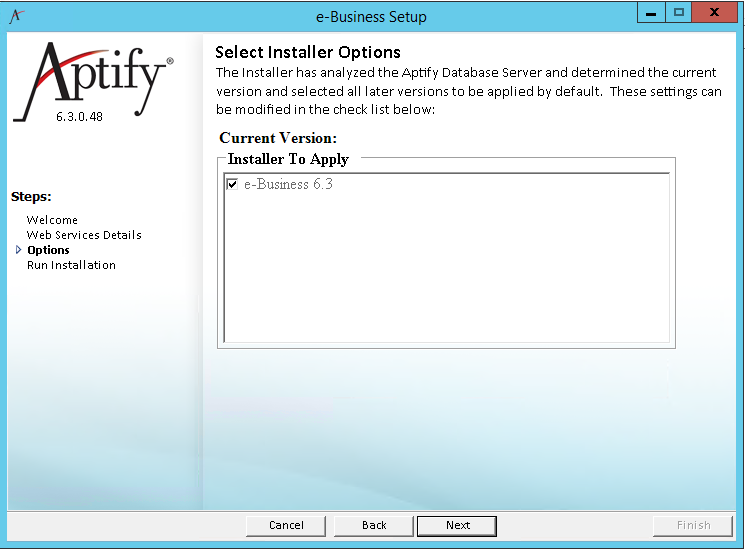
- Click Next to continue and review your installation options. The Installer automatically selects the options in the box(es) for the installation(s) not currently installed.
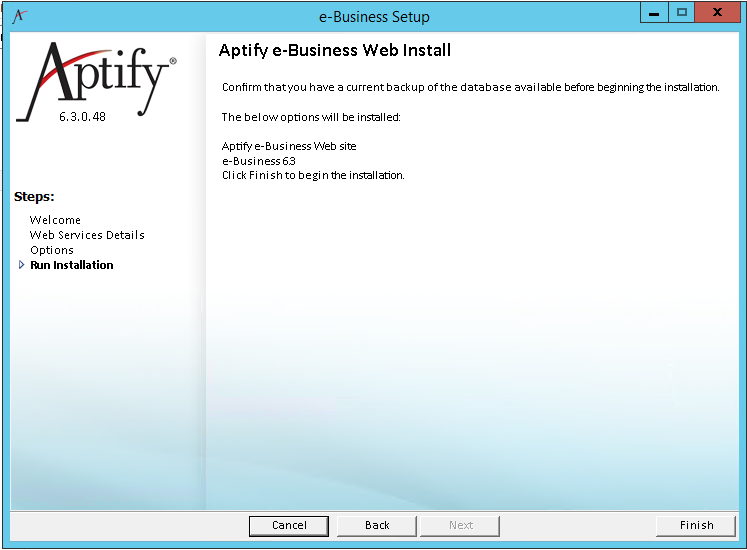
- Click Finish to begin the installation process.
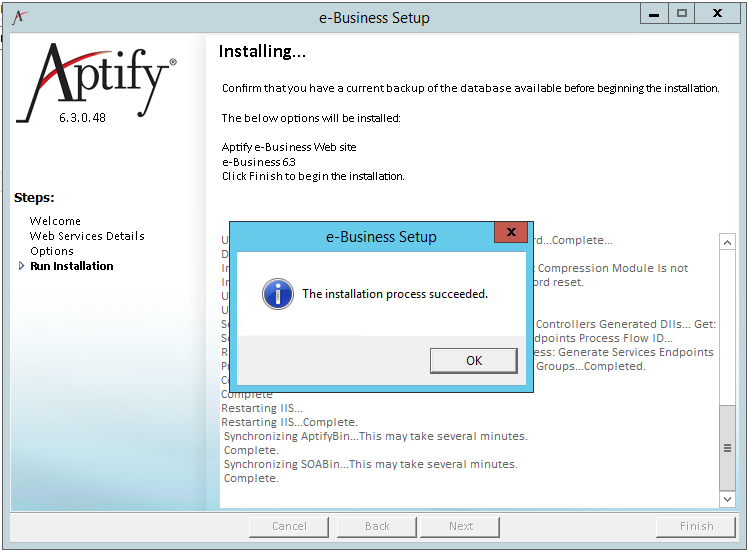
Click OK when prompted that Aptify has been successfully installed to close the installer.
 If a problem occurs during the installation, the Aptify Installer will notify you that an error occurred.
- Aptify e-Business is installed successfully, check the bindings for the site in IIS. A site should be bound with HTTPS as per the screenshot below. A valid SSL certificate should be associated with the bindings.
- Restart the IIS service.
- Although technically not required, restarting the IIS service will ensure that all existing sessions connected to the web server are terminated before the website is used.
- You can restart the IIS service from either the Internet Information Service (IIS) Manager or from the Windows Services dialog.
- Now Connect to Aptify e-Business SOA to confirm that it loads correctly.
You can access the e-Business SOA site by typing the below URL and confirm that SOA help displays correctly on the browser.
https://servername.domain.com/SOA/help - Connect to the Aptify e-Business website to confirm that it loads properly using a supported web browser.
- You can access the e-Business site using the below URL where servername is the name of your web server and domain.com is your organization's domain:
If e-Business is installed on Default Website, below would be the URL to access:
https://servername.domain.com/ui
If e-Business is installed on the non-Default Website, then find the port on which the non-default website is linked and below would be the URL to access:
https://servername.domain.com:eBusinessPortNo/ui
- You can access the e-Business site using the below URL where servername is the name of your web server and domain.com is your organization's domain:
Post Installation Configurations
This section provides the instructions to carry out configurations to make sure that the e-Business 6.3 website works as expected:
Load Default Image
Follow the below instructions for loading the product image on the e-Business 6.3 website.
- Navigate to the e-Business 6.3 environment on your database.
- Locate and open the 'ebConfig.js' in the <Web application installed path>\inetpub\wwwroot\UI\js\configuration path.
- Update the 'eb_config.loadDefaultImage' attribute as required:
LoadDefaultImage = true; // This value displays the 'No Photo Available' Image by default.
LoadDefaultImage = false; // This value searches for the product’s images in the Large and thumbnail folders and displays them accordingly.
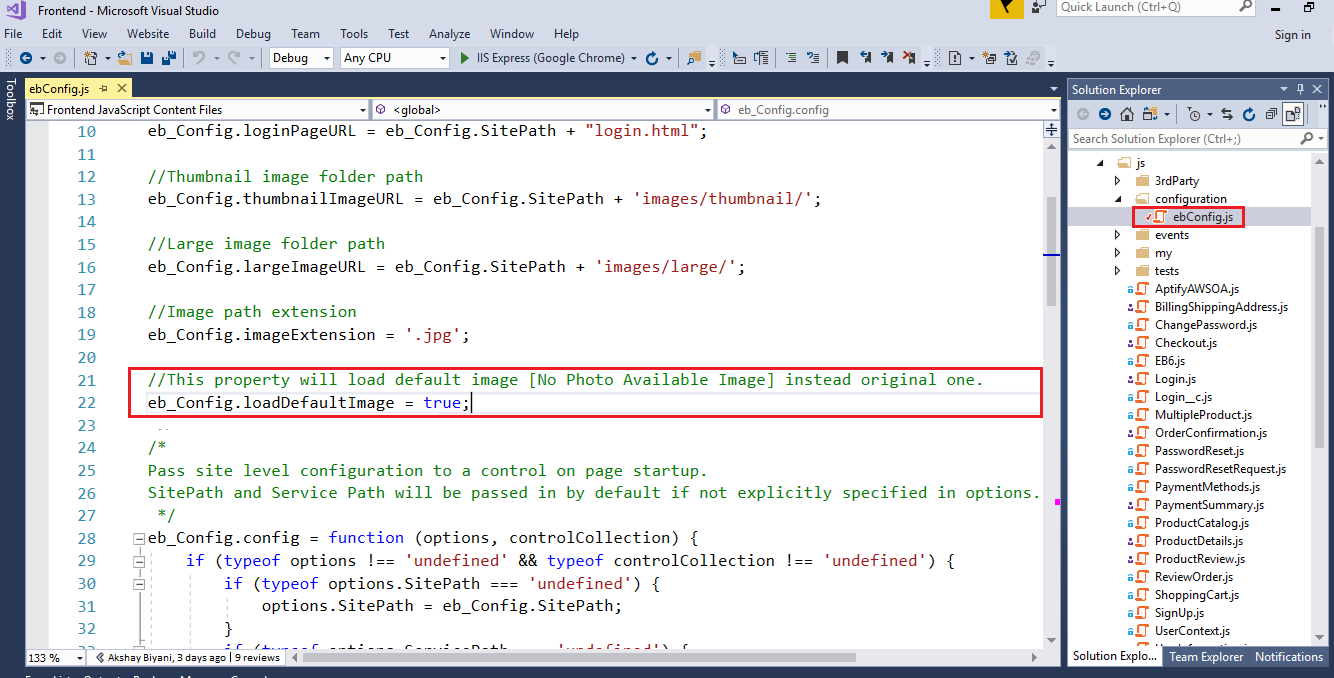
For loading the Product images, set LoadDefaultImage = false.
Configuring Image Sync Utility:
For syncing the product images available in the database into the images folder of the website, 'Image Sync Utility need to be run. Following instructions need to be followed by the user for configuring the Image Utility:
- Login to the SmartClient application as an administrator. Select Product Maintenance application -> '
Sync Image Record' services.

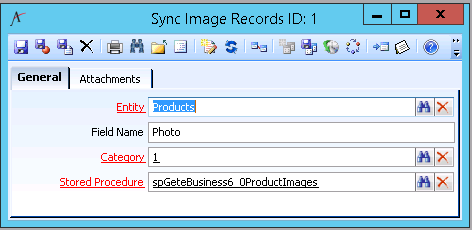
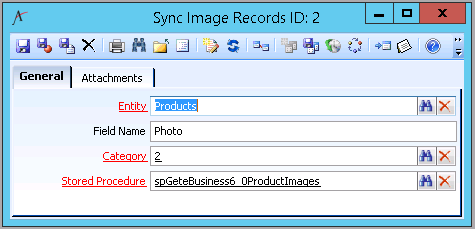
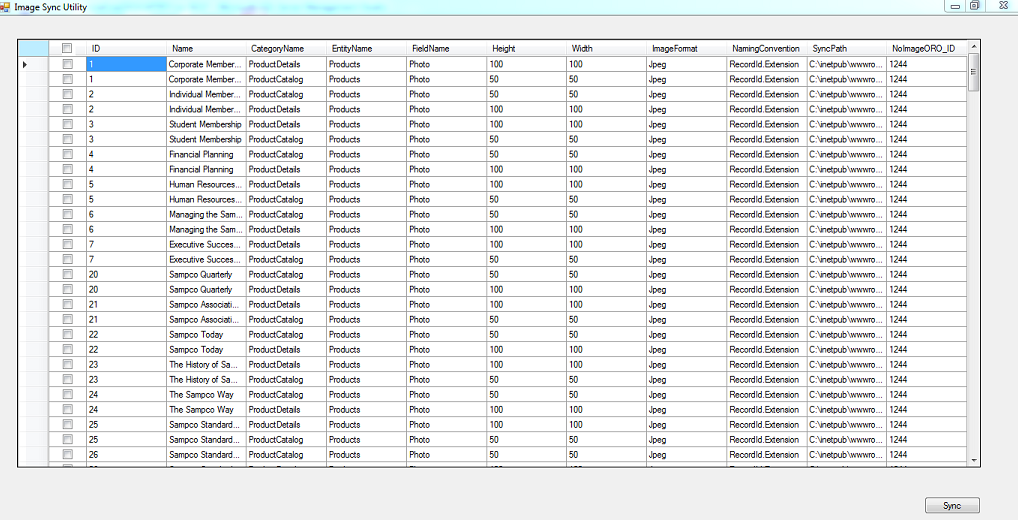
2. Create a new record under 'Sync Image Records' services with the following details (Refer the snapshot below):
Entity: Products
Field Name: Photo
Category: ProductDetails
Save and close the record.
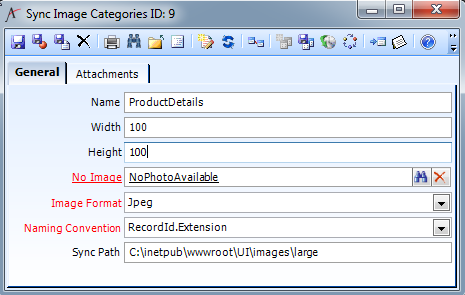
3. Create a new record under 'Category' with the following details (Refer the snapshot below):
Name: ProductDetails
Width: 100//This case be changed by the user based on the size of the image required.
Height : 100 //This case be changed by the user based on the size of the image required.
No Image : NoPhotoAvailable //This can be changed by the user with any other image required.
Image Format : Jpeg //This can be set to 'png' as well
Naming Convention: RecordId.Extension
Sync Path : <Database Server>\inetpub\wwwroot\UI\Images\large // The path 'c:\inetpub\wwwroot\UI\Images\large' can be used if the setup is installed on the default path. Else update the same to reflect the appropriate site path where the setup is installed.Update the 'Sync Path' field to reflect the following: '<e-Business Web setup path>\UI\Images\large' folder.
Save and close the record.
4. Create a new record under 'Sync Image Records' services with the following details (Refer the snapshot below):
Entity: Products
Field Name : Photo
Category: ProductCatalog
Save and close the record.
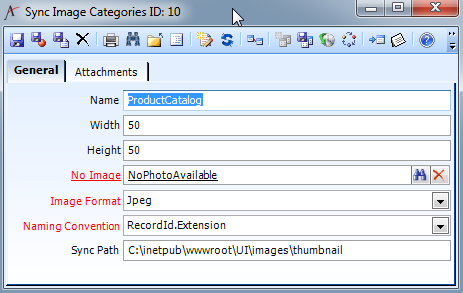
5. Create a new record for 'Category' with the following details (Refer the snapshot below):
Name: ProductCatalog
Width: 50 //This case be changed by the user based on the size of the image required.
Height: 50 //This case be changed by the user based on the size of the image required.
No Image: NoPhotoAvailable //This can be changed by the user with any other image required.
Image Format: Jpeg //This can be set to 'png' as well
Naming Convention: RecordId.Extension
Sync Path : <Database Server>\inetpub\wwwroot\UI\Images\thumbnail // This path 'c:\inetpub\wwwroot\UI\Images\thumbnail' can be used if the setup is installed on the default path. Else update the same to reflect the appropriate site path where the setup is installed. Update the 'Sync Path' field to reflect the following: '<e-Business Web setup path>\UI\Images\thumbnail' folder.
Save and Close the record
6. Close the SmartClient application.
Running the Image Sync Utility
Perform following steps for running the image sync utility:
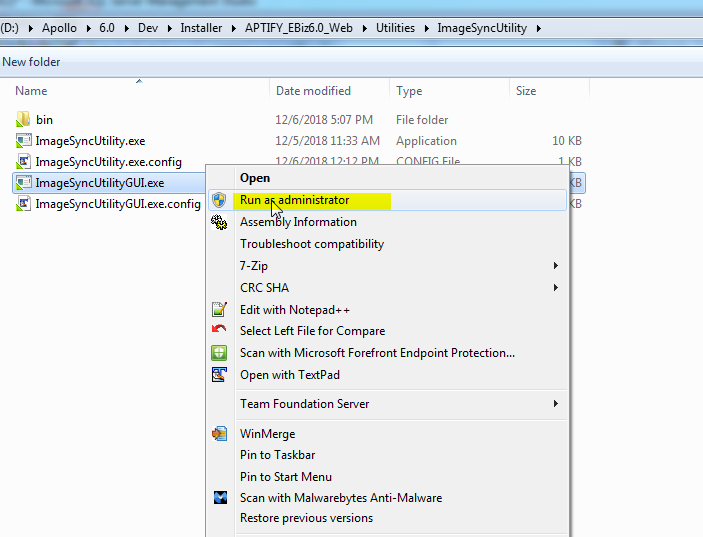
- Login to the Web server where the e-Business setup is placed.
- Traverse to the 'ImageSyncUtility' folder under 'Utilities' in the e-Business setup. Right-click on 'ImageSyncUtilityGUI.exe' and click on 'Run as administrator'.
- On the Login screen that appears, enter the database instance name, username and password with administrative privileges.
- After successful login, the following screen appears. Select all the Images or selected images that the user wants to sync. Click on 'Sync' button.
- Close the Utility after the Sync is successful.
- Reset the IIS. Now refresh the Web browser and connect to the Aptify e-Business website to confirm that product images loads properly.
Running the Application Server with e-Business 6.3:
For automatic sending of the order confirmation email, we have utilised the Aptify Application Server Async processor.
Following additional steps need to be performed for Aptify Application server to be working correctly with e-Business 6.3
- Install Aptify Application server. Refer the Installation guide for the same. Perform the required configuration and Updations as instructed in the guide.
- Traverse to the Application server installed path and locate the file "AptifyAsyncProcessor.exe.config".
- Open the file and perform following updates in the config file:
<runtime>
<assemblyBinding xmlns="urn:schemas-microsoft-com:asm.v1">
<dependentAssembly>
<assemblyIdentity name="Newtonsoft.Json" publicKeyToken="30ad4fe6b2a6aeed" culture="neutral" />
<bindingRedirect oldVersion="0.0.0.0-10.0.0.0" newVersion="10.0.0.0" />
</dependentAssembly>
</assemblyBinding>
</runtime> - The "
AptifyAsyncProcessor.exe.config" would appear as follows. Save and close the record.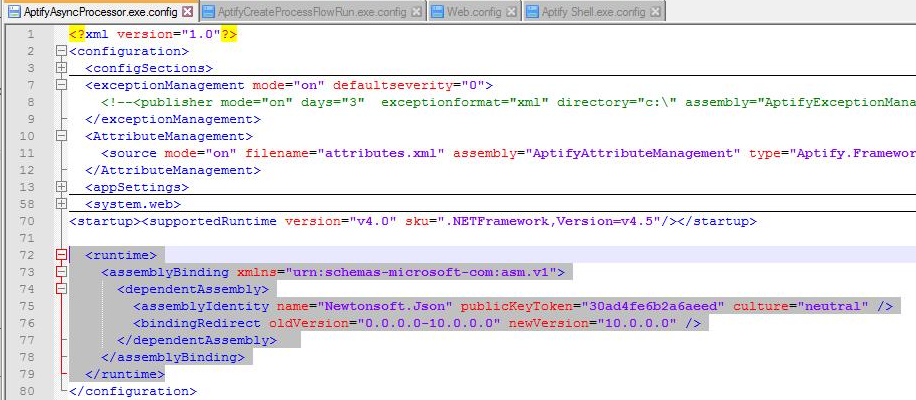
- Restart the following services '
Aptify 5.5 Asynchronous Processor'. The user should be able to use the application server with e-Business 6.3.
Configure Default Order Values
Customers who want to configure default order values for the order associated with the shopping cart are instructed to change the last step in the Process Flow ‘Ensure Active Cart Exists’. If you open this Process Flow in the designer you may see the last step as a rule step with the label ‘Assign Default Values’ (pictured below)

Unfortunately, this is an orphaned rule step that is overlaying the real final step of the process flow. If you click and drag this step to a new position in the designer, you will see it is not wired up to the steps around it and the real final step is a sub-process step named ‘Assigned Default Values To Order’ (pictured below).

Customers can feel free to delete the ‘Assign Default Values’ step as it is no longer used. This will avoid confusion with developers thinking the ‘Assign Default Values’ step is actually wired up, making changes to it, and not understanding why they are not being executed.
Related topics
Checklist for basic Aptify Web/e-business 6 troubleshooting
Sample Aptify Web/e-Business 6 Troubleshooting story