Applying Bluepay HPP on classic e-Business 5.5.3
The below page details down the step by step guide to deploy Bluepay Hosted Payment on classic e-Business 5.5.3 running on Aptify 6.1 or higher.
Pre-requisites
The following prerequisites must be satisfied in order to install the Bluepay Remote Hosted Payment feature on classic e-Business 5.5.3 (CMS and NON CMS):
- Aptify 6.1 or higher version is installed
- Classic e-Business 5.5.3 is installed
Instruction
Before starting the installation, take a backup copy of your existing Aptify Db and classic e-Business 5.5.3 website + related SOA folder.
Install the Aptify Bluepay Hosted Payment Page (HPP) on classic e-Business 5.5.3
To install Aptify Bluepay Hosted Payment Page (HPP), perform the following steps:
Aptify 6.1 and higher core setup installs the Bluepay Hosted Payment framework automatically with the setup and hence the below instructions are specific to additional steps needed other than the Bluepay Framework which is already installed by default.
Step 1: Create a new stores procedures spIsHostedPaymentActive
- Login as an administrator on the desktop application. Open a new record from the Database Objects service
- Enter the following details in each of the fields mentioned below:
- Name: spIsHostedPaymentActive
- Description: This Stored Procedure will check remote payment active OR de-active. SP will return 1, if Hosted Payment is active else returns 0. This stored procedure is used in e-Business.
- DB: Aptify (or Select the SQL Server database where the object is to reside in the DB field)
- Type: Stored Procedure
Enter the SQL statements for the database object in the SQL tab.
Click the Grant SQL tab and specify the user permissions as mentioned below:
"GRANT EXECUTE ON spIsHostedPaymentActive To EndUsers"
Step 2
Open the Utilities folder in the Aptify Setup and run the ‘Object Synchronizer’ Tool for the sync repository object as e-Business.
To know more about running Object synchronizer utility, please refer Running the Object Repository Synchronizer.
We should not run the synchronizer for all the objects but only for ‘e-Business’. The below list of updated dll’s will be downloaded in the e-Business bin folder after the sync is completed successfully for e-Business sync repository object:
- ContributionPaymentObject.dll
- Pledge.dll
- StandingOrder.dll
- AptifyOrdersEntity.dll
- PaymentInfoObject.dll
- Payments.dll
- RemotePaymentEntityService.dll
- AptifyMarketplaceListingsEntity.dll
- ElectronicPayment.BluePay.dll
- AptifyPersonsEntity.dll
- RemotePayments.dll
- EBusinessShoppingCart.dll
- CompanyObject.dll
- PaymentInfoControl.dll
Step 3: Perform the below Config file changes
Navigate to the e-Business installed folder and update the following in Aptify_UC_Navigation.config file. Please see the below screenshot for more details.
- Open the web.config from the e-Business installed path and add the below key:
“ <add key="GenericErrorPageURL" value="SecurityErrorPage.aspx" />”
- Also update the web.config with a new Key to update the Remote payment URL . In the below example, replace the e-Business site URL with the actual site URL.
<add key="Aptify.FrameWork.Payment.BluePay.RemoteUrl" value="<e-Business site-URL>/RemotePayment.aspx" />
An Example:
<add key="Aptify.FrameWork.Payment.BluePay.RemoteUrl" value="https://test-eBusiness.aptify.com/e-Business/RemotePayment.aspx" />
- Please note that the URL is case sensitive if you are building the page using CMS site. So mention the URL as it has been created in CMS site.
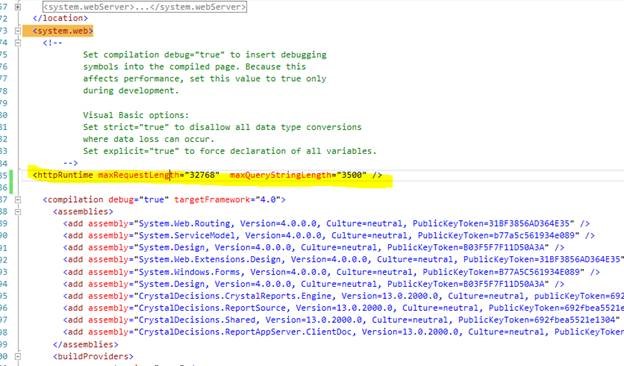
Add below lines in web.config file as shown in the snapshot below:
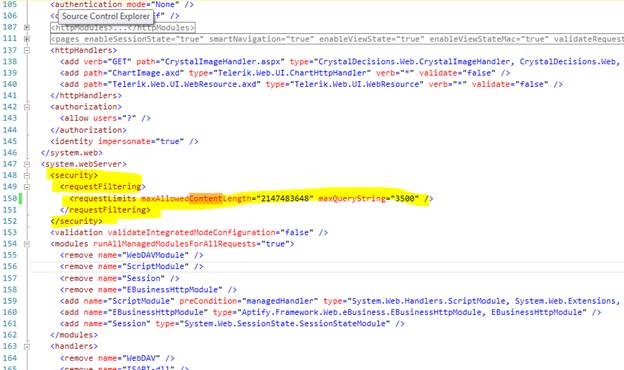
- Add below changes in the web.config file. Please refer the snapshot below. Save and close the Web.config file
<httpRuntime maxRequestLength="32768" maxQueryStringLength="3500" />
Step 4: Perform the below changes for User Controls
Please contact our Support Team for retrieving the updated classic e-Business User Controls with Bluepay Hosted Payment Changes that need to be run with Aptify 6.1 or Aptify 6.2
Add the below updated user controls in respective folders.
- Below updated controls should be copied and replaced in UserControls Folder -> Aptify_Product_Catalog folder.
- BillingControl.ascx.vb
- BillingControl.ascx
- AdminPaymentSummary.ascx.vb
- Below updated controls should be copied and replaced in UserControls Folder -> Aptify_General folder.
- CreditCard.ascx.vb,
- CreditCard.ascx
- Below updated controls should be copied and replaced in UserControls Folder -> Aptify_Group_Admin folder.
- AdminOrderDetail.ascx.vb,
- AdminOrderDetail.ascx,
- AttendeeTransferWiz.ascx.vb,
- AttendeeTransferWiz.ascx,
- RenewMultipleMembership.ascx.vb,
- RenewMultipleMembership..ascx,
- MeetingTransferWiz.ascx.vb,
- MeetingTransferWiz.ascx,
- RenewMultipleSubscription.ascx.vb,
- RenewMultipleSubscription..ascx
Below updated controls should be copied and replaced in UserControls Folder -> Aptify_Customer_Service folder.
- MakePayment.ascx.vb,
- MakePayment.ascx,
- SavedPaymentMethods.ascx.vb,
- SavedPaymentMethods.ascx
- Below updated controls should be copied and replaced in UserControls Folder -> Aptify_Fundraising folder.
- Fundraising.ascx.vb,
- Fundraising.ascx
- Below updated controls should be copied and replaced in UserControls Folder -> Aptify_Marketplace folder.
- NewListing.ascx.vb,
- NewListing.ascx
- Copy and replace the file vb in App_Code folder available in e-Business installed path.
- Below are newly created user controls, need to copy and paste them in UserControls -> Aptify_General folder list.
- RemotePayment.ascx
- RemotePayment.ascx.vb
- RemotePaymentReciptControl.ascx
- RemotePaymentReciptControl.ascx.vb
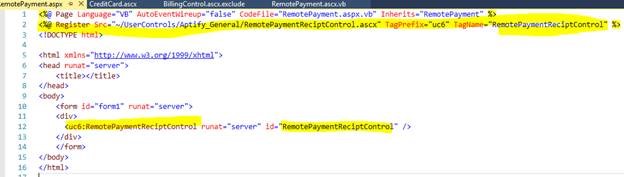
- Below are newly created pages., need to copy and paste them in e-Business installed path for a NON-CMS e-Business site.
- RemotePayment.aspx and
RemotePayment.aspx.vb
This page is available for the Non-CMS but if we are using CMS site then we need to create the page on the respective CMS site. This page contains “RemotePaymentReciptControl.ascx”user control as shown in image given below.
- Connect to the Aptify classic e-Business website to confirm that it loads properly using a supported web browser.
- After all the above changes are done, Please refer Setting up BluePay Hosted Payment Configurations for configuring Bluepay Hosted Payment Page.
- Once the configurations are completed, restart the IIS and browse the e-Business. You will observe Bluepay Hosted Payment Option under the payment section.