Linking the Simple Process Flow to an Event
In this step of the Simple Process Flow tutorial, the business case developed for this example specifies that the email must be sent when a new Companies record is added to the system. This indicates that the XY Send Email process flow must be somehow connected to the Companies service, so that the system knows why and when to send a notification.
There are several events that occur within the normal life cycle of a record in a database. These include when the record is created, saved, updated, and deleted. The standard Event Definitions are listed and defined in Event Definitions as Delivered. The appropriate event must be determined to allow the functionality we are implementing in this example to work correctly.
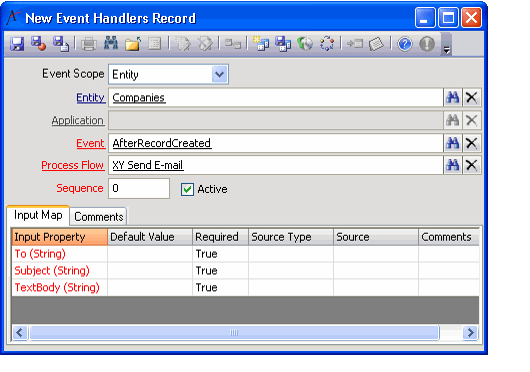
Examine what is known about the business case. The email will be sent only when a new Companies record is created, not when existing Companies records are updated. We also make the assumption that this email will only be sent after the record has been saved in the database. This information indicates that the AfterRecordCreated event is the most appropriate event to use for the process flow.
Perform these steps to link the simple process flow to an event:
- Open a new record from the Event Handlers service.
- You can also review Event Handlers using the Aptify Event Handler Management dashboard component. See Using the Event Handler Management Dashboard for details.
- You can also review Event Handlers using the Aptify Event Handler Management dashboard component. See Using the Event Handler Management Dashboard for details.
- Leave Event Scope set to Entity.
- Enter Companies in the Entity field.
- In the Event field, enter AfterRecordCreated.
- In the Process Flow field, enter your XY Send email process flow.
- Once the process flow is specified, the Input Map tab populates with the Context Object input properties defined in the process flow. In this case, this corresponds to the To, Subject, and TextBody input properties.
- Once the process flow is specified, the Input Map tab populates with the Context Object input properties defined in the process flow. In this case, this corresponds to the To, Subject, and TextBody input properties.
- Leave the Active option selected.
Fill out the input map as described below:
Input Property
Source Type
Source
To
Static Value
<<enter your email address>>
Subject
Static Value
New Company Created: <%Name%>
Body
Static Value
A new Company record has been entered for <%Name%>. The assigned ID is <%ID%>.
- Each row may be configured directly in the grid. You may also double-click on the row, or click on the ellipsis (...) button in the Source field to display an Edit Mapping dialog box.
- While the business case indicates that the notifications are to go to the Sales department, for the purposes of testing, enter your own email address instead of <<your email address>> in the To row.
- Aptify will automatically insert field data from the new Companies record in the placeholders surrounded by the brackets and percent signs.
- Save and close the record.
- Close and reopen Aptify before continuing.
Related content
Copyright © 2014-2017 Aptify - Confidential and Proprietary

