Registering for Classes and Viewing Class Information Online
The class information available to a Web User varies based on the Web User's status. When browsing the course catalog, a Web User can only access a sub-set of the information about a particular class. However, once the Web User has registered for a particular class, more information becomes available automatically.
The following steps provide an overview of a web user's online experience when accessing class information using the e-Business Education portal:
The screen shots in this section are from Aptify's e-Business Sample Site.
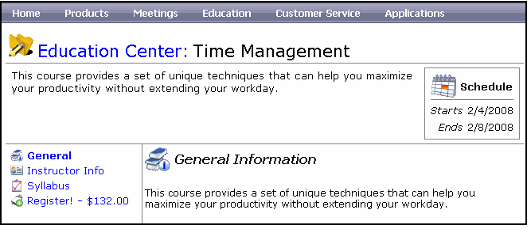
- The Web User selects a particular class from a Class Schedule page (either by browsing the entire class schedule or just the classes for a particular course). This displays a class page.
- See Viewing Course Information Online for information on accessing the Education Center and viewing course information.
- See Viewing Course Information Online for information on accessing the Education Center and viewing course information.
- If not currently registered for the class, the user browses the available information, grouped into these hyperlink headings:
- General: The General Information screen displays the information from the Details sub-tab on the Classes record's Web tab.
- Instructor Info: Displays information about the class instructor specified on the Classes record's Instructors tab. The instructor's information will not appear if the Show Instructor Info box is cleared on the Classes record's Web tab. This page also displays any notes from the instructor to registered and prospective students.
- Syllabus: Displays the class syllabus as defined by the Course Parts specified on the Classes record's Parts tab. When not registered for the class, the system disables the hyperlinks to the relevant course content (for SCORM or Tin Can compliant content launched via an LMS integration or if a URL is specified in the Course Parts records).
- When ready to register for the class, the user clicks the Register! hyperlink.
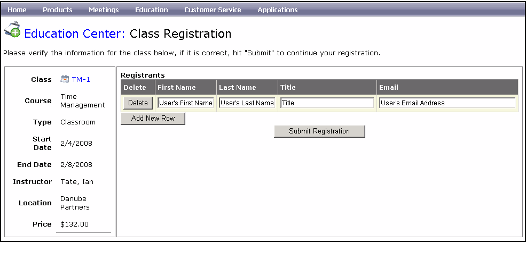
- On the Class Registration page, the user verifies that the class information is correct and enters additional registrants for the class, as applicable.
- The name, title, and email address of the current Web User appears for the first registration by default. This can be modified as necessary.
Additional registrants are added by clicking the Add New Row button and specifying the registrant's name, title, and email address. The e-Business site will attempt to match the registrant against an existing Persons record in Aptify based on the information provided. Otherwise, a new Persons record will be created for this registrant.
The multiple registrant option cannot be used for classes that are created using the deprecated Class Registration wizard. In this instance, the Web User can only register himself or herself for the class.
- When ready, the user clicks the Submit Registration button.
- The e-Business site displays the Web User's shopping cart with the specified class registration(s). The Web User completes the Check Out process.
- When the Web User places the order, the system automatically creates an Orders record, Payments record, and Class Registrations record(s) in Aptify as applicable.
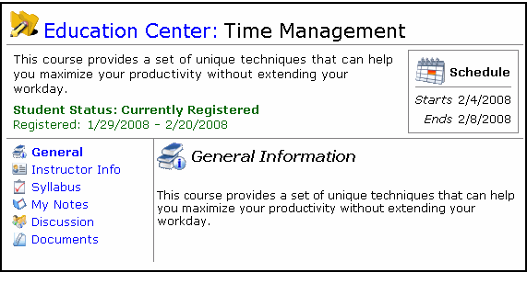
- When the registration process is complete, the Web User can return to the class's page and now access the following additional features:
- Syllabus: This heading still displays the class syllabus, but the system automatically activates any hyperlinks to class content for a particular part (depending on the configuration of the corresponding Course Parts record; see Creating Course Parts for details).
- My Notes: Provides an area for a student to add and edit any class notes. These notes are stored in the student's Class Registrations record (on the Student Notes tab).
- Discussion: If the instructor has created a Discussion Forum for the class, the student can read and post threads on the discussion board.
- Documents: If the instructor has posted any documents for the class, the student can download those files from this page.
If an organization specifies a Date Expires on the Class Registrations record, the class's availability dates (Date Available to Date Expires) appear below the Student Status on the Class page. If no Date Expires is specified, the second line with the availability dates does not appear.
Copyright © 2014-2019 Aptify - Confidential and Proprietary


