How to Create a Sample Pivot Table in the Desktop Client
This topic illustrates how to create a sample pivot table of the Companies service. This pivot table displays information about your organization's contacts with persons and their companies.
In this topic, you will:
- Create a pivot table view of the Companies service that links in Persons and Contact Log data.
- You will create three Linked Entities records: one for Persons, one for Contact Log Links, and one for Contact Log. The Contact Log Links reference is necessary to connect Persons to the Contact Log entity.
- Specify that the corresponding Contact Log record is opened when you double-click a contact log's details in the pivot table (as opposed to the Companies record).
- Design the pivot table to display Companies, the Persons at those Companies, and the contacts for those persons.
- Create a calculated field that displays how many times a company has been contacted and display this number as a percentage of the total number of contacts included in the dataset.
- Drill-down to specific information within the table.
- Create a print preview of the pivot table.
Follow these steps to create a sample pivot table:
- Open a new view of the Companies service.
- Enter Sample Pivot Table in the Name field.
- Select Pivot Table from the View Type drop-down list.

- Click the Pivot Table tab.
- Click the New icon under the Links sub tab to open a new Linked Entities record.
- Specify the following fields on the General tab to add a link to the Persons entity:
- Linked Entity: Persons
- Linked Entity Field: CompanyID
- View Alias: P
- Join Type: Optional
- Join Field: ID

- Click the Fields tab and add the following fields to the Selected Fields column on the right-hand side:
- FirstLast
- Title
- Country

- Click OK to save the record and return to the Links sub tab.
- Click the New icon under the Links sub tab to open another new Linked Entities record.
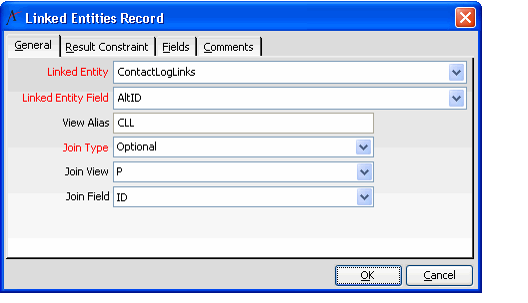
- Specify the following fields on the General tab to add a link to the Contact Log Links entity:
- Linked Entity: ContactLogLinks
- Linked Entity Field: AltID (This is the field in Contact Log Links that records a record's ID)
- View Alias: CLL
- Join Type: Optional
- Join View: P
- Join Field: ID
- Add Contact Log Links Link
Click the Result Constraint tab and add the following statement to ensure that the system returns only ContactLogLinks record that applies to the Persons entity:
result constraintCLL.EntityID= ( SELECT ID FROM vwEntities WHERE Name='Persons' )

- Click OK to save the record and return to the Links sub tab. Note that you do not need to configure fields for the Contact Log Links entity.
- Click the New icon under the Links sub tab to open another new Linked Entities record.
- Specify the following fields on the General tab to add a link to the Contact Log entity:
- Linked Entity: Contact Log
- Linked Entity Field: ID
- View Alias: CL
- Join Type: Required
- Join View: CLL
- Join Field: ContactLogID

- Click the Fields tab and add the following fields to the Selected Fields column on the right-hand side:
- ID
- Date
- Type
- Category
- Description
- OwnerID
- Select and right click the ID field in the Selected Fields column to display the Display Name Setup dialog.
- Enter ContactLogRecordID in the field provided and click OK.

- Click OK to save the record and return to the Links sub tab.
- Click the Detail Navigation sub tab.
- Enter Contact Log in the Detail Open Entity field.
- Enter ContactLogRecordID in the Detail Open Entity Field field.
- This corresponds to the alias you assigned to the Contact Log entity's ID field in the Linked Entities record.
- With this setting, Aptify will open a Contact Log record when you double-click a cell in the pivot table.

- Click the Filters tab and add one or more filter statements on the Companies service to reduce the number of records that will populate the table.
- The specific Filters to enter depend on your dataset. Ideally, the persons at the companies populating the pivot table should have multiple Contact Log records associated with them. Not specifying a filter will display all Companies record, which is not recommended.
- For example, if using the sample dataset, you can create a filter to display Companies whose Company Type is Education.
- Click the Fields tab and edit the Selected Fields column to include the following fields:
- ID
- Name
- City
- State
- ZipCode
- Country
- CompanyType

- Click OK to load the pivot table.
- The blank pivot table loads.
- The blank pivot table loads.
- Click the Field List icon to display the Field List.

- Drag and drop the company's Name field from the Field List to the Drop Row Fields Here area.

- Drag the First and Last field to the right of the Company Name in the Row Area of the pivot table, as shown below.

- Drop the following Contact Log fields into the Drop Totals or Detail Fields Here area in the following order (as shown below).
- Date
- Type
- Category
- Description

- Select all of the rows in the table (select the first company row, then hold down the SHIFT key and select the last company row).
- Right-click and select Collapse Items from the pop-up list.
- The Persons information is collapsed.

- The Persons information is collapsed.
- Right-click again and select Hide Details from the pop-up list.
- The pivot table should look like the illustration shown below.

- The pivot table should look like the illustration shown below.
- Drag the Name row's heading to the Totals column to add a calculated field that provides the number of contacts per company (called Count of Name).

- Right-click the Count of Name heading and select Commands and Options from the pop-up menu.

- Click the Captions tab and enter # Contacts By Company in the Caption field.

- Click the X icon in the upper right corner to close the dialog.
- Select the # Contacts By Company heading and click the Show As button. Then, select the Percent of Grand Total option. This changes the counts so they are reported as percentages of the total contact count.

- Click the plus (+) sign to the left of a company to expand its items.
- Double click a contact for that company to open the corresponding Contact Log record, as illustrated below.

- Click the minus (-) sign to the right of the person to hide the details.
- Expand the items for all companies displayed in the table to display the Persons at each company and their contact details.
- Click the minus (-) sign to the right of each person to hide the details.
- Click in the Sample Pivot Table heading to select the entire table.

- Select the Print Preview option from the Aptify Button menu to open a print preview window for the pivot table, as shown below.

- Click Close to close the preview window and return to the pivot table.
This completes the creation of the sample pivot table. You can continue working with this sample table (for example, you can try exporting this view to Microsoft Excel, as described in Exporting Pivot Table Data to Microsoft Excel). Otherwise, select another view or close Aptify.
Copyright © 2014-2019 Aptify - Confidential and Proprietary