Creating the CustomerPhone Sub-Type Entity Sample Application Example
This topic provides an example of how to create a new sub-type using one of the sample application entities to illustrate the process.
One of the requirements for Motor Loaner, Inc.'s new system is that it should include the ability to track multiple address and phone numbers for Customers. This is documented as BPR5: Allow Multiple Addresses and Phone Numbers for Customers, DR6f: Customer Other Address(es), and DR6h: Other Phone Number(s) in the About the Business Process Requirements for the Sample Application and About the Data Requirements for the Sample Application topics, and the design for this entity is described in the About the Creation of Entities for the Sample Application.
Aptify normalizes address and phone number data in Addresses and Phone Numbers entities. Other entities link to Addresses and Phone Numbers as Embedded Objects to provide users with a seamless interface where an address or phone number appears integrated directly in the parent record. See Managing Embedded Database Objects for an extensive discussion on this technology.
To build a static set of addresses and phone numbers in an entity that will be available in every record, a developer adds AddressID and/or PhoneNumberID embedded fields. However, if a developer wants to provide more flexibility for users to dynamically add or remove addresses and phone numbers as needed, the developer can add an Address or Phone sub-type entity that stores other contact information as applicable.
Aptify provides standard address and phone form components that display contact information in a unified format across records. See Modifying Field Layout with the Visual Designer for details. These controls also automatically integrate data from an Address or Phone Number sub-type entity (so any additional contact information stored in a sub-type record is available directly from the top-level record along with the pre-defined contact fields). The form components identify the appropriate sub-type to integrate based on the presence of an entity attribute in the top-level entity (stored on the entity's Configuration > Attributes tab):
- ExtendedAddressesSubType: This attribute identifies the name of a sub-type entity for this top-level entity that stores additional address information.
- ExtendedPhonesSubType: This attribute identifies the name of a sub-type entity for this top-level entity that stores additional phone number information.
Using the requirements and design information and the system knowledge described above, the developer followed these steps to design the CustomerPhone entity in Aptify to provide associates with the ability to add new phone numbers for customers as needed:
These steps describe how a developer created the CustomerPhone entity. Note that the same general process was followed to create the CustomerAddress entity.
- Open the Customers entity.
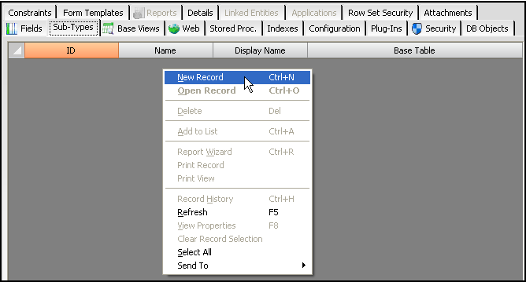
- Click the Sub-Types tab.
- Right-click in the gray area and select New Record from the pop-up menu.
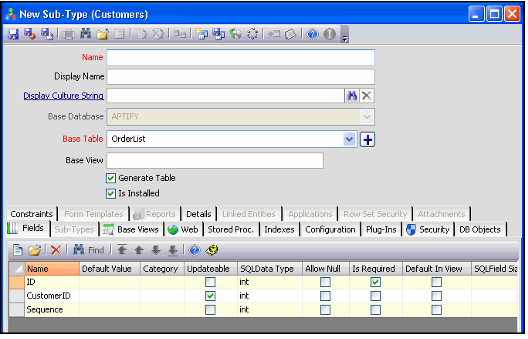
- This opens a new sub-type record for the Customers entity. The system automatically adds an ID field, a link to the parent entity (CustomerID field in this case), and a Sequence field.
- This opens a new sub-type record for the Customers entity. The system automatically adds an ID field, a link to the parent entity (CustomerID field in this case), and a Sequence field.
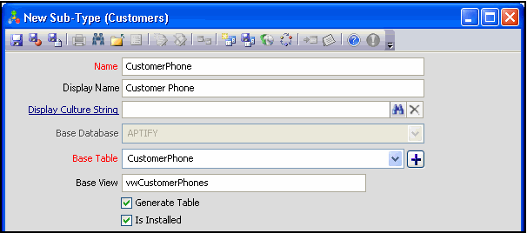
- Enter CustomerPhone in the Name field.
- This follows Aptify's convention to not use spaces in sub-type entity names.
- The Display Name field populates automatically with Customer Phone when you tab or click out of the Name field.
- Enter CustomerPhone (singular form of Name without spaces) in the Base Table field and vwCustomerPhones (plural form of name without spaces and vw prefix) in the Base View field.
- Click the New icon in the Fields tab's toolbar to open a new Fields record.
- Enter a Name field that will be used to store the name assigned to this phone record, using the following settings:
- Name/Display Name: Name
- SQL Data Type (Size): nvarchar(50)
- Options: Select the Is Name Field check box
- The Allow Null field on General tab is unchecked automatically and the Is Required field on the Validation tab is checked automatically since Name fields are assumed to be required to save a record.
- The Allow Null field on General tab is unchecked automatically and the Is Required field on the Validation tab is checked automatically since Name fields are assumed to be required to save a record.
- More Options: Also check Show In Find (so the name can be used as a search field in a Find dialog), and Default In View (so the Name field shows up in the sub-type grid by default).
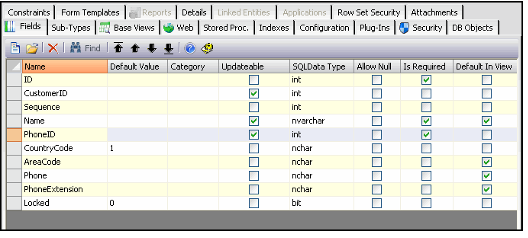
- Default In View is particularly important for Sub-Type entities. Only the fields that have this check box selected will show up in a sub-type's record grid, and the set of fields that appear in the grid cannot be modified directly on the form (they can only be modified using this check box on the Entity Fields record).
- Default In View is particularly important for Sub-Type entities. Only the fields that have this check box selected will show up in a sub-type's record grid, and the set of fields that appear in the grid cannot be modified directly on the form (they can only be modified using this check box on the Entity Fields record).
- Help Text: Enter help text for this field (such as Name to be assigned to the Customer's Phone Number)
- Click OK to close the Fields record and add the field to the entity.
- Open a second new Fields record (this is for the embedded link to the Phone Numbers entity).
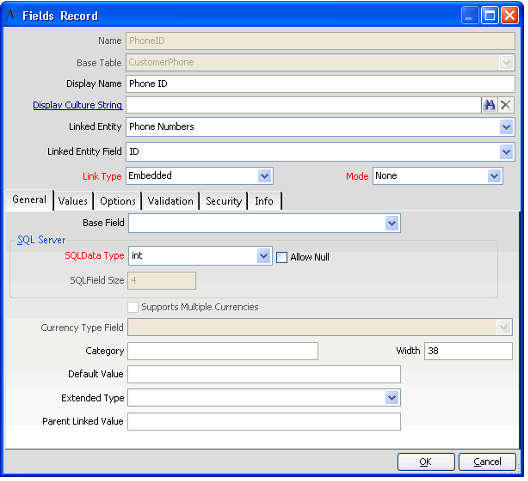
- Use the following settings to create the embedded link:
- Name: PhoneID
- Display Name: Phone Number
- Linked Entity: Select the Phone Numbers entity.
- Linked Entity Field: Select the ID field in the Phone Numbers entity.
- Link Type: Select Embedded.
- Mode: Leave as None. See About the Types of Embedded Objects for more information on the available modes.
- SQL Data Type (Size): This is automatically set to int(4) when you specify the linked field.
- Is Required: Note that this option on the Validation tab is automatically selected when you specify the linked field. In this case, the PhoneID field will be required to save a new CustomerPhone sub-type record, so leave this option selected.
- Click OK to save your changes, close the Fields record, and open the Aptify Entity Virtual Fields wizard, which opens automatically for embedded fields so you can add one or more virtual fields.
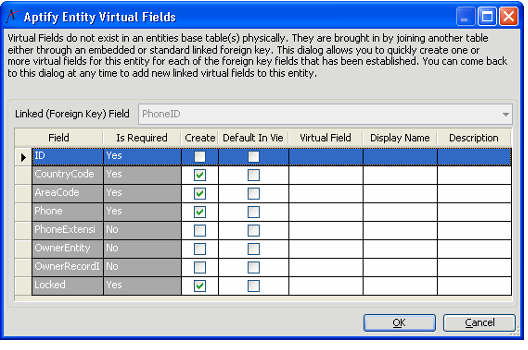
- At a minimum, you need to add the fields required in the embedded entity as virtual fields. These fields have the Create check box selected automatically, as shown below for the required fields in the Phone Numbers entity.
- At a minimum, you need to add the fields required in the embedded entity as virtual fields. These fields have the Create check box selected automatically, as shown below for the required fields in the Phone Numbers entity.
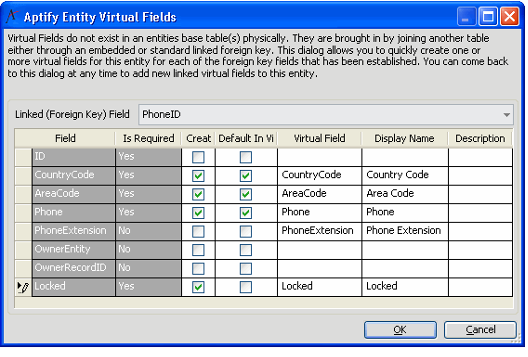
- Within the wizard, specify that Virtual Fields be created for CountryCode, AreaCode, Phone, PhoneExtension, and Locked, using the values shown below.
- CountryCode, AreaCode, Phone, and PhoneExtension correspond to the characteristics of a phone number.
- In the sample application, AreaCode, Phone, and PhoneExtension have Default in View checked. This means that the CountryCode field would not appear by default in a sub-type grid of CustomerPhone data, but this has little functional impact since the phone data will be viewed via the Phones form control, which includes a field for Country Code.
- In the sample application, AreaCode, Phone, and PhoneExtension have Default in View checked. This means that the CountryCode field would not appear by default in a sub-type grid of CustomerPhone data, but this has little functional impact since the phone data will be viewed via the Phones form control, which includes a field for Country Code.
- The Locked field is a required field used by embedded entities in a shared mode. See Designing and Creating Shared Embedded Objects for more information. While the Motor Loaner System does not use a shared embedded object, the Addresses and Phone Numbers in Aptify also support shared embedded implementations (such as with the Persons, Companies, and Orders entities in Aptify's standard business applications).
- CountryCode, AreaCode, Phone, and PhoneExtension correspond to the characteristics of a phone number.
- Click OK to close the wizard and create the virtual fields.
- Click the Security tab and add the permission set for users and groups who need to access this sub-type entity based on the application's security design.
- See Administering Security for Entities for information on Aptify's security features.
- For the CustomerPhone entity, the security design specifies the following access permissions shown below:
- Users and Managers: Read, Create, Edit, and Delete permissions.
- Administrators: Same permissions as Users/Managers plus the ability to view record data in the Object Viewer (which is an alternative method for access record information — see Modifying Field Layout with the Visual Designer for details).
- Note that this differs from the security specified for the top-level Customers entity, where Users do not have Delete access (so users cannot delete customers but they can add or delete phone numbers as needed) and where Managers and Administrators have Merging permissions (a merge operation cannot be initiated from a sub-type entity).
- Save the sub-type's Entities record to automatically generate the Base Table, Base View, Stored Procedures, Form Templates, and CRUD process components for the entity.
- Note that the save process for a sub-type also regenerates objects for the top-level entity as well. For example, the top-level entity's Delete stored procedure is updated to call the sub-type entity's Delete stored procedure first to remove any sub-type records before deleting the top-level record.
- Note that the save process for a sub-type also regenerates objects for the top-level entity as well. For example, the top-level entity's Delete stored procedure is updated to call the sub-type entity's Delete stored procedure first to remove any sub-type records before deleting the top-level record.
- Close the CustomerPhone sub-type's Entities record.
- Return to the Customers entity and click the Configuration > Attributes tab.
- As described in the introduction to this topic, you need to add an entity attribute to the top-level Customers entity to identify that the new sub-type holds extended phone numbers so the new sub-type is properly integrated within the Phones control.
- As described in the introduction to this topic, you need to add an entity attribute to the top-level Customers entity to identify that the new sub-type holds extended phone numbers so the new sub-type is properly integrated within the Phones control.
- Click the New icon to open a new Attributes record.
- Enter ExtendedPhonesSubType in the Name field. This is the name of the attribute that identifies an extended phone number sub-type entity.
- Enter the name of the sub-type entity (CustomerPhone) in the Value field.
- Click OK to save and close the record.
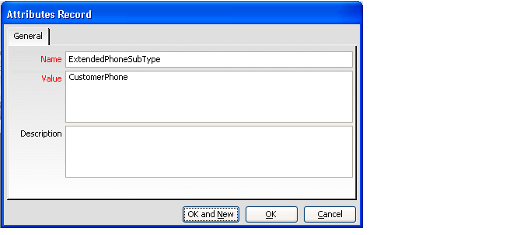
- Note that to specify an extended address entity, use the ExtendedAddressesSubType attribute, as illustrated below.
- Note that to specify an extended address entity, use the ExtendedAddressesSubType attribute, as illustrated below.
- Save and close the Customers entity.
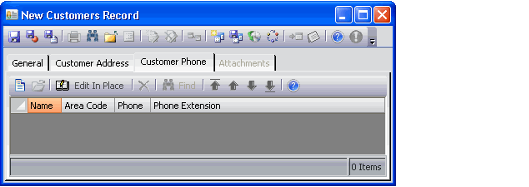
- Note that at this point in the application development, the Customer Phone and Customer Address sub-type entities appear as separate tabs on the Customers form (as shown below). These tabs are removed later when the Customers form is updated to use the standard Aptify Addresses and Phones controls. See Adding an Address and Phones Control Form Template Example for details.
- Note that at this point in the application development, the Customer Phone and Customer Address sub-type entities appear as separate tabs on the Customers form (as shown below). These tabs are removed later when the Customers form is updated to use the standard Aptify Addresses and Phones controls. See Adding an Address and Phones Control Form Template Example for details.
Copyright © 2014-2019 Aptify - Confidential and Proprietary
