Activating the Membership Renewal Workflows
- admin (Deactivated)
Analytics
This topic describes how you can activate the Membership Renewal Workflows included with Aptify 5.5.1.
Aptify recommends that rather than modify an Aptify baseline record directly, you should clone the Aptify delivered baseline and create your own organization-specific copy. This will help prevent Aptify from unintentionally overwriting any changes you make to those records during an upgrade process. When creating copies of Views, Message Templates, and Entity Bulk Operations to be used by process flows, you will also need to modify the input properties for your process flows and scheduled tasks so they point to the appropriate views and entity bulk operations rather than to the Aptify baseline.
Follow these steps to use these workflows within your system:
- Confirm that you have an Application Server configured and functional on your network. You must have one or more Application Servers to use Aptify Scheduled Tasks.
- Confirm you have configured a Message System, such as Dot Net Mail or Dot Net Mail SMTP Client, to send automated emails.
- Using the Membership Renewal Workflow section as a guide, review the Scheduled Tasks, Process Flows, Views, Entity Bulk Operations, Message Templates, and Entity Bulk Operations provided by Aptify to understand what happens when each automated workflow runs. Review, and update if needed, the Message System and Message Source values that are used by the Scheduled Tasks and Process Flows.
- For the Expire Memberships for Non-Payment workflow, modify the Member Type ID and Member Status ID values as necessary to reflect the Member Type values used in your system. At a minimum, you may need to adjust the Member Type ID values in the Individual Memberships to Expire and Company Memberships to Expire views and in the Expire Individual Membership and Expire Company Membership entity bulk operations.
- Review the starter Message Templates provided by Aptify and create your own organizationspecific notices. When working with the starter templates, remember to replace the placeholder values (identified by square brackets) with static values specific to your organization. You should also review the starter message parts and create your own parts as needed using the delivered parts as examples or starting points. For example, in the Membership Auto Renewal 30 Day Notice, Aptify uses the Subscription Product Default Price message part to display the default price of the membership product within the email. This message part is only appropriate if you have a standard price for a membership product that all members pay. If members pay different prices based on specific criteria, then you should create your own part that can display the appropriate price or modify the template to remove that information.
- Review the delivered Membership Email Schedules provided by Aptify, which control the Membership Renewal Notices that are sent to members. Deactivate any schedules that your organization will not use and create new, active Membership Email Schedules as needed.
- Enable View Scheduling for the following views so reports are periodically generated that can be followed up by a staff member:
- Standing Orders That Will Not Fulfill in 60 Days list view
- Memberships Expired Today list view
- Enable the Scheduled Tasks to start using the Membership Renewal Workflows.
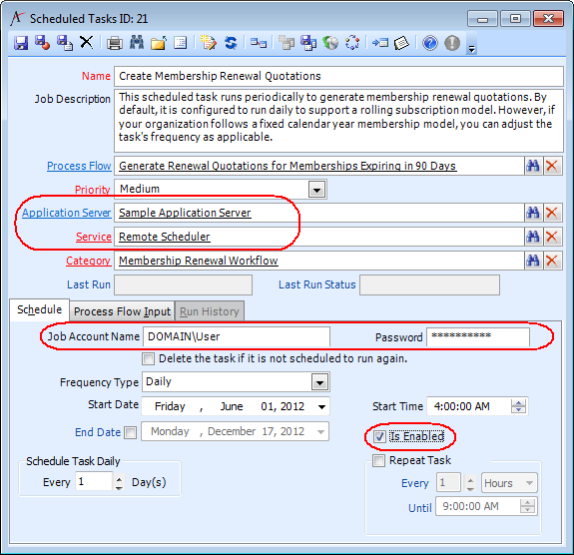
- For each scheduled task, follow these steps:
- Open the Scheduled Tasks record.
- Clear the Service field.
- Change the Service to Remote Scheduler.
- After saving the record, the Application Server will change the Service to Windows Scheduler automatically and set up a Windows Task for this item.
- If you are running the Aptify client on the Application Server directly, you can set the Service to Windows Scheduler directly.
- Specify the Application Server that will execute this task.
- Specify the Job Account Name and Password for the account that will execute this task on the Application Server. See Creating a Scheduled Task for more information.
- Select the Is Enabled option.
- Modify the Frequency, Dates, and Start Time as needed.
- Save the Scheduled Task.
Copyright © 2014-2017 Aptify - Confidential and Proprietary