After setting up the configuration services for the Advertising module as discussed in Setting Up Advertising Management, the main processing features of the module are ready for use. This section discusses creating Advertising Contracts records and Advertising Insertion Orders records and how they all interact in the Advertising module and with the Orders service. It should be noted that the user never has to enter the Orders service to process an advertising product. References are made to the Orders service to fully explain the processing functionality of the advertising module. The processes are presented in the order they should occur to function correctly in the Advertising module.
- Advertising Rate Cards must be set up before Advertising Contracts;
- Advertising Contracts must be created before Advertising Insertion Orders; and Advertising Insertion Orders must be created before an order for the advertisement product can be generated, paid, or cancelled.
The following services and processes for each service are covered in detail within this chapter:
Processing Advertising Insertion Orders
Advertising Insertion Orders records track specific advertising order information and generate actual Orders records in the Orders service for advertising products. Separate insertion orders are required for each product issue included on an Advertising Contracts record. If a contract for a specific publication is for a frequency of 12x, then an Advertising Insertion Orders record must be created for each of the 12 different product issues that make up the product.
This section covers the following topics:
- Creating an Advertising Insertion Order
- Saving an Insertion Order
- Posting Payments from the Insertion Order
- Cancelling an Insertion Order
Creating an Advertising Insertion Order
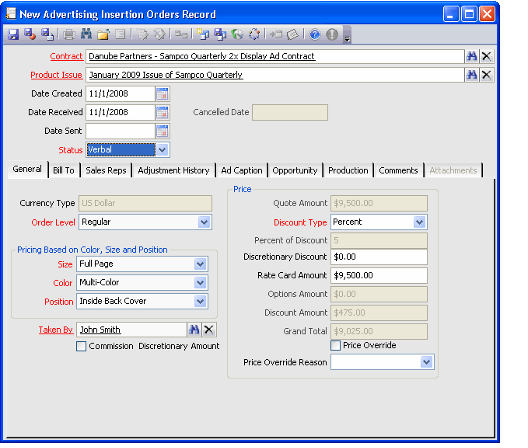
Advertising Insertion Orders can be created from the Advertising Insertion Orders service or through the Advertising Contracts record.
- Open a new Advertising Insertion Orders record from the service.
Alternatively, you can also open a new record from the Insertion Orders tab on an Advertising Contracts record. - Enter an advertising contract in the Contract field. This insertion order will be listed on the Insertion Order tab of the Advertising Contracts record when it is saved.
- Enter or select a Product Issue using the Find feature. Each insertion order is for a specific issue of the advertising product.
When you enter a product issue, the Materials Due Date field on the Production > Materials sub-tab is populated with the Materials Due Date entered in the rate card's Deadlines record for that product issue. - The current date appears in the Date Created field. Modify this date if necessary.
- If known, complete the Date Received and Date Sent fields with the applicable dates when the insertion order contract and/or materials were sent and approval received.
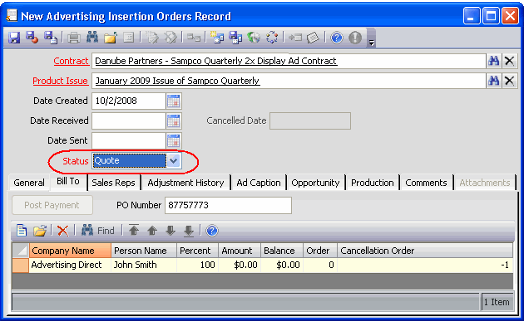
- Select a Status for the insertion order. The Status field determines when an Orders record is generated. Upon the initial save of an Insertion Orders record, the status must be either "Verbal" or "Quote." A list of options and their results include:
- Verbal — A verbal status does not create an Orders record, only an Advertising Insertion Orders record.
- Quote — A quote status creates an Orders record with the order status marked "Taken."
- Approved — An approved status creates an Orders record with the order status marked "Shipped." An insertion order needs to be saved first with an order status of verbal or quote before it can be changed to "Approved".
- On-Hold — An on-hold status suspends the insertion order, but does not cancel it at this point. Once an order is cancelled it cannot be undone, therefore it may be wise to put an insertion order on hold until you know for sure the order needs to be cancelled.
- Cancelled — Marks the insertion order as cancelled. If previously marked as Quote or Approved, the system creates a cancellation order and it locks down the insertion order, preventing fields from being changed. See Cancelling an Insertion Order for details.
- Configure the pricing information for the insertion order, as described in the following subsections:
- The rate card's currency information is passed to the Currency Type field on the insertion order as well as the orders that are generated when the insertion is saved as approved. Note that only one currency type can be defined per rate card. Therefore, the insertion order's currency type cannot be modified.
- Aptify automatically updates the order's General Ledger (GL) level in the Order Level field with the Advertiser's GL Order Level (if different from the default).
- Configure the other tabs and fields of the insertion order as necessary and then save the record. See Saving an Insertion Order for details.
Selecting Display Advertisement Features for Pricing
The pricing section of the General tab, labeled "Pricing Based on Color, Size and Position," lets you pick the advertisement features as they are defined in the rate cards to populate the pricing section. These fields become available once the Product Issue field is populated.
- Select from the list in the Size field to choose from the available sizes. Only sizes with the previously selected color scheme are available. After a size code is selected, the Position field becomes active.
- Select from the list in the Color field to choose from the available color schemes. Only color codes that are defined for a specific product issue in the Rate Cards records are available. After a color code is selected, the Size field becomes active.
- Select from the list in the Position field to choose from the available positions. Only advertising positions with the previously selected color scheme and size are available.
Once the color, size and position codes are selected, the Base Rate from the Rates record that matches the selected combination populates the pricing fields in the pricing section of the General tab.
Selecting Classified Advertisement Features for Pricing
The pricing section on the General tab, labeled "Pricing Based on Color, Size and Position," can also determine if the advertisement is for a classified advertisement. By selecting the codes that were defined for the classified ads, the correct rate card can be used to determine the price of the classified ad.
- Once the color, size, and position codes for a classified advertisement have been chosen, select the Ad Caption tab on the form to select the advertisement product section. The Product Section record defines where the advertisement will display in the product.
- In the Product Section field, enter the specific classified advertisement section. Only the sections that are listed under the previously selected position code are available.
Creating a new Products Sections record from an insertion order will not properly link the section to the publication. Therefore, the hyperlink functionality is disabled for the Product Sections field on Advertising Insertion Orders records to ensure that sections are not created directly from an insertion order. - In the blank space below the Product Sections field, enter the text for the classified advertisement. The text entered determines the cost of the advertisement based on the unit count.
- The Units Count field indicates how many units of text have been entered in the above text space. The unit count is based on the unit definitions listed on the Rate Card Rates record.
- The Pricing section on the General tab is now updated to show the current cost of the classified advertisement based on the base rate in the rate card and the amount of text listed on the Ad Caption tab.
Ad Caption Spell Check Feature
A spell check feature is available to check the spelling of the classified advertisement text entered on the Ad Caption tab. To run a spell check at anytime, simply right-click within the advertisement text field and select the Spell Check option from the context menu.
Ordering Advertising Options
- Create an Advertising Insertion Orders record as described in Creating an Advertising Insertion Order. Remember you must select a product issue and the correct combination of color, size and positions codes to use the rate card that has advertising option products attached to it, otherwise no advertising option products will be available.
- Before saving the order, select the Advertising Options field label (it is highlighted in blue). The Rates record used is based on the advertising product selected in the Product Issues field and the color, size and position codes selected on the insertion order. It is this Rates record that determines which advertising options products are available to the advertiser. These options appear in the Advertising Insertion Order Options dialog box.
- Select the option product(s) the advertiser wishes to purchase by clicking in the Selected column for the desired available product(s) listed in the Advertising Insertion Order Options dialog box.
: - If the option product selected is a product associated with an entity, such as the blind box, double-click on the option product record in the dialog box to open the Advertising Insertion Options record. If the option product is not associated with an entity skip to step 7 and continue.
- Click the Record field's label (it is highlighted in blue) to open a new record from the product's associated entity. For example, if the option product is associated with the Advertising Blind Boxes service, a new Advertising Blind Boxes record opens.
- Enter the required data in the option product's entity record. The data entered on this form may vary depending on which entity the advertising option is associated. The following steps are for entering data into an Advertising Blind Boxes record.
- Enter a name in the Name field to identify the advertising blind box.
- Enter contact information to identify where responses to the ad's blind box should be sent.
- Click OK to save and close the new entity record, in this case the Advertising Blind Boxes record.
The record you just created automatically populates the Record field on the Advertising Insertion Order Options record.
- Modify the values in the Quantity and Price fields, if applicable, on the Advertising Insertion Options record for that option product.
An option type of Yes/No only allows for price modification in the Price field and an option type of Quantity allows for price and quantity modifications in the Price and Quantity fields. Note that the ability to modify the price requires that the option's Products record allows price overrides. - Click OK to close the Advertising Insertion Options record.
- Click OK in the dialog box to save and close the Advertising Insertion Order Options dialog box. The Option Amount field on the Insertion Order now displays the total cost of the option products ordered and the Grand Total field on the insertion order displays the total cost of the advertising product and advertising options for the insertion order.
Overriding the Quote Amount
The Quote Amount field may be overridden by the user to encourage a sale or make a special deal without using the predefined rate schedules.
- To override the quoted price and discount (if any), select the Price Override option located at the bottom of the pricing section. Selecting the Price Override option activates two fields, the Price Override Reason field and the Quote Amount field.
- In the Price Override Reason field, select from the list the valid reason defined during the setup stage that best represents the reason for the price override.
- In the Quote Amount field, enter any price to replace the calculated quote. As you tab away from the field, the other pricing fields update accordingly. The Discretionary Discount also updates automatically to display the difference between the grand total for the original quote amount and the new quote amount.
Including a Discretionary Discount
As an alternative to overriding the price, a user may enter a discount amount in the Discretionary Discount field, that reduces the price in addition to any other discounts due to the rate card's Agency Discount field. This discretionary discount and any applicable agency discount are applied as a discount percentage to the advertising product's order line on the generated order.
- In the Discretionary Discount field, enter an amount to further discount the quoted amount.
- After entering a discretionary discount and tabbing away from the field, the totals update to include the new discount.
Discounts and Commissions
One of the features of the Advertising module is that it ties in with the Aptify Commission & Royalty Management application. Since the Advertising module requires tracking Sales Representatives for each contract, commissions for each contract can be assigned to each sales representative as well. Because each organization may have different business rules regarding paying commissions on discounted amounts, the Commission Discretionary Amount option gives the organization the option to choose whether the discounted amount is included or excluded when calculating the sales representatives commission.
If applicable, select the Commission Discretionary Amount option to indicate that the amount listed in the Discretionary Discount field is to be included with the total amount when calculating the commission for the sales representative.
Sales Representative Tab
Aptify automatically adds the sales representative information from a corresponding Advertising Contract to an Advertising Insertion Order. A user can modify this information on the insertion order as necessary.
Production Tab and Miscellaneous Fields
The fields on the Production tab include space for any special instructions about the materials provided and positioning instructions. These are optional fields.
The miscellaneous fields on the insertion order form include the number of tear sheet and proof copies the advertiser wishes to receive before running their advertisement. These fields are optional. See Advertising Insertion Orders Form for more information on the fields that appear on an insertion order.
Note that the Taken By field auto-populates with the employee's record from the Employees service and is required to save the Insertion Order and create the associated Orders record.
Saving an Insertion Order
Saving an Advertising Insertion Order can result in one of three scenarios depending on the order status in the Status field. One status just saves the insertion order. Another status saves the insertion order and then creates a regular Orders record. Finally and another status saves the insertion order and then creates a cancellation Orders record. Additionally, insertion orders create two scheduled transactions that move the sales account monies received to a deferred account since the advertising products are typically deferred income products. See Understanding Advertising Management Insertion Order Accounting for more information on the accounting issues for scheduled transactions.
Note
If the advertiser or the contact does not have an approved credit or enough credit to place an order, the insertion order cannot be saved. A message notifies the user that at that point in time the advertiser or agency does not have an approved credit status.
Saving a Verbal Insertion Order
To save an insertion order with a verbal status, make sure the insertion order Status field is marked as "Verbal" and click OK.
The Advertising Insertion Orders record saves and is then ready to have its order status upgraded or cancelled.
When the verbal insertion order's status is ready to be upgraded to quote or cancellation, the user can reopen the verbal insertion order and change the status to "Quote" or "Cancelled."
Saving a Quote or Approved Insertion Order
Orders records are created when saving an Insertion Order that has a status of "Quote" or "Approved." The Advertising module generates the Orders record automatically, preventing the user from having to jump to the Orders service to create an Orders record and repeating much of the same information already listed in the Advertising module.
Orders and Insertion Orders
For data integrity purposes, users should only use the Insertion Orders record to update any details pertaining to the order. If a user opens the Orders record to change the status of the Order (for example, ship the order from the Orders record), add a new product, or to update information like quantity, pricing, discounts, or payments, the insertion order will not be updated when the Orders record is saved. To make any changes in the Orders record, they must be made in the Insertion Orders record and then saved. The Orders record should never be updated directly when it pertains to information that affects the data integrity of advertising products.
To specify a Purchase Order number for the order(s) generated for this insertion order, click the Bill To tab and enter the number in the PO Number field.
- To generate an Orders record that has a "Taken" status, select Quote in the Status field on the Insertion Order, and select Save.
- To upgrade the Orders record status from "Taken" to "Shipped," open the Insertion Order, change the value in the Status field of the insertion order from Quote to Approved, and select Save. To change the status insertion order to Approved, the original insertion order must first have a status of Quote.
- The Insertion Orders and the Orders record are saved with the new statuses. To see which Orders record is associated with the Insertion Orders record, view the Multiple Bill To record located on the Bill To tab.
Specifying Payment Type and Due Dates for Purchase Orders
Insertion orders generate Orders records with a payment type of Purchase Order. The Advertising Insertion Orders entity has the ability to control the Purchase Order payment type that is specified on the Orders record as well as the date populated in the Due Date field on the Orders record. These are configurable attributes located in the Advertising Insertion Orders entity and can be accessed and modified by your system administrator as needed. Below is a description of each attribute:
- PurchaseOrderPaymentTypeID: The Purchase Order payment type record (by ID) to be specified on the Orders record. The default value for this attribute is 1. Note that the ID specified must have a base type of Purchase Order to generate the proper type of payment information on the Orders record.
- DueDatePeriod: Specifies the Due Date on the Orders record. Having the ability to modify the value in this attribute provides the flexibility to automatically set the Due Date to a specific number of days after the Orders record is created. The current default setting for this attribute is 30. This sets the Due Date field to 30 days after the day the Insertion Order was saved with a status of Quote.
Billing Multiple Persons
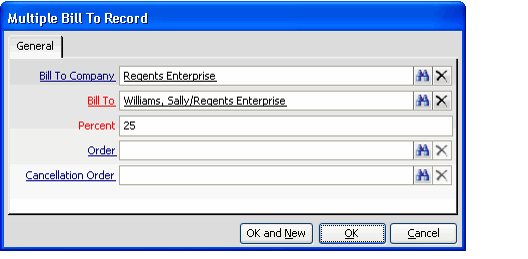
The Bill To tab plays an important role in enabling an organization to bill multiple parties a portion of a single insertion order. By adding specific persons to the Bill To tab and designating the percentage of the order they are billed, an Orders record for each Multiple Bill To record is created. To create multiple Orders records, the Multiple Bill To records must be created before an insertion order is saved with a status of Quote. Therefore, if an order is saved first with a status of Verbal, the Multiple Bill To records can be added to the sub-tab before the status of the insertion order is changed to Quote. To add a Multiple Bill To record to an insertion order, do the following:
- Open a new Multiple Bill To record from the Bill To tab on an Advertising Insertion Orders record.
- In the Bill To Company field, enter the name of the company from the Companies service who is to be billed for a portion of the advertisement.
- In the Bill To field, enter the name of the person from the Persons service who is to the contact for this insertion order.
Designate the portion of the advertisement cost to bill the person/company in this record by entering a percentage amount in the Percent field. Use a whole number since the field stores it as a percentage. For example, the module interprets 50 as 50% and .50 and .5%.
Note
When adding persons/companies to the Multiple Bill To tab, the total percent of all the records must equal 100%. An error message alerts the user if the total does not add up to 100%. The record cannot be saved until the percentages total 100% so all parties can be billed correctly.
- Click OK to save the record.
- Repeat steps 1 through 5 for each person/company that share in the payment for the insertion order.
- Modify the Bill To percentages as necessary so they add up to 100.
Note
When the Insertion Order is saved with a status of "Quote," each Multiple Bill To record for that insertion order is locked. All fields in the Multiple Bill To form become read-only and cannot be changed, nor can any record be added. Additionally, the Order field in each Multiple Bill To record is populated with its corresponding Orders record.
Adjustments History
Each time a change to the discretionary amount or the quote amount fields is made and the Insertion Orders record is saved, an Adjustments History record is added to the Adjustments History tab. These records show the date the adjustment was made, the old and new price amounts, and who made the adjustment. These records are for viewing the audit trail of the insertion order price and quotes and cannot be edited or created from the Adjustments History tab. The Adjustment History tab is supplemental to the standard record history feature to show just the audit trail of the price and quote changes.
Posting Payments from the Insertion Order
Orders that are created from the Insertion Orders records initially have a payment type of Purchase Order. A purchase order payment type requires an approved credit status in order to process the order. Payments are posted from the Advertising Insertion Orders record to update the Orders record with a corresponding Payments record.
Making a Payment on the New Insertion Order
When creating a regular Orders record, payment information is generally filled in at the time the order is saved. However, when creating an insertion order and saving it as Quote, the system only generates the Orders record; it does not automatically create payment information. To make a payment on the insertion order, do the following:
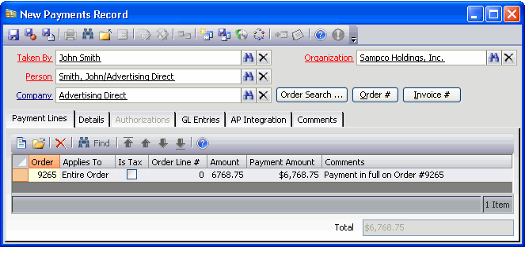
- Select the Post Payment button on the Bill To tab of an Insertion Order with a status of Quote or Approved to open a pop-up window listing all of the Multiple Bill To records that still have balances.
- Select and double-click the desired Multiple Bill To record to open a new Payments record for that bill to person/company.
The new Payments record is populated with almost all the required information from the Insertion Orders record and Orders record. Additionally the payment line defaults to a full payment. To post a full payment, skip Step 3.
.
- To post a partial payment, double-click on the payment line to open the pre-populated payment line and modify the amount and comment as necessary. Click OK to save and close the payment line.
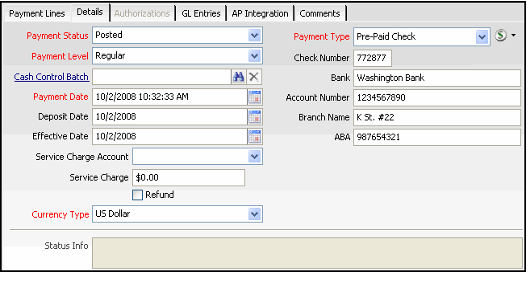
- Select the Details tab of the new Payments record and select the payment method. Options may include Pre-paid check and Credit Card. Enter the rest of the payment information and select Save and Close to finish creating the full or partial Payments record.
- Repeat steps 1 through 4 for each Multiple Bill To record requiring a payment.
Cancelling an Insertion Order
Depending on the status of an Insertion Order, the cancellation process works as follows for the various insertion order statuses:
Cancelling Verbal Insertion Orders
To cancel a "Verbal" Insertion Order, change the "Verbal" status to "Cancel" and click Save.
The Insertion Order is now locked down from any other entry and the verbal in-sertion order is cancelled and today's date appears in the Cancelled Date field. Because verbal insertion orders do not generate an order, a cancellation order is not created.
Cancelling Quote or Approved Insertion Orders
To cancel a "Quote" or "Approved" Insertion Order, simply change the "Quote" or "Approved" status to "Cancel" and click Save.
Upon saving, the Insertion Order generates a cancel order and the Cancellation Order ID field in the Payment section populates with the cancellation order's ID number. Orders that are marked as "Taken" are first changed to "Shipped" and saved, and then the cancellation order is created.
By saving the insertion order with the new cancelled status, the system automatically populates the Cancelled Date field with the date the cancellation order is created.
Placing an Insertion Order On-Hold
Changing an insertion order's status to "On-Hold" does not create a cancellation order. Rather it flags the insertion order as a possible cancel. Since cancelling an order cannot be reversed, it is wise to place an insertion order with a status of "Quote" or "Approved" on-hold first before cancelling the order. It is not necessary to place a "Verbal" insertion order on-hold since there is no corresponding Orders record for that insertion order.
