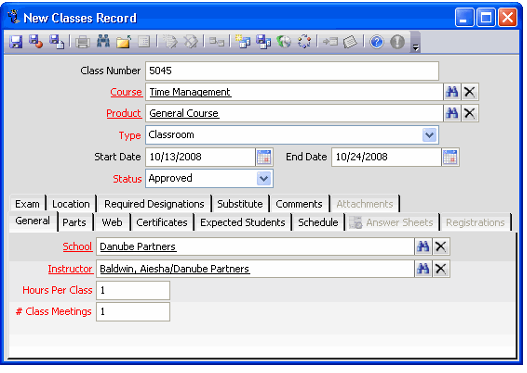
Creating a Class Type Class
Follow these steps to create a new class type Classes record for a class type course:
- Open a new record from the Classes service.
- Enter an identifying Class Number for this course.
- Generally, an organization uses a class number to identify each class of the same course. The field is not a required field, but Aptify strongly suggests that you enter an identifying number.
- Generally, an organization uses a class number to identify each class of the same course. The field is not a required field, but Aptify strongly suggests that you enter an identifying number.
- Select or enter the Course name.
- You may create a new Courses record from this hyperlink, but it is generally recommended that Course records be created before Class records. See Creating Courses for more information on creating Courses.
- You may create a new Courses record from this hyperlink, but it is generally recommended that Course records be created before Class records. See Creating Courses for more information on creating Courses.
- By default, the Product for the selected Course flows down to the Class automatically. You can change this if necessary.
- If the Course you entered does not have an associated Product, then you must specify a Product before you can save the Classes record.
- This is the product that is ordered when a student registers for this class. You can specify a class-specific product or a more general course product.
- The Product Type for the product you specify will determine which method you can use to create Class Registrations (using the Wizard or from an Order). See Creating a Product to Associate with Courses and Classes for details.
- In the Type field, select one of the following options: Classroom, At Work, Independent Study, or Internet to describe the class setting.
- Specify the Start Date and the End Date for the Class, if applicable.
- For example, you may not want to specify Start and End Dates for Web-based online courseware that can be completed at any time convenient for students.
- For example, you may not want to specify Start and End Dates for Web-based online courseware that can be completed at any time convenient for students.
- Select the current Status for the Class from the options in the drop-down list.
- The options are Pending, Approved, Rejected, Cancelled, and Completed. The default is Approved.
- This field lets class administrators track the status of a particular class, but it does not impose validation for class registrations (in other words, the system does not prevent a user from registering a student for a Pending, Rejected, Cancelled, or Complete class). However, Web users can only register for Approved classes on an e-Business website.
- On the General tab, select or enter the School that is offering the course.
- You can only select or enter a school that appears on the Courses record's Schools tab.
- You can only select or enter a school that appears on the Courses record's Schools tab.
- Enter or select the name of the Instructor.
- If the Courses record indicates that the instructor needs to be a registered instructor, then you can only enter one of these registered instructors in this field. (The registered instructors are specified on the Courses record's Instructors tab.)
- If you select an instructor whose Status is not Active, the system generates an error message letting you know that this instructor is not currently active when you attempt to save the Classes record.
- Enter the time length of each class meeting in the Hours Per Class field.
- Enter the number of meetings the class plans to hold.
- You may enter a number here, but be aware that if you plan to detail each meeting's location or agenda, the number entered will be overridden by the number of Class Schedule records entered on the class's Schedule tab.
- You may enter a number here, but be aware that if you plan to detail each meeting's location or agenda, the number entered will be overridden by the number of Class Schedule records entered on the class's Schedule tab.
- Click the Location tab and enter the address for the location where the class is being held.
- Save the Classes record.
- The Course Parts specified on the Courses record automatically flow down to the Class but you can modify this information, as necessary. See Specifying Class Parts.
- The Course Parts specified on the Courses record automatically flow down to the Class but you can modify this information, as necessary. See Specifying Class Parts.
- Configure the other tabs of the Classes record, as described in the following sections:
Copyright © 2014-2019 Aptify - Confidential and Proprietary
