Installing the Fundraising Management Module
The Fundraising Management application is an add-on module for Aptify 6.0. Therefore, it is not included in the standard Aptify system and must be installed separately.
Follow these steps to install the add-on application:
- If you have received a CD from Aptify, insert the installation CD into the computer's CD-ROM drive and copy the files to a location on the computer. Otherwise, download the installation ZIP file to a folder on the computer and unzip its contents.
- You can run the installation from any computer on the network as long as the user has permissions to the computer hosting the SQL server.
- Do not run the installation program from a CD (if one was provided). If you have a CD, copy the files locally and then run the installation. The installation program writes to files in the installation folder, which is not possible if run from a CD.
- Run the installation program locally on the computer; do not run it over the network.
- Close the Aptify desktop application on the computer, if currently running.
- Run Setup.exe to launch the installation program.
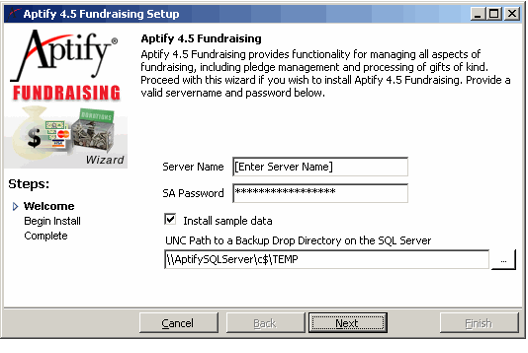
- Enter the name of your Aptify server in the Servername field.
- Enter the sa password for the server in the SA Password field.
If you are installing this module on a server for testing and demonstration purposes, leave the Install sample data selected. If installing this module on a production server (or if you do not want to install the sample data), clear the Install sample data option.
Only select the Install sample data option if you installed the sample CRM data on the Aptify server during initial installation since there are dependencies between the Fundraising sample data and the CRM sample data. Also, for best results when using sample data, you should run the add-on installation -immediately after installing the Aptify server and CRM sample data.
- If you left the Install sample data selected, enter a location on the SQL Server to which your user account has read/write access. You must enter the location's path in the UNC (Universal Naming Convention) format.
- During installation, the installer copies a database backup file that contains the sample data to the location you specify on the server.
- During installation, the installer copies a database backup file that contains the sample data to the location you specify on the server.
- Click Next to continue.
- Click Next to begin the installation of the add-on module.
- Click OK when prompted that the installation is complete.
- If you want to review the details of the installation process, click the View Install Log button to open the Aptify Session Exceptions viewer, which reports any messages recorded during the installation. Otherwise, click Finish to close the installer.
Copyright © 2014-2019 Aptify - Confidential and Proprietary
