Setting Up Aptify to Use SQL Server Reporting Services
This topic describes how to configure your SQL Server 2012 environment to support SSRS reports.
Pre-requisites
- SQL Server 2012 or higher
- Reporting Services Configuration Manager and Reporting Services
- These are additional features that you may or may not have installed when originally configuring your SQL Server as shown below. See the Microsoft Developer Network documentation for the Reporting Server Configuration Manager and Reporting Services for more information:
https://msdn.microsoft.com/en-us/library/ms156305(v=sql.110).aspx
https://msdn.microsoft.com/en-us/library/ms173745(v=sql.110).aspx
- These are additional features that you may or may not have installed when originally configuring your SQL Server as shown below. See the Microsoft Developer Network documentation for the Reporting Server Configuration Manager and Reporting Services for more information:
Steps
- Launch the Reporting Services Configuration Manager from your database server. Specify the Server Name and Report Server Instance.
- If you have not configured your instance of SQL Server to use Reporting Services or if the service is not currently running, you will not be able to select a Report Server Instance. See the product documentation for your particular version of SQL Server for more information.

- If you have not configured your instance of SQL Server to use Reporting Services or if the service is not currently running, you will not be able to select a Report Server Instance. See the product documentation for your particular version of SQL Server for more information.
- Select Service Account from the tree.
- Check User built-in account and select Network Service from the drop-down.
- Using the User built-in account option makes local admin administrators in the Report server and the only admins. That is, local admin will be able to manage reports and make changes to the server (i.e. add permissions for users, etc.) You can change who has access to the Report later on.
- Using the User built-in account option makes local admin administrators in the Report server and the only admins. That is, local admin will be able to manage reports and make changes to the server (i.e. add permissions for users, etc.) You can change who has access to the Report later on.
- Click Apply.
- Select Web Service URL from the tree.
Enter the Virtual Directory as SSRSReportServer (or a different name of your choosing).
If you did not specify a directory or the directory you specified does not exist, you will need to click Apply before continuing to the next step.
- Click the Advanced.. option.
- You may have to click Apply or exit out of the Reporting Server Configuration Manager and re-launch it before the Advanced... option is enabled.
- For web servers that will be available on the public Internet, we recommending securing the site using HTTP over a Secure Socket Layer (SSL) to create an HTTPS site. The default installation of the Aptify web requires SSL.
- In the Multiple SSL identities for Report Manager section, click the Add button and select the certificate from the certificate drop-down. The Default SSL Port is 443.

- Click OK and then OK again to close the Advanced.. dialog.
- Click on Apply (if needed, clicking OK on the Advanced... dialog may automatically start the URL creation process).
- Select Database from the tree.
- Click Change Database and select Create a new report server database.
- In versions prior to SQL Server 2014, you may be able to select the Create a new report server database option directly.
- In versions prior to SQL Server 2014, you may be able to select the Create a new report server database option directly.
- Click Next.
- In the Database Server setting, you can select Integrated Security SQL Server Account as the Authentication Type depending on your organization's needs.
- You can click Test Connection to make sure the authentication type you select can connect successfully. If using Integrated Security, the domain user in which you have logged into the database server must have a valid user in the Aptify database.
- You can click Test Connection to make sure the authentication type you select can connect successfully. If using Integrated Security, the domain user in which you have logged into the database server must have a valid user in the Aptify database.
- Click Next.
- Enter the database name as ReportServer and click Next.
- Enter the credentials of an existing account that the report service will use to connect to the report server database.
- Click Next.
- Review the Summary screen and then click Next to complete the process and then Finish.
- You may need to click Apply to apply the changes.
- You may need to click Apply to apply the changes.
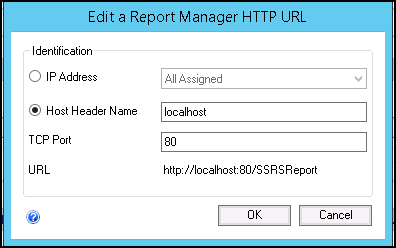
- Select Report Manager URL from the tree. Enter the Virtual Directory Name as SSRSReport.
- Click Apply.
- Click the Advanced... option.
- In the Multiple identities for Report Manager section, click Add to add the localhost URL.
- Click OK.
- In the Multiple SSL identities for Report Manager section if not already added, click the Add button and select the certificate from the certificate drop-down. The Default SSL Port is 443.
- Click OK.
- You should now be able to use both http and https for SSRS reporting.
- You should now be able to use both http and https for SSRS reporting.
- Open the rsreportserver.config file and make sure the SecureConnectionLevel key is set to 0.
- When running SQL Server 2014, this file is found in C:\Program Files\Microsoft SQL Server\MSRS12.MSSQLSERVER\Reporting Services\ReportServer by default.
- When running SQL Server 2012, this file is found in C:\Program Files\Microsoft SQL Server\MSRS11.SQL2012\Reporting Services\ReportServer by default.
- From a Browser, open the Report Manager URL (for example, https://servername.domain/SSRSReport).
- When prompted, enter the username and password of a user who has administrative rights to report server.
- If you used the Use built-in account option, only accounts with administrative rights locally to the database server or with role-based administrative rights to the report server itself can access the report manager.
- If you used the Use built-in account option, only accounts with administrative rights locally to the database server or with role-based administrative rights to the report server itself can access the report manager.
- Select New Folder and create a folder called Reports (will store the SSRS reports).
- Select New Folder again and create another folder called DataSource (will store the data sources that will be used to connect between your reports and the Aptify database).
- In the Reports folder, click Upload File to upload the sample reports provided by Aptify (Invoice.rdl and PersonRoster.rdl) and any other reports you want to add.
- The sample reports included in Aptify 5.5.4 are stored as objects in the Aptify Object Repository. You can obtain these reports by downloading them from the object repository.
- Additional steps are required to add new reports to Aptify. See Adding Reports to an Entity for more details.
- Navigate to the DataSource folder and click New Data Source and complete the steps below to create a data connection between the report and the Aptify database:
- Enter a name for the Data Source
- This can be shared across multiple reports.
- This can be shared across multiple reports.
- Select Datasource type as Microsoft SQL Server
- Add the connection string: Data Source=databaseserverinstance;Initial Catalog=Aptify
- Select an authentication method, based on your organization needs, Windows Integration is recommended.
- Click Test Connection to make sure the connection is successful.
- Click Apply

- Enter a name for the Data Source
- To apply the new data source to the uploaded reports, navigate to the Reports folder, make sure you are in Detail View, and select Manage from the drop-down for the report you want to manage.
- Click the Data Source tab, select A select shared data source and browse to the data source you created in the previous steps.
- Click Apply.
If you want other users to at least open reports, you need to provide the appropriate security rights using the steps below. The following steps illustrate how to add trusted domain users so they can access reports.
- Click on Site Settings in the top-right corner and go to Security tab.
- Click on New Role Assignment and enter NT AUTHORITY\Authenticated Users in the group or username text field
For end users who are only viewing reports, select System User as the role and then Click OK.
If a user is required to provide administrative rights, you will need to assign System Administrator rights to that specific user
To apply the new security updates to the uploaded reports, navigate to Home and select Security from the Folder drop-down.
- Click on New Role Assignment and enter NT AUTHORITY\Authenticated Users in the group or user name text field.
- Check the appropriate options (like Browser and My Reports) and click on OK.
Verifying SSRS Report Run in Aptify
- Log into Aptify desktop and navigate to the Object Repository Objects service.
- Open the objects for each report you added (in our case, the sample reports PersonRoster_SSRS and Invoice_SSRS) and verify that the Download Path is correct. The path should be something like: https://<ServerName>/<SSRSServerName>?/<ReportsFolderName>
- If you specified a Report Path in the Aptify 5.5.4 setup, the Download Path will already be populated. Verify it is correct based on how you set up your SQL Server Report Server.
- If you specified a Report Path in the Aptify 5.5.4 setup, the Download Path will already be populated. Verify it is correct based on how you set up your SQL Server Report Server.
- Once you have verified the path is correct for all reports, close and re-open the Aptify desktop as an end user and make sure you can run the report from an appropriate view.
- The desktop client must have the SSRS CLR and Report viewer runtimes installed. See the Installing Aptify 5.5.4 Server Software for more details.
- The desktop client must have the SSRS CLR and Report viewer runtimes installed. See the Installing Aptify 5.5.4 Server Software for more details.
- If you are using Aptify web, you will need to restart the application pool for the SOA user (typically Aptify_SOAWeb) before reports can be viewed by users through the web interface.
- The above steps is sufficient when making changes to an existing report's object repository records. However, when adding a new report (which require a brand new object repository record), you must run the Object Repository Synchronizer utility to update your web server's bin folders so it has the latest Aptify objects. You can also manually add the object to the bin as needed. See Running the Object Repository Synchronizer for more information.
Copyright © 2014-2019 Aptify - Confidential and Proprietary