Adding Reports to an Entity
- admin (Deactivated)
When a user launches the Report wizard from a view, the wizard displays the list of reports associated with that view's service. These reports may be in various formats, such as Crystal Reports or Microsoft SQL Server Reporting Services, and are defined and linked to the entity through the Reports tab of the Entities form.
Follow these steps to add a new report to an entity:
- Obtain the report you want to add to Aptify from the report writer. Aptify supports both Crystal Reports and Microsoft SQL Server Report Services (SSRS).
- When writing Crystal reports:
- Aptify integrates with Crystal Reports 2008 with backward compatibility to Crystal Reports 9. Note that if using Crystal Reports XI, you need version XI R2.
- Business Objects offers several versions of Crystal Reports but the Standard version is all that is needed to integrate with Aptify.
- Alternatively, you can use the version of Crystal Reports included with Visual Studio.
- When writing reports using SSRS:
- Visual Studio includes an add-on tool (SQL Server Data Tools – Business Intelligence (SSDT-BI)) to write reports.
- Visual Studio includes an add-on tool (SQL Server Data Tools – Business Intelligence (SSDT-BI)) to write reports.
- When writing Crystal reports:
- Make sure the report is added as an object in the Aptify Object Repository. See Creating Object Repository Objects for more details.
This location in which reports are found in the repository varies from organization to organization. If using the Aptify sample dataset, the location for the sample Crystal Reports is Production > CRM > CrystalRPT or Production > DataModules > CrystalRPT.
Note Concerning Running Reports in Aptify Web
When adding a new report (which require a brand new object repository record), you must run the Object Repository Synchronizer utility to update your web server's bin folders so it has the latest Aptify objects. You can also manually add the object to the bin as needed. See Running the Object Repository Synchronizer for more information.
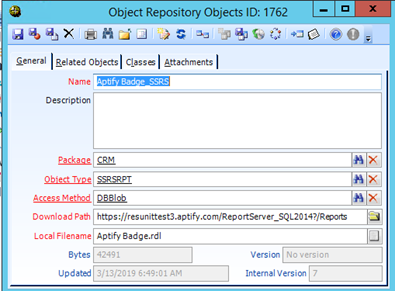
For the location for the sample SQL Server Reporting Services (SSRS) reports is Production > CRM > SSRSRPT or Production > DataModules > SSRSRPT.
SSRS report entries in the Object Repository should point to the Report Server URL (such as https://<ServerName>/<SSRSServerName>?/<ReportsFolderName>), which you can specify when installing 5.5.4, as described in Installing Aptify 5.5.4 Server Software. See Setting Up Aptify to Use SQL Server Reporting Services for information on setting up SSRS after installation.
- Launch Aptify with a user account that is a member of the Administrators group.
- Open the Entities record for the entity to which you want to add a report.
- Click the Reports tab.
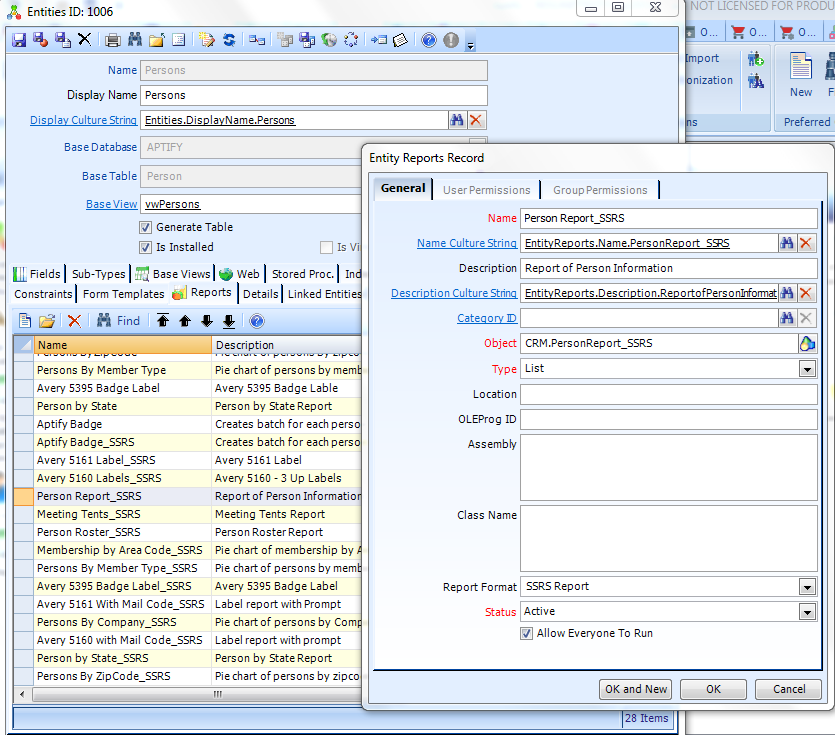
- Open a new Reports sub-type record.
- Enter the report name and a description in the Name.
- Enter a culture string to use as the display name of the report in the Display Name Culture String field if you want to localize the name of the report on a user-by-user basis (based on a user's assigned Culture). See Working with Culture Strings for details.
- Enter a description of the report in the Description field.
- Enter a culture string to use as the description of the report in the Description Text Culture String field if you want to localize this report's description on a user-by-user basis (based on a user's assigned Culture). See Working with Culture Strings for details.
- Enter a category in the Category ID field, if applicable.
- This field links to the Report Categories service. See About the Report Categories Form for details.
- If you leave the Category ID field blank, the report will appear under the Report wizard's General tab.
- If you enter a name in the Category ID field, the report will appear in the Report wizard under a tab labeled with the specified category's name. For example, if you enter Membership in the Category ID field, the report will appear under the Report wizard's Membership tab.
- Note that if you enter an existing category that belongs to another entity, Aptify will automatically create a new Report Categories record with the same category name assigned to the current entity.
- Click the icon to the right of the ObjectName field to open the Object Repository selection dialog.
- Browse to the location where your organization stores reports in the Object Repository.
This location varies from organization to organization. If using the Aptify sample dataset, the location for the sample Crystal Reports is Production > CRM > CrystalRPT or Production > DataModules > CrystalRPT, and the location for the sample SQL Server Reporting Services (SSRS) reports is Production > CRM > SSRSRPT or Production > DataModules > SSRSRPT.
- Select the report file and click Open.
- If the report has not yet been added to the repository, click New, which opens a Windows file selection dialog, and browse to the location of the Crystal Report or SSRS file. Select the file and click Open. Then double-click the name of the report you just added within the Object Repository dialog. See Creating Object Repository Objects for details.
- This returns you to the Reports sub-type record and fills in the report name and location within the Object field.
- Enter the report's type in the Type field (typically, List).
- Active Data Driver (1): The source for this report is a Crystal Reports Data Definition (TTX) file or SSRS.
List (2): This is the most common list type in Aptify. It corresponds to a list-based Crystal Report. When this option is selected, the list report generates a List within Aptify before displaying the report results.
List (2) should be selected when you are adding a Crystal Report or SSRS report to an entity.
- Standard (3): A standard report is not based on a List; the report is responsible for requesting any parameters from the user within the Report wizard.
Custom Report (4): A custom report corresponds to a special report type that requires that an object be created by a developer. See the next step for additional information.
- If you adding a Custom Report, complete the following fields as necessary. (Note that the Location field is reserved for future use.)
- OLEProgID: If the object that implements this report is a COM DLL, enter the name of the class that implements this report.
- Assembly: If the object that implements this report is a .NET assembly, then enter the name of the assembly in this field.
- Class Name: If the object that implements this report is a .NET assembly, enter the name of the assembly class that implements this report.
- If your environment is running Aptify 5.5.4, perform the following steps:
- If you are adding a Crystal Report or SSRS report, select the appropriate format from the Report Format drop-down list. The available formats are Crystal Report and SSRS Report.
- Specify whether the report should appear in the Status field by selecting Active or Inactive.
- If you want this report available to all users, select the Allow Everyone To Run option. Clearing this option means that the report is available to those users that have the appropriate permissions for the entity.
")
- Click OK.
- Confirm that the new report has been added to the entity's Reports tab.
- Save and Close the entity.
- Close and reopen Aptify.
- If you do not close and reopen the client application, the report may not appear in the Report wizard due to system caching.
- If you do not close and reopen the client application, the report may not appear in the Report wizard due to system caching.
- Create or open a view for the service to which you just added the report.
- Click the Report Wizard icon in the View toolbar to launch the wizard.
- Select the new report and click Finish.
- The report loads.
- Review the layout of the report. Also, confirm that all of the records from the view appear in the report.
- Close the report.
Related topics
Related content
Copyright © 2014-2019 Aptify - Confidential and Proprietary