/
Running the Object Repository Synchronizer
Running the Object Repository Synchronizer
- admin (Deactivated)
Owned by admin (Deactivated)
Jan 30, 2018
Analytics
Loading data...
Perform the following steps to run the Object Repository Synchronizer Utility:
The Object Repository Synchronizer should be run after hours to ensure that current activities in the Aptify environment are not disrupted.
- Locate the Object Repository Utility.
- You can generally find the latest version of the utility included in the Utilities folder of the most recent Aptify release or service pack.
- Contact Aptify Technical Support if you cannot locate this file.
- Copy the utility's folder to the computer that contains the Object Cache that you want to synchronize (for example, if you want to update an e-Business bin folder, you should copy the utility to the web server).
- Be sure to retain the folder structure of the Object Repository Synchronizer utility, as shown below (the exe file, a config file and the bin directory).

- Be sure to retain the folder structure of the Object Repository Synchronizer utility, as shown below (the exe file, a config file and the bin directory).
- Double-click AptifyObjRepSynchronizer.exe to launch the utility.
- In the Login screen, enter the name of the Aptify database server in the Server field and specify the login credentials for a user in Aptify (such as sa or your trusted user account, if suitable).
- In the Welcome screen, use the ellipsis (...) button to the right of the Object Cache Folder field to browse to the Aptify folder (typically, this is C:\Program Files\Aptify 5.0).
- Note that the default path is the current folder from which you are running the application, so you need to modify this to point to the appropriate location.

- Note that the default path is the current folder from which you are running the application, so you need to modify this to point to the appropriate location.
- Select a Repository User from the drop-down list (such as sa or your trusted user account).
- Assuming that all of your users default to the same Object Context, you can specify any user of Aptify for this step.
- Assuming that all of your users default to the same Object Context, you can specify any user of Aptify for this step.
- Select the Synchronize All Objects option to download all objects from the repository.
- The tool also supports the option to Select Objects for Synchronization. When you choose this option, the tool displays the list of all objects available for download and lets you choose the ones you want to synchronize.
- This tool also supports specifying a list of objects to download through the Specify a Sync Repository Object Record option. An administrator can create a list (or multiple lists) of objects to download (or not download) through the Sync Repository Objects service, which can be selected from the Object Name drop-down list. See Creating a List of Objects to Download for more information.

- Click Next to continue.
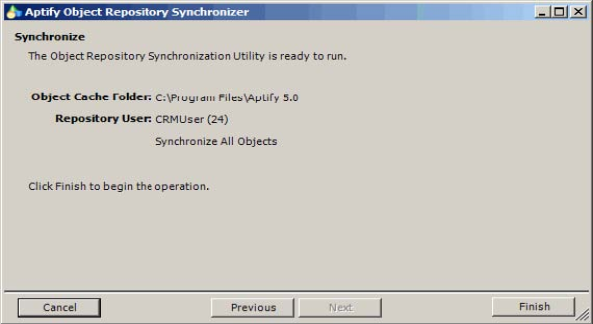
- In the Synchronize screen, review the summary information and click Finish to synchronize all of the objects.
- Depending on the number of objects, this process may take several minutes.
- Depending on the number of objects, this process may take several minutes.
- Click OK when prompted that the process is complete (this closes the tool).
, multiple selections available,
Related content
Creating a List of Objects to Download
Creating a List of Objects to Download
More like this
Automating the Synchronization Process
Automating the Synchronization Process
Read with this
Running the Object Repository Synchronizer
Running the Object Repository Synchronizer
More like this
Keeping the Object Repository Synchronized
Keeping the Object Repository Synchronized
Read with this
Maintaining Aptify Objects
Maintaining Aptify Objects
More like this
Installing Aptify 6.0 Server Software
Installing Aptify 6.0 Server Software
Read with this
Copyright © 2014-2019 Aptify - Confidential and Proprietary