Creating Process Components
New Process Component records may be created within Aptify to satisfy an organization's business-specific requirements. Each component is based on code stored within an object's class. New components require that new objects be written and compiled. The creation of this code is not covered in detail in this guide. The steps in this section describe how to create a Process Components record after the component has been written, compiled, and added to the Object Repository.
Note that Aptify automatically generates four process components (known as the CRUD (Create, Read, Update, amd Delete) components) each time you save a new entity or regenerate an existing entity in Aptify. See About the CRUD Process Components for details.
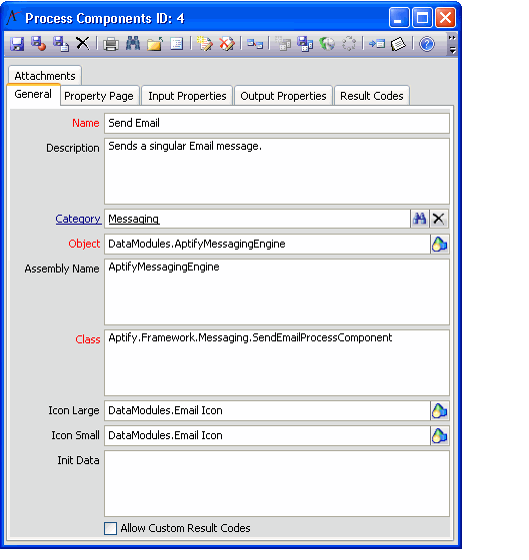
A sample Process Components record is shown in the figure below.
Follow these steps to create a new Process Components record:
- A developer writes the new process component. This document does not describe this development process in detail but provides the following guidelines:
- A new Process Component should implement the IProcessComponent interface (in the Aptify.Framework.BusinessLogic.ProcessPipeline namespace). See the Aptify Software Development Kit (SDK) for information on this interface.
- The component's project should include the following references:
- AptifyApplication
- AptifyExceptionManagement
- AptifyUtility
- AptifyProcessFlowEngine
- A Process Component utilizes a properties collection to handle input and output properties.
- A Process Component should always be designed without GUI elements, including message boxes.
- A new Process Component should implement the IProcessComponent interface (in the Aptify.Framework.BusinessLogic.ProcessPipeline namespace). See the Aptify Software Development Kit (SDK) for information on this interface.
- Add the process component's object file (obtained from the developer) to the Object Repository.
- See Creating Object Repository Objects for information on adding new items to the repository.
- See Creating Object Repository Objects for information on adding new items to the repository.
- Open a new record from the Process Components service.
- Enter a Name and Description for the component.
- Enter a Category for the component. This field links to the Process Component Categories Service.
- In the Object field, click the Object Repository button (the button to the right of the field) to select the Object Repository location of the process component's object.
- Enter the object's Assembly Name and Class in the fields provided.
- If desired, specify the icon that appears in a process flow designer for steps that use this component by entering an image in the Icon Small field.
- This field specify an image's location in the Object Repository.
- Note that the Icon Large field is not currently in use.
- See Navigating the Process Flow Designer for information on the process flow designer.
- If the component you have specified is generic in nature, specify any additional initialization information in the Init Data field.
- The CRUD components all use the same generic components. The system uses this field to identify a particular entity for the generic CRUD component. See About the CRUD Process Components for more information.
- The CRUD components all use the same generic components. The system uses this field to identify a particular entity for the generic CRUD component. See About the CRUD Process Components for more information.
- Save the record.
- Configure the Input Properties, Output Properties, Result Codes, and Property Page tabs as necessary in order for the component to function as intended. See the topics linked below for details.
- For the Input Properties tab, see Using the Generate Data Mapper Process Component Wizard.
- For the Output Properties tab, see Defining Process Flow Output Properties.
- For the Property Page tab, see Using the Generate Data Mapper Process Component Wizard.
- For the Result Codes tab, see Using the Web Service Process Component Wizard.
- Save and close the record.
Related content
Copyright © 2014-2017 Aptify - Confidential and Proprietary
