Registering for a Meeting Type Class
Follow these steps to register a student or students for a meeting type class using the Aptify Orders form:
- Open a new record from the Orders service.
- Enter Ship To and Bill To information on the Customer tab.
- This section provides only an overview of the order entry process. It is intended to focus on how ordering a class product differs from ordering a basic product. See Entering Customer and Order Information for complete information on how to specify customer information on an order.
- This section provides only an overview of the order entry process. It is intended to focus on how ordering a class product differs from ordering a basic product. See Entering Customer and Order Information for complete information on how to specify customer information on an order.
- In the Lines area of the Orders form, enter the meeting in the Find Product field.
- If ordering a meeting with sessions that are part of a product group, enter the product grouping instead. See Adding Sessions to a Meeting Product for more information.
- Typically, the same Products record is linked to a single Course and all of the Classes for that course. In this case, a user enters the Class product for the Course and then selects the specific class on the order line, as described below.
- Each Course and Class is linked to a Products record. See Creating Courses and Creating a Class Type Class for more information.
- Each Course and Class is linked to a Products record. See Creating Courses and Creating a Class Type Class for more information.
- In the Quantity field, enter 1.
- When creating more than one Class Registration, add a separate order line for each registrant. Create one order line with the class product for each registrant with a quantity of one.
- When creating more than one Class Registration, add a separate order line for each registrant. Create one order line with the class product for each registrant with a quantity of one.
Click Add to add an order line to the order.
A check for prerequisite classes is not performed for the student when a Class product is added to an order. If needed, an organization can configure the system to perform this check. Contact Aptify for assistance.
- If a meeting is booked when a new order is placed, Aptify prompts the order taker that the meeting has no space available and the attendee is put on the wait list. Within the Order Lines record, Aptify automatically sets the attendee's Status to Waiting.
- Note that a person on the Waiting List is not automatically moved to the Registrant list if a space opens up in the meeting. You need to re-assign the person manually or have your administrator set up business automation (such as using a Process Flow). See Managing Process Pipelines for details.
- If you specified a product grouping in the Find Product field, Aptify automatically adds all of the meetings and sessions specified in that grouping as separate order lines.
If you specified a product that has related sessions, Aptify displays a dialog that allows the order taker to select all or some of the sessions linked to that meeting as separate order lines.
The automatic pop up of the Order Line/Registration information can be enabled at the Product level on a per Product or per Category level.
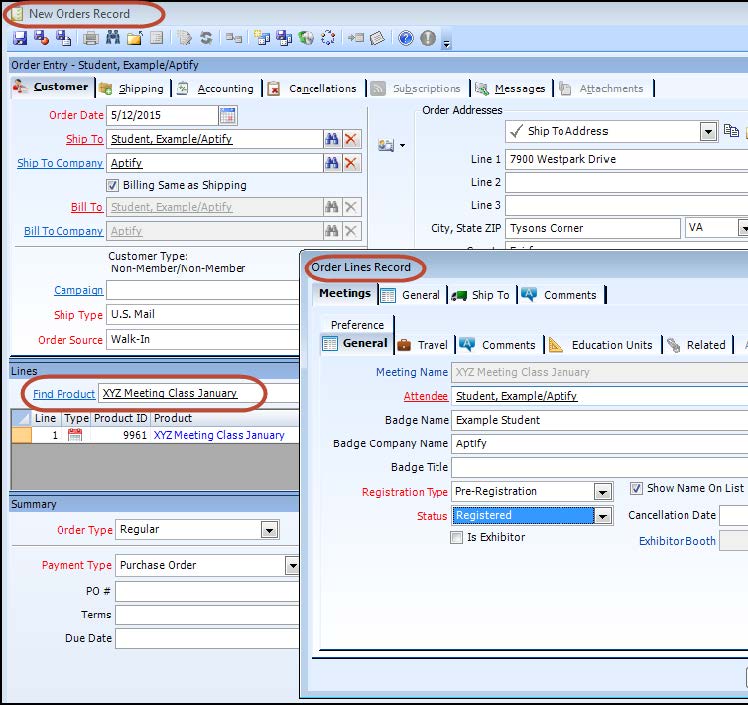
- Double-click in the gray area to the far left of a class order line to open its Order Lines record.
- Click the Class Registration tab.

- Enter the Class for which the student is registering.
- This step is required for all class registrations.
- Use the Find button to display the set of available classes. The Find dialog only returns those classes linked to the product you specified on the order.
- Modify the person who is registering for the class in the Student field, if necessary.
- On the General sub-tab, the Student field automatically populates with the Order's Ship To person.
- This is where you specify the class registrant. If a single order is for multiple class registrations, create one line item for each registration and edit the Student field to show the name of the appropriate class registrant.
- Enter or modify other registrant information as necessary.
- The Status field displays the student's status, including Pending and Registered. By default, all class registrations are set to Pending.
- The Status field displays the student's status, including Pending and Registered. By default, all class registrations are set to Pending.
- Specify any additional information on the other tabs of the Order Lines form.
- See Specifying Order Line Details for information on the Order Lines form and the configuration options that are common to all products. This section only describes the configuration options that are specific to class registrations.
- See Specifying Order Line Details for information on the Order Lines form and the configuration options that are common to all products. This section only describes the configuration options that are specific to class registrations.
- Click OK to save and close the Order Lines form.
- Continue processing the order as necessary (including adding other lines as needed).
- See Taking Orders for details.
- See Taking Orders for details.
- Save the order.
- If a meeting's Meeting Conflict field is set to Conflict Warning, the system reviews the registrant's current meeting registrations to determine if he or she is already registered for another meeting at the same date and time. If so, Aptify displays a warning message. A user can override this setting to ignore the conflict and create the meeting registration by clicking the Yes button.
- If a meeting's Meeting Conflict field is set to Conflict Prohibited, the system reviews the registrant's current meeting registrations to determine if he or she is already registered for another meeting at the same date and time. If so, Aptify displays a warning message. However, in this case, the user cannot override this setting to ignore the conflict. The order cannot be saved with the conflicting meeting registration.
- See Using the Meeting Conflict Checker for more information on meeting conflict validation.
- Ship the order.
- See Shipping Orders and Placing Back Orders and Placing Back-Orders for details.
- If the order only contains a class registration, you should ship the order when you believe it is complete (so you can generate the appropriate general ledger (GL) entries). If you expect other changes will occur to the order, leave the Order Status as Taken until confirmed.
- Aptify automatically adds the meeting and sessions for which a person has registered to the Meetings tab in the Persons record.
- The registrant is automatically added to the Registrants sub-tab on the meeting's Products record. A person who was added to the Wait List appears on the Wait List tab.
If you need to cancel a class registration, use the standard order cancellation procedures in Aptify. This will automatically set the Status to Withdrawal in the corresponding Class Registrations record or set the Status to Canceled in the corresponding Meeting Registrations record, as applicable. See Cancelling a Class Registration for instructions.
Copyright © 2014-2017 Aptify - Confidential and Proprietary