Creating User Accounts
The ability to create users requires administrative permission in Aptify. This permission can be granted when the user record is created. By default, the sa user is the only user granted administrative permissions when Aptify is installed.
Aptify encrypts the password for untrusted users. Therefore, in order to create untrusted SQL Server Security users (that is, Username/Password-based users), your system administrative user account must have the necessary permissions to the Security Key (the Generic Entity Encryption Key, by default) that encrypts untrusted users' passwords. However, note that users do not need access to this key to successfully log in to the Aptify. See Adding User Accounts to a Security Key for details.
Follow these steps to create a new user:
- Log in to Aptify using a user account that has system administrator privileges.
If you are logging in as a system administrator account, and you intend to create untrusted (Username/Password-based) users, your account must have permission to the Security Key that encrypts user passwords (which is the Generic Entity Encryption Key by default). See Adding User Accounts to a Security Key for more information and instructions.
- Expand the Users Administration application in the Navigation Bar.
Right-click the Users service and select New Users Record to open the Aptify User Administration wizard.
The Aptify User Administration wizard is not supported in the Aptify web interface.
- Step 1: Select a login method for the new user and click Next. Depending on whether Windows Integrated Security or SQL Server Security is selected, the individual's login is trusted or untrusted.
- If the Windows Integrated Security option is selected (the method recommended by Aptify) Aptify accepts login credentials that have already been authenticated by the Windows Domain, and the user is not prompted to provide a user name and password during a login. This method is easier to administer because the user does not need to remember a separate password for Aptify. The use of Windows Integrated Security is referred to as a trusted connection.
- If the SQL Server Security option is selected, the system prompts the user for a user name and password each time Aptify is launched. The use of SQL Server Security is referred to as an untrusted connection.
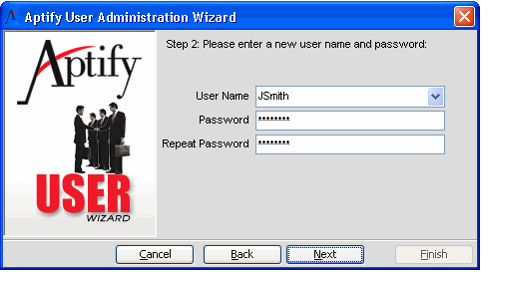
- Step 2: Specify the Windows account or user name and password for the new user, depending on the login security method you selected.
- If you selected Windows Integrated Security in the previous step, the wizard prompts you to enter the user's Windows Domain and Account. The Domain and Account lists are populated with existing domains and accounts from the network to which that user's Windows account belongs.
- Select a Windows domain from the Domain drop-down menu and then select or enter a user account that exists on that domain in the Account field.
- If you selected SQL Security, the wizard prompts for the login and password to be used by the user.
- Enter the new user's name in the User Name field, and enter the password twice, once in the Password field and once in the Repeat Password field.
- Note that when specifying a Password, if the password does not meet the Windows policy requirements, an error message will appear prompting you to re-enter a new password. The Session Exceptions log contains more information about why the password change failed.
- If your organization is using untrusted user accounts, your users can change their own passwords after logging into Aptify. See Changing Your Password for details.
- Click Next to continue.
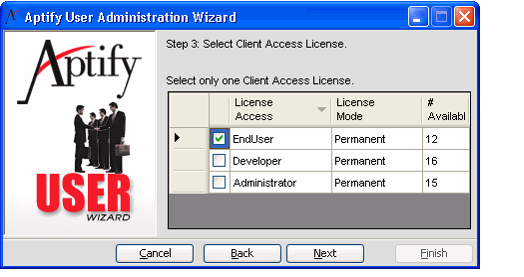
- Step 3: Select the Client Access License for the user by selecting the check box next to the appropriate License Access type.
- Only one Client Access License can be selected per user.
- The available Client Access License types include EndUser, Administrator, and Developer. See Licensing Aptify Products for more information.
- Click Next to continue.
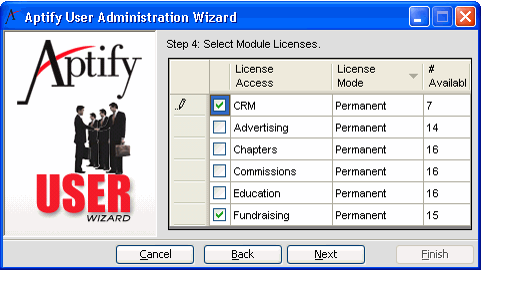
- Step 4: Select the Module for which this user should be licensed by selecting the check box next to the appropriate License Access type.
- If assigning one or more module licenses, the user must be assigned a CRM license. For example, a user cannot be assigned an Education license without also being assigned a CRM license. A typical user will have one of the following module license assignments:
- No Module Licenses (for framework-only installations)
- CRM only (to access the standard CRM applications)
- CRM plus one or more add-on modules
- See Licensing Aptify Products for more information.
- If assigning one or more module licenses, the user must be assigned a CRM license. For example, a user cannot be assigned an Education license without also being assigned a CRM license. A typical user will have one of the following module license assignments:
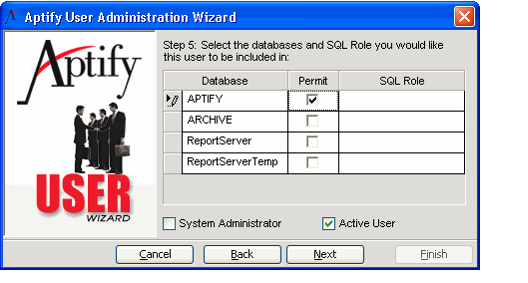
- Step 5: In the Permit column, select the check box for each of the databases to which you want grant access to the user.
- You only need to grant a user access to the APTIFY database.
- Aptify automatically assigns the user an EndUser role for the specified database(s).
Select the System Administrator option for accounts that require administrative access to the databases and the SQL server.
When this check box is selected, Aptify automatically assigns the user a DB Owner role on the SQL server.If the System Administrator option is selected, the user is granted the dbowner role to the database in SQL server. This option should only be selected for administrative users who require this ability. Operations that require dbowner privileges include any action that adds a new table, database object, or login to the SQL Server, such as creating a new user, new entity, or a new stored procedure. Other actions may require sysadmin permission to the entire server. For accounts that require that level of access, you need to check the sysadmin role for that SQL Login directly within SQL Server Management Studio.
- If you want a system administrator account to able to create new users, select the Can Create Users option.
- Confirm that the Active User option is selected and click Next to continue.
- Inactive users cannot access the Aptify system.
- If you want to create an account now but do not want the user to have access to the system at this time, you can clear the Active option to mark the user as inactive. Then, at a later date when you want to activate the account, you can open this user's record again and select the Active User option.
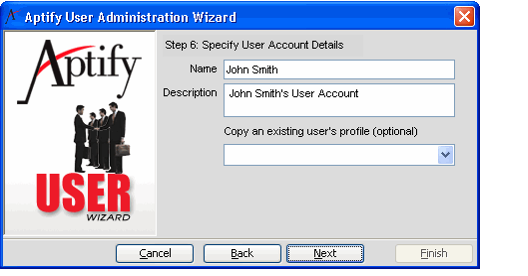
- Step 6: Enter the user's full name in the Name field.
- If desired, enter a Description for this user account in the field provided.
- If desired, select an existing user account from the Copy an existing user's profile (optional) drop-down list.
- When you select another user account from this drop-down list, the system copies the existing user's desktop and display options to the new user's profile. This includes:
- The existing user's profile settings.
- The existing user's displayed Applications.
- The existing user's displayed Services.
- The existing user's Data Control Bar button layout.
- A copy of each of the existing user's Views and View Folders.
- A copy of the existing user's Shortcut Bar (including Shortcuts and Shortcut Groups).
- A copy of the existing user's personal dashboards (that is, dashboards with a User Usage Scope that are linked to the existing user).
- A copy of the existing user's personal form templates (that is, form templates with a User Usage Scope that are linked to the existing user).
- Aptify includes nine role-based profiles, which provide an Aptify interface that has been specifically designed for members of different departments at an organization. Using the role-based profile as a starting point for a particular type of Aptify user, an administrator can leverage the profiles provided by Aptify to create new profiles specific to an organization. An individual user can then later modify the profile as needed to personalize the Aptify user experience. See the Using Role-based Profiles for more details.
Aptify also includes the CRMUser profile which is a sample profile that originated with Aptify 4.0. This profile is not role specific like the role-based profiles included in, but contains a predefined set of views for several important services, including Persons, Companies, and Orders. The CRMUser profile can also be used as a starting point for an administrator to set up profiles for each department or functional group within an organization.
Some items may be unavailable to the new user if you copy from a profile that has a greater permission level than the new user.
- Click Next to continue.
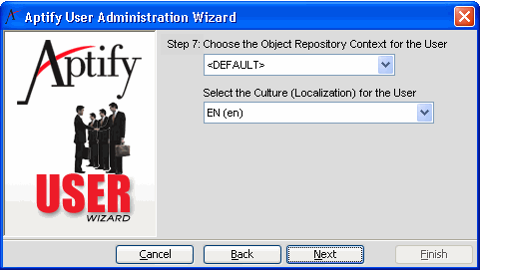
- Step 7: Select the Object Repository Context for the user from the drop-down list. This list includes all existing Object Contexts, as well as a <DEFAULT> option.
- Selecting <DEFAULT> links the user to the context the administrator has defined as the default in the system. If this default is ever changed, the user will automatically link to the new default context the next time they log in.
- If any other option is selected from this list, any change in the default Object Context does not affect the user.
- See Administering Object Contexts for more information on Object Contexts and the Object Repository.
- Select the Culture for the user from the drop-down list. This list includes all existing Cultures, as well as a <DEFAULT> option.
- Selecting <DEFAULT> links the user to the default culture. An administrator can specify the default culture in the Default Value field for the Users entity's CultureID Fields record. In the standard Aptify installation, the default value for CultureID is 1 (which corresponds to the English Cultures record). Note that if you selected <DEFAULT> for a user and then subsequently change the default value for CultureID, the existing user's culture will not update to the new default.
- See Using Localization Administration for more information on Cultures and Localization.
- Click Next to continue.
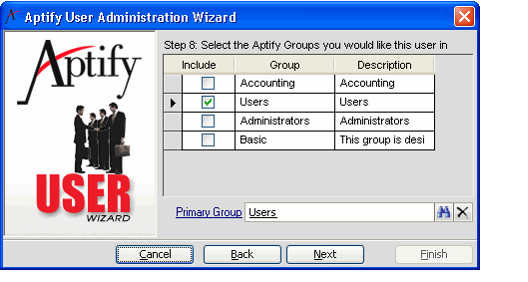
- Step 8: In the Include column, select the check box for each Group to which you want to add the new user.
- If you selected one or more Groups, specify one of the groups as the Primary Group in the field provided. Click Next to continue.
- The system uses the Primary Group to identify the group to use when selecting a Group-scoped Form Template or Dashboard for this user.
- The system uses the Primary Group to identify the group to use when selecting a Group-scoped Form Template or Dashboard for this user.
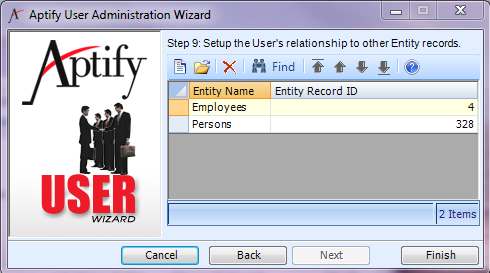
- Step 9: Create Entity Relations records as necessary.
This step allows you to associate the user with any number of other entity records. Only an administrator can create, edit, or delete this connection between the user record and another entity record. For example, a user's login information can be connected to his/her Employees record. When this relationship exists, Aptify automatically populates the Employees field on certain forms using the Employees record that is linked to the current user who opened the form.
Aptify recommends that each user be linked to an Employees record and a Persons record as certain features in Aptify will not work properly without these relationships.
- Follow these steps to create a new User Entity Relations record:
- Select the New icon to open a new record.
- Specify the entity for the related record in the EntityID field. For example, to link to an Employees record, you would specify the Employees entity in this field.
- Specify the related record in the Entity Record ID field. For example, this would be a specific Employees record.
- Enter a Description for the relationship, if desired.
- Click OK to save the new record.
- Repeat these steps to add relations to other records as necessary. You can click OK and New to save the record and open a new record in one step.
- Select the New icon to open a new record.
- Click Finish to complete the creation of the user login.
- Users are automatically assigned an available License Key based on the license selections made in Steps 3 and 4 of the wizard. See Licensing Aptify Products for more information.
- Users are automatically assigned an available License Key based on the license selections made in Steps 3 and 4 of the wizard. See Licensing Aptify Products for more information.
- If this user needs access to credit card numbers (for example, if this user account is for an order entry clerk who will create orders and payments that use a credit card Payment Type), add the user to the Security Key that encrypts credit card numbers in the system (that is, the key that encrypts the CCAccountNumber field in the Payment Information entity).
- See Adding User Accounts to a Security Key for information on how to add a user to a Security Key.
- See the Granting Access for Credit Card Number Encryption for more information on how credit card numbers are treated in Aptify.
- Depending on your geographic location, you may need to modify the Regional Options for the user's desktop computer and the default language for the user's SQL Server login so the system displays dates, times, numbers, and currencies in the appropriate format for that user.
- See Configuring Language Setting for SQL Server Users for more information.
Copyright © 2014-2017 Aptify - Confidential and Proprietary

