Editing User Accounts
Under some circumstances, you may want to edit an existing user's configuration settings. Possible changes include:
- Changing password (untrusted SQL server users only)
- Note that untrusted SQL server users can also change their own passwords within Aptify. See Changing Your Password for details.
- Note that untrusted SQL server users can also change their own passwords within Aptify. See Changing Your Password for details.
- Marking user as Active or Inactive
- Changing user's database permissions or SQL roles
- Modifying user's profile
- Modifying user's Object Repository Context
- Modifying user's Culture
- Modifying user's Groups membership
- Adding, editing, or removing User Entity Relations records
Note on Modifying an Existing User's Name
If you have modified the user name for a trusted Windows Integrated Security user in your organization's Active Directory, you need to create another user account in Aptify (you cannot update the name of the existing Integrated user account in Aptify). Follow these steps:
- For a trusted user, change the user's account name in the Microsoft Active Directory.
- Mark the existing Aptify user as Inactive (see Disabling User Accounts).
- Run the User Administration wizard to create a new Windows Integrated Security user, keeping in mind the following:
- In Step 2 of the wizard, select the updated account in the Domain/Account fields.
- In Step 6, copy the existing Aptify user's profile (the one you just deactivated) so the new account inherits the user's views and settings.See Creating User Accounts for more information on creating a new user.
Follow these steps to edit an existing user:
Log in to Aptify using a user account that has system administrator privileges.
The Aptify User Administration wizard is not supported in the Aptify web interface.
- Expand the Users Administration application in the Navigation Bar, if necessary.
- Open or create a view of the Users service.
- Double-click the Users record you want to edit to open the User Administration wizard.
- For trusted users, the User Administration wizard opens at Step 3 (Select Client Access License Type). You cannot modify Step 1 (select Login method) or Step 2 (selected Domain user) for an existing trusted user.
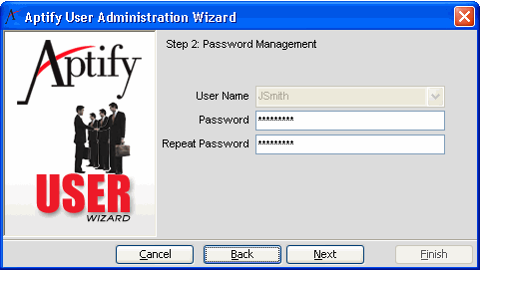
- For untrusted users, the User Administration wizard opens at Step 2 so you can change the user's password (if necessary). You cannot modify Step 1 (select Login method) or the user name in Step 2 for an existing untrusted user.
- If editing an untrusted user, enter a new password, if desired. Click Next to continue.
- If you are logged in as a user who does not have access to the Generic Entity security key, the Password and Repeat Password fields will be blank. You can make changes to the user's configuration but you must have access to the Generic Entity Encryption Key to change the user's password. See Adding User Accounts to a Security Key for instructions.
- If you are logged in as a user who does not have access to the Generic Entity security key, the Password and Repeat Password fields will be blank. You can make changes to the user's configuration but you must have access to the Generic Entity Encryption Key to change the user's password. See Adding User Accounts to a Security Key for instructions.
- Modify the settings found on Step 5 of the wizard as necessary. See Creating User Accounts for more information on these options. Click Next to continue.
- Modify the user's database access and SQL server system administrator status, as necessary.
- You can also make a user inactive by clearing the Active check box. (Likewise, you can enable an inactive user by selecting the Active check box).
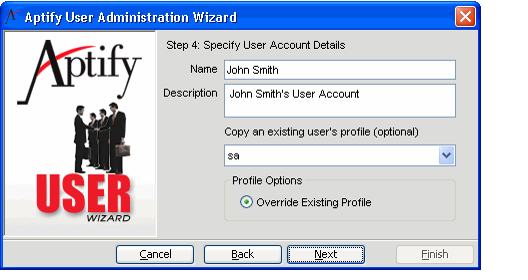
- Modify the user account details found on Step 6 of the wizard as necessary. If you want to specify a different profile for this user, select the new profile from the Copy an existing user's profile (optional) drop-down menu.
- When you select a new profile, the Override Existing Profile option comes into focus. This field is a notification that the user's existing Applications, Services, and Views will be removed and replaced with the selected profile's Applications, Services, or Views.
- When you select a new profile, the Override Existing Profile option comes into focus. This field is a notification that the user's existing Applications, Services, and Views will be removed and replaced with the selected profile's Applications, Services, or Views.
- Click Next to continue.
- Change the user's Object Repository Context or Culture as necessary. See the information on Step 7 of wizard in Creating User Accounts or more information on these options. Click Next to continue.
- Add or remove the user from one or more Groups, and change the user's Primary Group, as necessary. See the information on Step 8 of the wizard in Creating User Accounts for more information on these options. Click Next to continue.
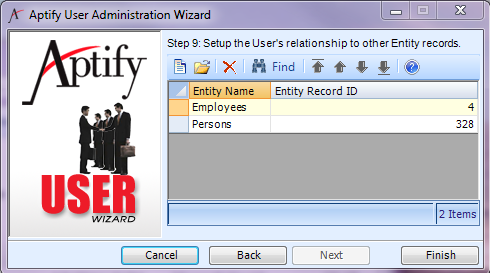
Add, edit, or remove the user's User Entity Relations records.
Aptify recommends that each user be linked to an Employees record and a Persons record as certain features in Aptify will not work properly without these relationships.
The example below shows how to add the Persons entity to an existing user.- Select the New icon to open a new record.
- In the EntityID field, enter Persons.
- In the Entity Record ID field, specify the Persons record.
- Enter a Description for the relationship, if desired.
- Click OK to save the new record.
The Persons entity relationship is added for this user. - These steps can be repeated these steps to add relations to other records as necessary. You can click OK and New to save the record and open a new record in one step.
- Click Finish to save your changes to the user and close the wizard.
Related content
Copyright © 2014-2017 Aptify - Confidential and Proprietary


