Workflow for Processing an ACH Payment
- admin (Deactivated)
In Aptify 5.5.5, the functionality of the Automated Clearinghouse (ACH) Payment Type is updated to improve...
This topic describes the workflow for processing an ACH payment in the following steps:
Limitations Concerning This Update to ACH Payment Processing
- This update does not support Fraud Level checking in PayPal. If fraud level checking is configured in PayPal, the ACH payment may not settle.
- When shipping an order, if inventory is not available and a backorder is created, the payments always stays with the original order. If your organization practices is to have the payment on the new order, you will need to manually connect the payment to the new order. This is a known issue and will be addressed in a future release of this functionality.
ACH payments can be used as Saved Payment Methods (SPMs).
- Open an Orders form and enter the customer and order information, as described in Entering Customer and Order Information.
- Add one or more Order Lines, as described in Adding an Order Line.
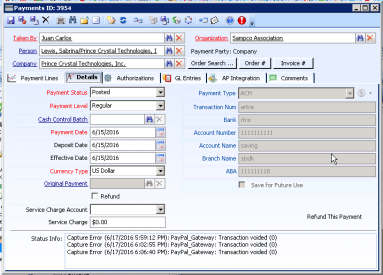
- Enter the Payment information for the Order, ensuring that the Payment Type is set to ACH, and the following fields are updated:
- Transaction Num (required): The number assigned to the electronic transaction.
- Bank (required): The bank where the account is located.
- Account Number (required): The number of the account from which the funds will be withdrawn.
- Account Name (required): The name of the account from which the funds will be withdrawn.
- Branch Name: The name of the purchaser's bank branch.
- ABA: The bank's nine-digit ABA (American Bankers Association) routing number. This number identifies the bank in electronic transactions.
- Save for Future Use to <account_type>: This option appears if the ACH payment type has been setup to allow for the saving of the account information for future use. Select this option and select the type of account (Person or Company) to save the ACH account details to be used again.
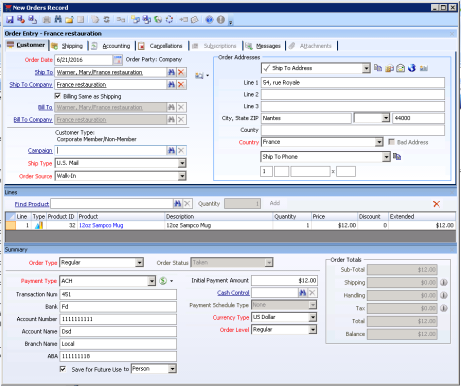
- Complete and save the Order.
- Ship the Order.
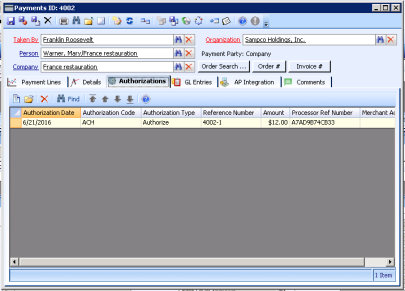
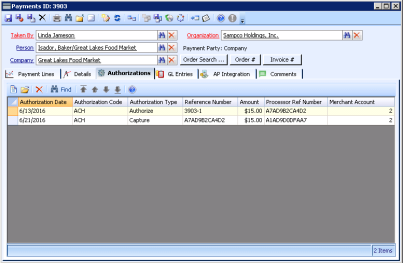
- Once the Order has shipped, the Payments record is updated with an Authorization record, but this does not indicate that the payment has been authorized. The Authorization record can be opened from the Authorizations tab.
- It will take two days after shipment for the bank to authorize the payment.
- Two business days after shipment of the order, the ePayment Capture wizard must be run to capture the ACH payment information.
Successful capture of the ACH payment is reflected in the Authorizations tab of the Payments record when the Authorization Type is Capture.
A process component can be defined to run the ePayment Capture wizard automatically.
For an ACH payment to be included as part of a batch payment, it must be first captured.
If the ePayment Capture wizard is started and the ACH payment is not authorized by the bank, an error message appears in the Payments not Captured tab.
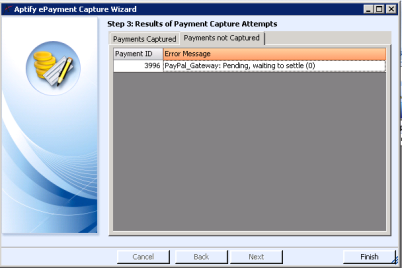
If the ePayment Capture wizard is finished when the ACH payment has not been authorized, the wizard fails, the Payment Status of the ACH Payment record is Exception, and an error is displayed in the Status Info field of the ACH Payment record's Details tab.
Copyright © 2014-2017 Aptify - Confidential and Proprietary