/
Tracking Grant Information
Tracking Grant Information
Follow these steps to create a new Grant record in Aptify to track information about a grant provided by an organization:
- Open a new record from the Grants service.
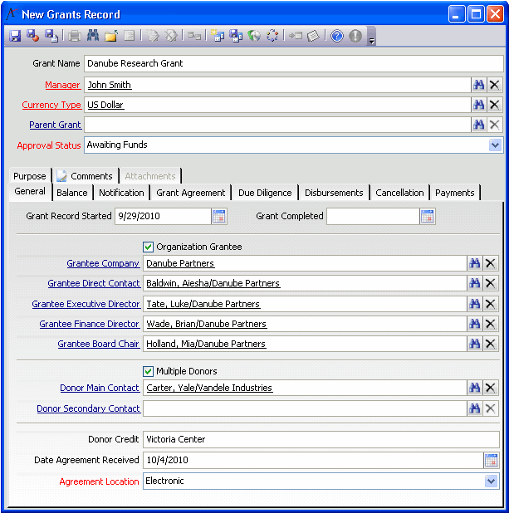
- Specify a Grant Name.
- Specify the employee who oversees the grant in the Manager field.
- This field links to the Employees service.
- This field links to the Employees service.
- If needed, modify the currency in which you want the Grant to be based in the Currency Type field.
- When opening a new Grants record, the Currency Type field defaults to your organization's functional currency or the system's default currency if an organizational currency is not specified. You can modify the currency type as needed to create grants in a different currency.
- When opening a new Grants record, the Currency Type field defaults to your organization's functional currency or the system's default currency if an organizational currency is not specified. You can modify the currency type as needed to create grants in a different currency.
- If the grant is a subsidiary of a larger grant, specify the parent in the Parent Grant field.
- Specify the grant's current status from the Approval Status drop-down list.
- Note that Aptify automatically updates the status as the grant moves through its phases (for example, when a due diligence record is added, the status changes from Awaiting Funds to Awaiting Funds/Due Diligence Begun). You can also manually update the status as needed.
- Standard options include:
- Awaiting Funds: The Grant is waiting for funding.
- Awaiting Funds/Due Diligence Begun: The Grant is waiting for funding and due diligence has already started for the grant.
- In Progress: The Grant is currently in progress.
- Paid/Payments: Payments have been made towards the Grant.
- Closed: The Grant has been closed and is no longer Active.
- Cancelled: The Grant has been cancelled and is no longer Active.
- On the General tab, modify the Grant Record Started date, if necessary. By default, Aptify populates this field with today's date.
- Specify information about the grantee (the company or individual receiving the grant) and identify the appropriate contact people.
- The available fields vary depending on whether the grantee is a company or an individual. To specify that the grantee is a company, select the Organization Grantee option.
- The available fields vary depending on whether the grantee is a company or an individual. To specify that the grantee is a company, select the Organization Grantee option.
- Specify information about the donor who is providing the grant funding.
- If there are multiple donors, select the Multiple Donors option and specify the primary donor contact in the Donor Main Contact field.
- If there are multiple donors, select the Multiple Donors option and specify the primary donor contact in the Donor Main Contact field.
- Specify the person or company on whose behalf the donor has provided funding in the Donor Credit field, if applicable.
- Specify the date the grant agreement was received in the Date Agreement Received field, if applicable at this stage of the grant process.
- If applicable, select the location of the agreement from the Agreement Location drop-down list. The standard options are Electronic and Hard Copy.
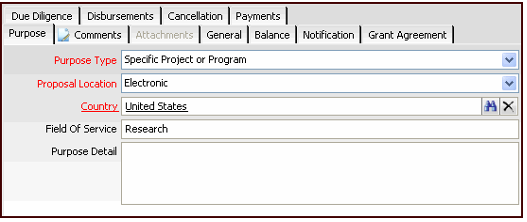
- Click the Purpose tab.
- Select the Purpose Type. Standard options include General Charitable Operations, Specific Project or Program, and Subgrantee(s).
- Select the location of the proposal from the Proposal Location drop-down list. Standard options include Electronic and Hard Copy.
- Enter the Country where the grantee is located or where the grantee will conduct the grant's project.
- This field links to the Countries service and must be filled in to save the record.
- This field links to the Countries service and must be filled in to save the record.
- Specify additional information about the grant's purpose in the Field of Service and Purpose Detail fields.
- Click the Grant Agreement tab and specify information concerning the current status of the grant agreement, including Approval Status and dates relevant to the agreement.
- Note that the Request Grant Agreement Approval and Send Agreement options and the fields on the Notification tab do not drive system functionality by default but are provided to be used in conjunction with Aptify's Process Pipeline technology to automate processes related to grant management. See Managing Process Pipelines for more information.
- Note that the Request Grant Agreement Approval and Send Agreement options and the fields on the Notification tab do not drive system functionality by default but are provided to be used in conjunction with Aptify's Process Pipeline technology to automate processes related to grant management. See Managing Process Pipelines for more information.
- Click the Comments tab and enter any additional information about the grant.
- Save the record.
- As the grant is processed through the Due Diligence stages, record the progress on the Due Diligence tab. See Recording Due Diligence Progress and Results for details.
- After a grant is approved to make disbursements from the donor to the grantee, create Grant Disbursements to allocate funds to the grantee and create Disbursement Reports to record information about the period reports received by the grantee on the grant's current status at the time the disbursement was made. Then, if applicable, link the report to the Grant and the corresponding payment on the Grants record's Disbursements tab.
- See Managing Grant Disbursements for details.
- See Managing Grant Disbursements for details.
- Track the Grant's available balance and the total amount that has been disbursed to the grantee on the Grants record's Balance tab. See Evaluating a Grant's Available Balance for details.
- When the grant is closed and all disbursements have been made, change the Approval Status field in the Grants record's top area to Closed, specify the Grant Completed date (on the General tab), and save and close the record.
- If the grant is cancelled for any reason rather than closed, change the Approval Status to Cancelled and enter a reason on the Cancellation tab. Then, save and close the record.
- Note that saving a grant with a status of Closed or Cancelled locks down the field and prevents further updates.
, multiple selections available,
Related content
Recording Due Diligence Progress and Results
Recording Due Diligence Progress and Results
More like this
How to Use the Grant Services
How to Use the Grant Services
More like this
Tracking Grant Reports
Tracking Grant Reports
More like this
About the Grants Form
About the Grants Form
More like this
About the Grant Disbursements Form
About the Grant Disbursements Form
More like this
About the Grant Reports Form
About the Grant Reports Form
More like this
Copyright © 2014-2019 Aptify - Confidential and Proprietary


