Creating General Ledger Batches in the Desktop Client
General ledger (GL) batches are used to transfer the GL entries from a set of Orders, Payments, or Scheduled Transaction records to your organization's accounting system. Each GL Batch is saved as a record in Aptify's Batches service. Each Batches record corresponds to a single batch type (that is, Orders, Payments, or Scheduled Transactions), and each Batches record corresponds to a single currency/functional currency pair. For example, if a particular set of Orders for an organization whose Functional Currency is U.S. Dollars contains transactions in U.S. Dollars and Euros, then the system will generate two Batches records (one for the Dollar transactions (U.S. Dollar Functional Currency) and one for the Euros transactions (U.S. Dollar Functional Currency).
To create a GL batch, a user runs the Batch wizard from a view of Orders, Payments, or Scheduled Transactions. The wizard provides the same functionality for all three services, but it must be run separately for each service (for example, to create an Orders batch, run the wizard from the Orders service).
Since creating batches requires permission to perform accounting processes, the Batch wizard is only available to users with accounting privileges (i.e., members of the Accounting group in the default Aptify system). If you are not a member of the accounting group, the wizard will not appear in a view's toolbar. If you need access to accounting processes and procedures, see Granting Permissions to Aptify Applications or contact your administrator for assistance.
Follow these steps to run the Batch wizard to create a GL batch in the Aptify Desktop client:
- Create a view of the records within the service that needs to be batched. Note that the wizard also supports prompted views.
- GL batches may be created using any filter available in the view, but are most commonly filtered based on the time period, such as a particular week, month, day or year. You can also filter the view to display records that have a BatchID Is Blank (that is, BatchID is NULL), which will return only records that have not yet been batched for the accounting system.
- For Scheduled Transactions, you should only batch those records whose Scheduled Date is today or earlier (do not batch transactions dated in the future).
- The wizard automatically filters out non-qualifying records that have already been batched. Also, for Orders, the wizard filters out orders that have not yet shipped, and for Payments, the wizard filters out payments whose Status is not Posted.
- Note that the wizard only evaluates the records in the current view.
- Note that the Batch wizard is not available for SQL based temporary views.
- Launch the Batch wizard from the desired service.
- To batch orders, either click the Create Order Batch icon in the view toolbar or right-click within the view and Orders Options > Create Order Batch.
- To batch payments, either click the Create Payment Batch icon in the view toolbar or right-click within the view and select Payments Options > Create Payments Batch.
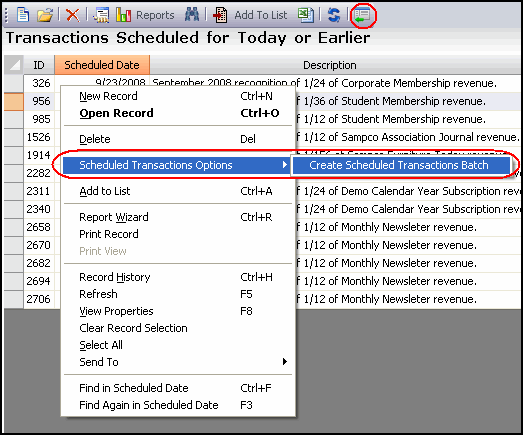
- To batch general ledger scheduled transactions, either click the Create Scheduled Transaction Batch icon in the view toolbar or right-click within the view and select Scheduled Transactions Options > Create Scheduled Transactions Batch.
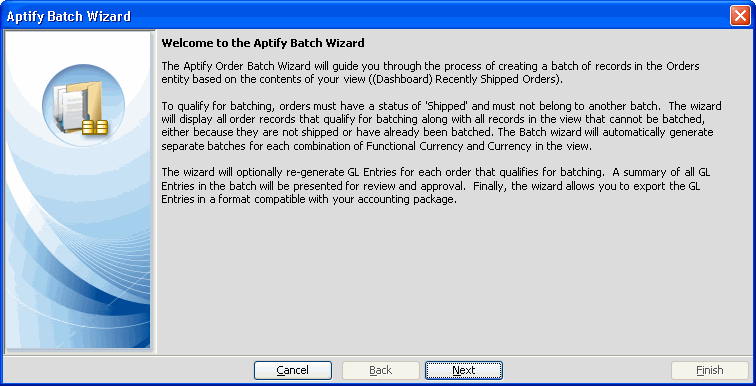
- Review the information on the Welcome page and click Next to continue.
- The Welcome page provides an overview of the wizard process and explains that not all records in the view automatically qualify for inclusion in the general ledger batch.
- The Welcome page provides an overview of the wizard process and explains that not all records in the view automatically qualify for inclusion in the general ledger batch.
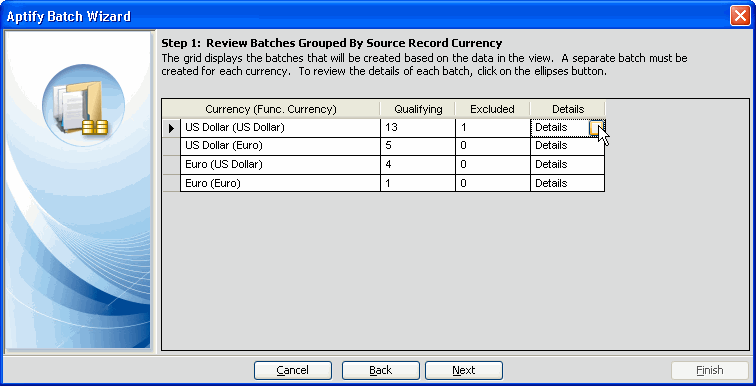
- Review the summary of the qualifying and excluded records grouped by currency type and click Next to continue.
- The grid on this page displays the general ledger batches that will be created based on the data in the view.
- The records are grouped together based on the record's currency and the functional currency for the organization specified on that record. For example, US Dollar and Euro orders taken by a US Dollar organization are divided into two batches: US Dollar (US Dollar) and Euro (US Dollar).
- To show the specific records that are included in and excluded from each currency's general ledger batch, place the cursor over the Details cell for a particular row to display a gray box. Then, click the gray box to open another dialog.
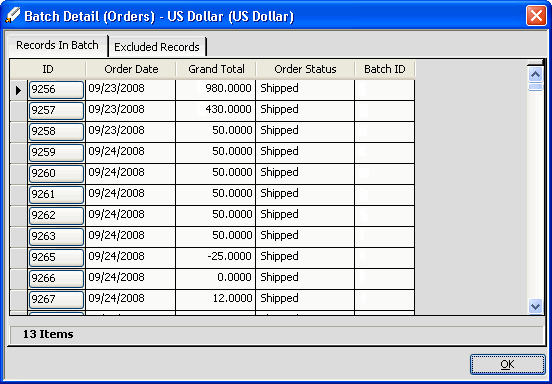
- The Details dialog includes two tabs: The Records In Batch tab lists all records qualifying for the general ledger batch. The Excluded Records tab lists all records excluded from the general ledger batch (because they have been included in a previous batch or for some other reason).
- The records listed on these two tabs are those in the view from which the wizard was initiated.
- When batching orders, only shipped orders can be batched.
- When batching payments, authorized credit card payments verified by a merchant account cannot be batched until they are captured using the ePayment Capture wizard so they appear in the Excluded Records list. See Using the ePayment Capture Wizard for more information. Note that refund credit card payments can be batched once authorized (they do not require a capture process first) so they appear in the Records In Batch list.
- Review the list of records and click OK to return to the main wizard screen.
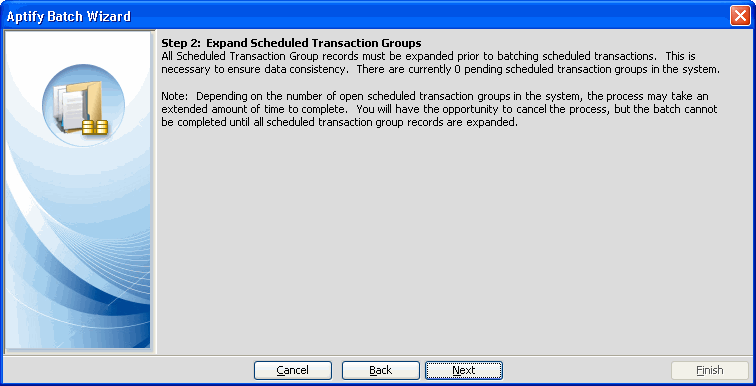
- When batching Scheduled Transactions records, click Next if prompted to expand all pending Scheduled Transaction Groups.
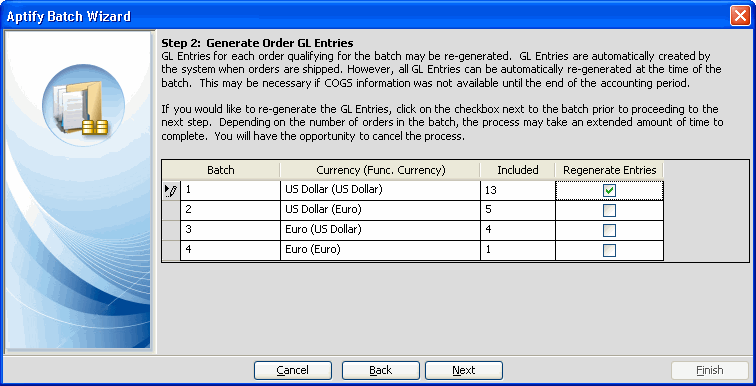
- The wizard displays a summary of the Batches records it will create. If you want to regenerate GL entries prior to generating a batch, select the Regenerate Entries option.
- The Regenerate Entries option should only be selected if changes have been made to the GL accounts for affected products or payment types since the earliest Order Ship Date or Payment Date included in the general ledger batch.
- The system automatically generates GL entries when orders are shipped and when payments are created. Unnecessarily regenerating the GL Entries increases the wizard's processing time.
- Note that the Regenerate Entries option is not available for (or applicable to) Scheduled Transactions.
- Click Next to continue.
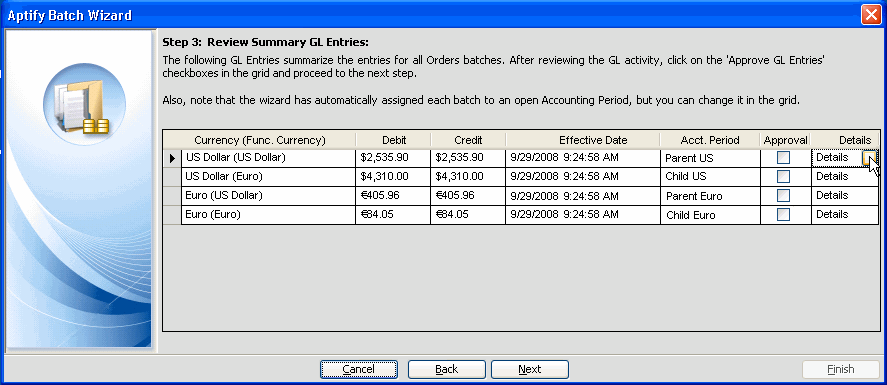
- The wizard generates the GL Batches and displays a summary of the batch's information, including the total debit and credit amount included in the batch.
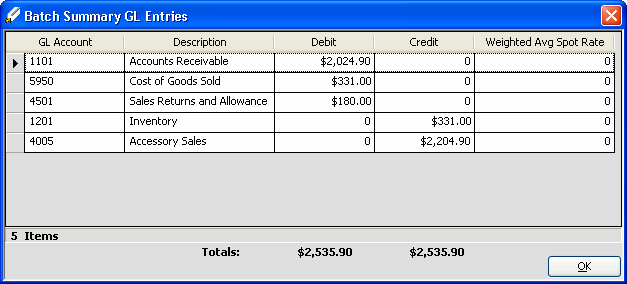
- To review the details of the summarized GL entries for each general ledger batch, place the cursor over the Details cell for a particular row to display a gray box. Then, click the gray box to open another dialog.
- On the Details dialog, the wizard reports the total amount debited or credited for each GL account included in the batch. Thus, the results are one entry for the accounts receivable GL account, one entry for the sales account, and so on.
- Also, for batches in a foreign currency (that is batches where the currency does not match the specified Functional Currency), the wizard reports the Weighted Average Spot Rate used to convert the foreign currency into the appropriate functional currency. See About the Weighted Spot Rates for more information.
- After reviewing the entries, click OK to return to the main wizard screen.
- The wizard generates the GL Batches and displays a summary of the batch's information, including the total debit and credit amount included in the batch.
- Associate the batch with an Open Accounting Period in the Accounting Period field.
- By default, the wizard will select the Open accounting period with the lowest ID whose date range includes the batch's effective date. See Managing Accounting Periods for more details.
- If at a later date, it is determined that the batch is associated with the wrong Accounting Period, you can modify the batch's Accounting Period affiliation at any time by running the Update Accounting Period entity bulk operation from a Batches list view. (By default, only members of the Accounting and Administrators groups can see and execute this entity bulk operation.)
- Select the Approval check box for each general ledger batch you want to approve and click Next to continue.
- You must approve at least one batch to complete the wizard.
- You must approve at least one batch to complete the wizard.
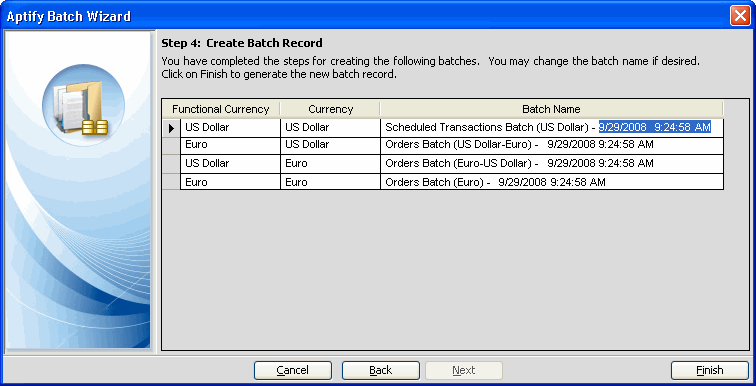
- Modify the default name of the Batches record, as needed, and click Finish to complete the wizard.
- The system automatically defaults the GL batch name to include both the name of the general ledger batch type (Orders, Payments, or Scheduled Transactions), the name of the currency in parentheses, and the date on which the general ledger batch was created.
- The system automatically defaults the GL batch name to include both the name of the general ledger batch type (Orders, Payments, or Scheduled Transactions), the name of the currency in parentheses, and the date on which the general ledger batch was created.
- The wizard displays the set of Batches records it created. Double-click on a record to export the batch's information to a file that can be imported into your organization's accounting system.
- If you choose not to export the file at this time, you can always export the file later by opening the appropriate record in the Batches service.
- See Exporting General Ledger Batch Information for more information on creating a batch export file.
- When finished, click OK to close the wizard.
Related content
Copyright © 2014-2017 Aptify - Confidential and Proprietary
