Installing Aptify 6.0 Server Software
- admin (Deactivated)
- Sagar Alat (Deactivated)
Note
Aptify strongly recommends that you install and test the installation on a test environment first using a copy of your production server before running it directly on the production server. Also, review the Important Post-Installation Considerations topic before starting an installation.
- Backup your database before starting the installation process.
- Log into the Aptify database server with an account that has administrative privileges.
- If you have not already done so, back up your Aptify database server.
- To ensure a successful upgrade, you should remove Row Set Security from the Persons and Companies entities before beginning the install. You can reinstate the Row Set Security settings once the install is successful. Follow these steps for the Persons and Companies entities:
- Open the record for the entity in the Entities service.
- Click the Row Set Security tab and determine whether a rule is set for this entity.
- Record the rule information for use later in re-enabling this functionality.
- If a rule is set, right-click on the rule and select Delete from the drop-down menu. Otherwise, go to step 5.
- Repeat step d for any additional rules in the record.
- Click Save and Close.
- Close the Aptify desktop application on the database server, if currently running.
Download the Aptify 6.0 Service Pack Installer ZIP file to a folder on the database server and unzip its contents.
Note
When using low-end hardware, Aptify recommends running the installation program locally on the database server; do not run it over the network.
Note Concerning Character Limitations
The Windows API requires that fully qualified file names are less than 260 characters. Aptify recommends that the Aptify 6.0 Service Pack Installer ZIP file is unzipped in a folder close to the drive's root folder (for example C:\Downloads) in order to limit the possibility of exceeding the character limitation for fully qualified file names imposed by the operating system.
- Browse to the location of the installation files, right-click the Setup application file, and select the Run As Administrator option to launch the Aptify 6.0 installation program.
- On Windows Server 2008, the Run as Administrator option bypasses the server's User Access Control (UAC) for the duration of the installation.
- On Windows Server 2008, the Run as Administrator option bypasses the server's User Access Control (UAC) for the duration of the installation.
Enter login information for your database server. Specify an account with system administrator privileges to both the Aptify database and SQL Server. The user should also be tied to a Developer license to ensure that the setup can perform such tasks as entity creation when needed.
Note
Selecting the System Administrator option when creating a user in the Aptify database sets the user to a dbowner in SQL Server. It does not add the user to the sysadmin role. You will need to manually add the user to the sysadmin role through SQL Server. If in doubt, check the user's permissions in the Security > Logins area of SQL Management Studio before proceeding with the installation.

Review the Installation welcome screen and click Next to continue.

- Review the displayed setup information concerning your database server's configuration and click Next to continue.The installer identifies the set of Aptify applications detected on the database server. Options include Platform (for the Aptify Framework), Core Business Applications (for Aptify's standard CRM business applications), add-on applications, and if applicable, the optional e-Business/Surveys applications.

- The Service Pack Installer automatically identifies the current version of Aptify and components installed on the database server and selects the box(es) for the update(s) not currently installed.

If you are using the SQL Server Reporting System (SRSS) in your environment, enter the location where the SSRS reports are stored in the SSRS Reports Path field.
The location should be entered in the following format:
https://<ServerName>/<SSRSServerName>?/<ReportsFolderName>
You can leave this field blank if an SQL Reporting Server is not already configured or if you are not planning on using SSRS in your environment.
The location can be configured at a later time.
- Click Next to continue.
If you have organization specific configurations, you can check any or all of the options on the Validation step to help identify invalid repository and database objects, and foreign key constraint errors.
Aptify recommends that you check all validation options to ensure Aptify 6.0 installs successfully.

- Click Next to continue.
- The Install Service Pack screen identifies what you will be installing. Review the items to be installed.

- Click Finish to begin the installation.
- If the setup detects a database validation error, a dialog appears alerting the user of the error with appropriate steps to troubleshoot further. Clicking OK closes the dialog.
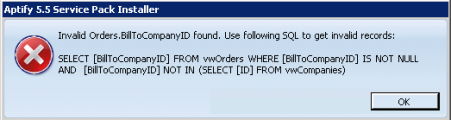
- Note: that you will need to Cancel the setup, resolve the detected errors and re-run the setup. You should not need to revert your database as nothing has been applied yet.
- If the setup detects that the server does not have Crystal Reports 32-bit and 64-bit installed, a dialog appears alerting the user that an installer will run to address this. Clicking Run starts the installer and closes the dialog.

- Click OK when prompted that 6.0 has been successfully installed to close the installer.

- Launch the Aptify desktop application to confirm that the update has been successfully installed. During the load process, the splash screen image should change and the version should increment from Version 5.5.3 or Version 5.5.4 to Version 6.0.
- For each client computer that connects to the Aptify Desktop client (including Application Servers and the e-Business server), you need to install the following software, if not already installed. You can find these files in the APTIFY_6_Desktop_Update.ZIP package, which is in your folder on the Aptify FTP site:
When using the Generic Import wizard with the Aptify 6.0 Desktop interface to import a Microsoft Access 2013 or 2016 file, the import may fail if running the 64-bit version of Microsoft Office 2013 or 2016. The error that is generated is: The 'Microsoft.ACE.OLEDB.12.0' provider is not registered on the local machine. The import fails because the user's computer has the 64-bit version of Access 2013 or 2016 installed, while the Aptify shell requires the 32-bit version. The current workaround for this issue is to install the 32-bit version of the Access Database Engine Redistributable on the user's computer. The installation file, AccessDatabaseEngine.exe, can be found in the Access Database Update sub-folder.
If you are planning on viewing reports using SQL Server Reporting Services (SSRS), you will need to install the 32-bit version of the Microsoft SQL Server System CLR Types and Report Viewer.
- Microsoft .NET 4.5 Framework, this was part of the 5.5.3 Desktop update, so it may already be installed.
- 32-bit version of the Crystal Reports 13 viewer, this was part of the 5.5.3 Desktop update, so it may already be installed.
- If you disabled Row Set Security for the Persons and/or Companies entities in step 4, re-enable the rule(s).
- Open the record for the entity in the Entities service.
- Click the Row Set Security tab.
- Open a new Row Set Security sub‐type record.
- Either click the New Record... button in the menu bar, or right‐click in the gray area and select New from the pop‐up menu to open a new record.
- Either click the New Record... button in the menu bar, or right‐click in the gray area and select New from the pop‐up menu to open a new record.
- Enter the rule you recording back in step 4 in the Base View Where Clause field.
- Enter a description for the rule.
- Click OK to save the rule.
- Enter additional rules for the same entity, if necessary. Aptify uses an AND operator to separate multiple Base View Where Clauses within a generated base view.
- Alternatively, you can click OK and New in Step h to save the current and open a new Row Set Security record in one step.
- Alternatively, you can click OK and New in Step h to save the current and open a new Row Set Security record in one step.
Save and close the Entities record.
Regenerate the base view for any related entities that join the entity for which you just enabled row set security.
- If your organization uses the View Scheduling feature to schedule the execution of one or more views by an application server, review the instructions in Removing Duplicate Windows Tasks for Scheduled Views to prevent duplicate Windows Tasks from executing.
- If you have Aptify e-Business, one or more application servers, or Mobile Point of Sale installed, run the Object Repository Synchronizer utility to update the relevant bin folders so they have the latest Aptify objects. The Object Repository Synchronizer is included in the service pack's Utilities folder. Where applicable, be sure to only download objects from the relevant Sync Repository Objects record. See Important Post-Installation Considerations for more details.
- Once Aptify 6.0 is installed, to activate the Suggested Tabs features, an administrator must modify the Update Relevant Tabs Model scheduled task record to create a corresponding Windows task on the Application Server, Perform the following steps:
- In the Scheduled Tasks service of the Process Pipeline Administration application, find and open the Update Relevant Tabs Module scheduled task record.
- In the Job Account Name and Password fields of the Schedule tab, enter the username and password for the user account that is used to run scheduled tasks on the Application Server.
- Select the Is Enabled option.
- Save and close the record.
- Once Aptify 6.0 is installed, you can install the 6.0 version of the Aptify Web interface. See Implementing the Aptify Web Interface for more details.
- If you have the initial release of the Aptify Web interface and you wish to install the 6.0 version, you will need to install a new Aptify site. See Implementing the Aptify Web Interface for more details.
- If you are using Melissa Data for address verification and using the COM Object version (rather than the web service version), you may need to change the rank of the Address Verification Systems record for the COM Object version (typically ID 1) so it is a higher rank than the web version (typically ID 3).
Post Installation Configurations:
This section provides the instructions to configure the Log4net functionality in Aptify:
Configuration steps:
Follow the below steps to configure these settings in app.config / web.config file. In Aptify, the Aptify Shell.config file is used to configure these settings.
Config Section: Add the below log4net Config section to add the namespace:
<configSections>
    <section name="log4net" type="log4net.Config.Log4NetConfigurationSectionHandler,log4net"/>
    <section name="exceptionManagement" type="Aptify.Framework.ExceptionManagement.ExceptionManagerSectionHandler,AptifyExceptionManagement" />
    <section name="AttributeManagement" type="Aptify.Framework.AttributeManagement.AttributeManagerSectionHandler,AptifyAttributeManagement" />
  </configSections>
Root: A single root section is required under the top-level root section as specified in Config Section. These are the loggers that inherit information from your base logger (root).
<log4net debug="false">
    <root>
      <appender-ref ref="TextInfoAppender"/>
      <appender-ref ref="TextDebugAppender"/>
      <appender-ref ref="TextErrorAppender"/>
      <appender-ref ref="TextPerformanceAppender"/>
    </root>
    <appender name="TextInfoAppender" type="log4net.Appender.RollingFileAppender">...</appender>
    <appender name="TextDebugAppender" type="log4net.Appender.RollingFileAppender">...</appender>
    <appender name="TextErrorAppender" type="log4net.Appender.RollingFileAppender">...</appender>
    <appender name="TextPerformanceAppender" type="log4net.Appender.RollingFileAppender">...</appender>
  </log4net>
Appender: An appender is the name of the information logger. It specifies where, how and under what circumstances the information will be logged. Each appender has different parameters based on the data movement.
<appender name="TextInfoAppender" type="log4net.Appender.RollingFileAppender"> <file value=".\AptifyLogs\Infolog.txt"/> <appendToFile value="true"/> <rollingStyle value="Size"/> <maximumFileSize value="5MB"/> <maxSizeRollBackups value="-1"/> <staticLogFileName value="true"/> <datePattern value="_yyyy.MM".log""/> <filter type="log4net.Filter.LevelMatchFilter">...</filter> <filter type="log4net.Filter.LevelMatchFilter">...</filter> <filter type="log4net.Filter.LevelMatchFilter">...</filter> <filter type="log4net.Filter.LevelMatchFilter">...</filter> <filter type="log4net.Filter.LevelMatchFilter">...</filter> </appender>Filter: With a filter, you can specify which level(s) to log and also look for keywords in the message. When a message fits inside the criteria for a filter, it is logged and the processing of the filter is finished. This is the biggest gotcha of a filter. Therefore, ordering of the filters becomes very important while creating a complex filter.
<filter type="log4net.Filter.LevelMatchFilter">
        <levelToMatch value="INFO"/>
        <acceptOnMatch value="true"/>
      </filter>
Application Configurations
Following are the additional configurations to turn on /off the exception log for the respective level.
<appSettings>
    <add key="Aptify.Framework.Log.IsInfo" value="true"/>
    <add key="Aptify.Framework.Log.IsDebug" value="true"/>
    <add key="Aptify.Framework.Log.IsPerformance" value="false"/>
  </appSettings>
- Aptify.Framework.Log.IsInfo: Set a Boolean value to turn On/Off log for Logging info exception.
- Aptify.Framework.Log.IsDebug: Set a Boolean value to turn On/Off log for Logging Debug exception.
- Aptify.Framework.Log.IsPerformance: Set a Boolean value to turn On/Off log for Logging performance exception.
Code Example for Your Reference
Below is an example of the log4net code in the app.config file:
<log4net debug="false">
<root>
<appender-ref ref="TextInfoAppender"/>
<appender-ref ref="TextDebugAppender"/>
<appender-ref ref="TextErrorAppender"/>
<appender-ref ref="TextPerformanceAppender"/>
</root>
<appender name="TextInfoAppender" type="log4net.Appender.RollingFileAppender">
<file value=".\AptifyLogs\Infolog.txt"/>
<appendToFile value="true"/>
<rollingStyle value="Size"/>
<maximumFileSize value="5MB"/>
<maxSizeRollBackups value="-1"/>
<staticLogFileName value="true"/>
<datePattern value="_yyyy.MM".log""/>
<filter type="log4net.Filter.LevelMatchFilter">
<levelToMatch value="INFO"/>
<acceptOnMatch value="true"/>
</filter>
<filter type="log4net.Filter.LevelMatchFilter">
<levelToMatch value="DEBUG"/>
<acceptOnMatch value="false"/>
</filter>
<filter type="log4net.Filter.LevelMatchFilter">
<levelToMatch value="FATAL"/>
<acceptOnMatch value="false"/>
</filter>
<filter type="log4net.Filter.LevelMatchFilter">
<levelToMatch value="ERROR"/>
<acceptOnMatch value="false"/>
</filter>
<filter type="log4net.Filter.LevelMatchFilter">
<levelToMatch value="PERFORMANCE"/>
<acceptOnMatch value="false"/>
</filter>
<layout type="Aptify.Framework.Log.TextLayout"/>
</appender>
<appender name="TextDebugAppender" type="log4net.Appender.RollingFileAppender">
<file value=".\AptifyLogs\Debuglog.txt"/>
<appendToFile value="true"/>
<rollingStyle value="Size"/>
<maximumFileSize value="5MB"/>
<datePattern value="_yyyy.MM".log""/>
<maxSizeRollBackups value="-1"/>
<staticLogFileName value="true"/>
<filter type="log4net.Filter.LevelMatchFilter">
<levelToMatch value="INFO"/>
<acceptOnMatch value="false"/>
</filter>
<filter type="log4net.Filter.LevelMatchFilter">
<levelToMatch value="DEBUG"/>
<acceptOnMatch value="true"/>
</filter>
<filter type="log4net.Filter.LevelMatchFilter">
<levelToMatch value="FATAL"/>
<acceptOnMatch value="false"/>
</filter>
<filter type="log4net.Filter.LevelMatchFilter">
<levelToMatch value="ERROR"/>
<acceptOnMatch value="false"/>
</filter>
<filter type="log4net.Filter.LevelMatchFilter">
<levelToMatch value="PERFORMANCE"/>
<acceptOnMatch value="false"/>
</filter>
<layout type="Aptify.Framework.Log.TextLayout"/>
</appender>
<appender name="TextErrorAppender" type="log4net.Appender.RollingFileAppender">
<file value=".\AptifyLogs\Errorlog.txt"/>
<appendToFile value="true"/>
<rollingStyle value="Size"/>
<maximumFileSize value="5MB"/>
<datePattern value="_yyyy.MM".log""/>
<maxSizeRollBackups value="-1"/>
<staticLogFileName value="true"/>
<filter type="log4net.Filter.LevelMatchFilter">
<levelToMatch value="INFO"/>
<acceptOnMatch value="false"/>
</filter>
<filter type="log4net.Filter.LevelMatchFilter">
<levelToMatch value="DEBUG"/>
<acceptOnMatch value="false"/>
</filter>
<filter type="log4net.Filter.LevelMatchFilter">
<levelToMatch value="FATAL"/>
<acceptOnMatch value="true"/>
</filter>
<filter type="log4net.Filter.LevelMatchFilter">
<levelToMatch value="ERROR"/>
<acceptOnMatch value="true"/>
</filter>
<filter type="log4net.Filter.LevelMatchFilter">
<levelToMatch value="PERFORMANCE"/>
<acceptOnMatch value="false"/>
</filter>
<layout type="Aptify.Framework.Log.TextLayout"/>
</appender>
<appender name="TextPerformanceAppender" type="log4net.Appender.RollingFileAppender">
<file value=".\AptifyLogs\Performancelog.txt"/>
<appendToFile value="true"/>
<rollingStyle value="Size"/>
<maximumFileSize value="5MB"/>
<datePattern value="_yyyy.MM".log""/>
<maxSizeRollBackups value="-1"/>
<staticLogFileName value="true"/>
<filter type="log4net.Filter.LevelMatchFilter">
<levelToMatch value="INFO"/>
<acceptOnMatch value="false"/>
</filter>
<filter type="log4net.Filter.LevelMatchFilter">
<levelToMatch value="DEBUG"/>
<acceptOnMatch value="false"/>
</filter>
<filter type="log4net.Filter.LevelMatchFilter">
<levelToMatch value="FATAL"/>
<acceptOnMatch value="false"/>
</filter>
<filter type="log4net.Filter.LevelMatchFilter">
<levelToMatch value="ERROR"/>
<acceptOnMatch value="false"/>
</filter>
<filter type="log4net.Filter.LevelMatchFilter">
<levelToMatch value="PERFORMANCE"/>
<acceptOnMatch value="true"/>
</filter>
<layout type="Aptify.Framework.Log.TextLayout"/>
</appender>
</log4net>
Copyright © 2014-2019 Aptify - Confidential and Proprietary