/
Adding Prospects Using a Wizard
Adding Prospects Using a Wizard
The Persons service includes the Add to Campaign wizard, which adds the selected records in a Persons view to a campaign's prospect list. Follow these step to use the wizard, broken down by interface:
Web Interface
- Create or open a view of the Persons service that contains the people you want to add to a campaign's prospect list.
- The Add to Campaign wizard is not available for prompted views or temporary views (views whose source is a SQL statement rather than a Views record).
- The Add to Campaign wizard is not available for prompted views or temporary views (views whose source is a SQL statement rather than a Views record).
- Do one of the following:
- If you want to add all records in the view to the list, do not select any records in the view and select the Add Persons to Campaign option from the More drop-down in the view toolbar.
- If you want to add only selected records to a prospect list, select those records. Then, select the Add Persons to Campaign option from the More drop-down in the view toolbar.
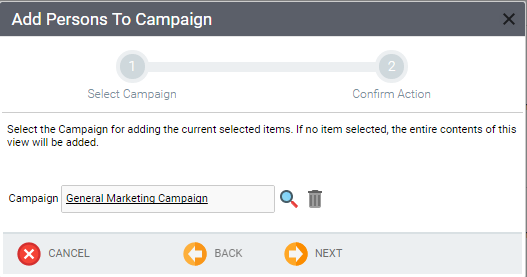
- The Add Person to Campaign wizard appears. Identify the campaign to which you want to add prospects.
- When prompted, click OK to add the records to the selected campaign.
- Click OK when prompted that the records has been successfully added to the campaign.
- The wizard creates Campaign List Detail records for each person in the view. This adds the selected people to the campaign's Prospect List tab.
- By default, prospects are added with a status of Accepted.
- Note that if a person already exists in the prospect list, the wizard does not add the person a second time.
Desktop Client
- Create or open a view of the Persons service that contains the people you want to add to a campaign's prospect list.
- The Add to Campaign wizard is not available for prompted views or temporary views (views whose source is a SQL statement rather than a Views record).
- The Add to Campaign wizard is not available for prompted views or temporary views (views whose source is a SQL statement rather than a Views record).
- Do one of the following:
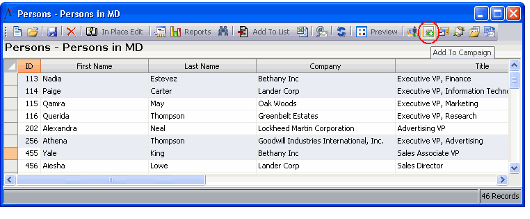
- If you want to add all records in the view to the list, do not select any records in the view and click the Add to Campaign icon in the view toolbar.
- If you want to add only selected records to a prospect list, select those records (hold down the CTRL key to select multiple records). Then, click the Add to Campaign icon in the view toolbar.
- If prompted, click Yes to add all records in the view to the list, or click No to add only the records you selected to the list. You can also click Cancel to stop the process.
- If you selected the Add to Campaign icon without first selecting one or more records in the view, this message box does not appear. Aptify assumes that you want to add all Persons in the view to a campaign.
- If you selected the Add to Campaign icon without first selecting one or more records in the view, this message box does not appear. Aptify assumes that you want to add all Persons in the view to a campaign.
- The Aptify Find dialogue box appears. Use this dialogue box to identify the campaign to which you want to add prospects.
- When prompted, click OK to add the records to the selected campaign.
- Click OK when prompted that the records has been successfully added to the campaign.
- The wizard creates Campaign List Detail records for each person in the view. This adds the selected people to the campaign's Prospect List tab.
- By default, prospects are added with a status of Accepted.
- Note that if a person already exists in the prospect list, the wizard does not add the person a second time.
, multiple selections available,
Related content
Adding Prospects Using a Wizard
Adding Prospects Using a Wizard
More like this
Adding Prospects Using the Service
Adding Prospects Using the Service
More like this
Adding Prospects Using the Service
Adding Prospects Using the Service
More like this
Managing Campaigns and Prospects
Managing Campaigns and Prospects
More like this
Managing Campaigns and Prospects
Managing Campaigns and Prospects
More like this
Running the Campaign List Builder Wizard
Running the Campaign List Builder Wizard
More like this
Copyright © 2014-2017 Aptify - Confidential and Proprietary

