Step Four: Configuring Mobile Point of Sale Post-Installation
Certain additional steps are required to successfully complete the Mobile Point of Sale Implementation. Included below is a list of IIS configurations, Aptify configurations, and other settings required to support the Mobile Point of Sale Application:
- Object Repository Sync
- IIS Configurations
- Aptify Configurations
- POS Event Setup
- POS Order Entity Configurations
- POS iPad App Configuration and Installation
Object Repository Sync
The listed assemblies should be removed from the framework bin located in the framework website folders. Following is the list of dlls that should be removed (if present) from the framework bin folder:
- CertificateImportWizard__c.dll
- ExpoCADShared.dll
- ExpoCADBoothSynch.dll
- ExpoCADAPIWrapper.dll
- Expoapi.dll
- ConfigManifestForm.dll
- CertificatePrintObject.dll
- TemporaryComponent.dll
- IAptifyWebBoundControls.dll
- MeetingTransferLayoutControl.dll
IIS Configurations
Configure SSL for both the web service sites
- Make sure the SSL certificate is installed on the web server.
- Set up the SSL configuration for both the Point of Sale Service and Framework Services
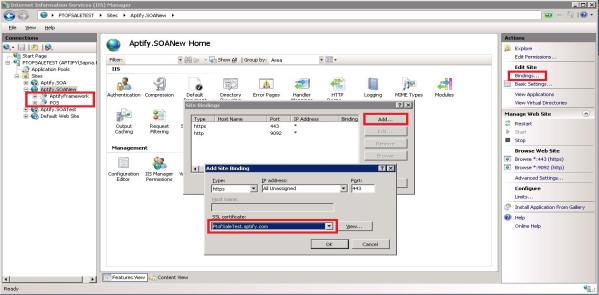
- Open Internet Information Service (IIS) Manager.
- Select the node containing Point of Sale Service and Aptify Framework web services.
- On the right hand side window pane, select the Bindings link.
- A new window, named Site Bindings, will open; click the Add button.
- A new window, named Add Site Binding, will open
- Select the type: https
- SSL certificate: <select the appropriate SSL certificate installed on the server>
- Port: default port is 443, if required it can be changed or configured as per your requirements.
- Click OK and close the Site Bindings window.
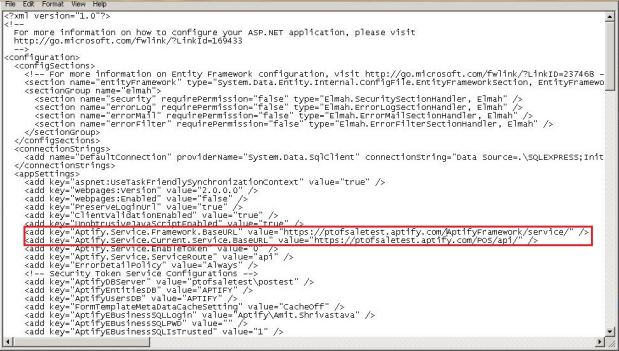
- Open the web.config file for the Point of Sale with a text editor, like Notepad. In general, this file is located in the Point of Sale folder specified as the website's Install Location.
- Update the appSettings for Aptify.Service.Framework.BaseURL and Aptify.Service.Current.Service.BaseURL to include https in the URL path. If you are unable to save the file in the same location, save the file to a separate location (desktop) and replace the original file.
Configure the authentication settings for Point of Sale Service
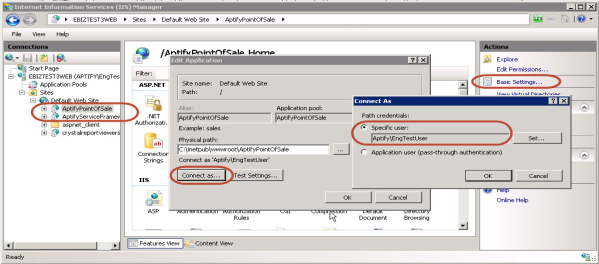
- Select the AptifyPointOfSale web service node in IIS Manager.
- Select Basic Settings from the right hand pane.
- Click Connect as… and verify that it is running under the Trusted User's credentials.
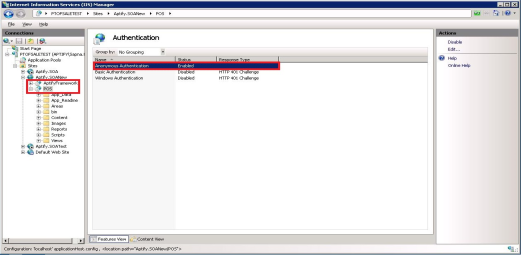
- From the center Features View pane, select Authentication.
- From list of options available, enable the Anonymous Authentication and leave the other options disabled.
Configure the authentication settings for Aptify Framework Service
- Select the AptifyServiceFramework web service node in IIS Manager.
- Select Basic Settings from the right hand pane.
- Click Connect as… and verify that it is running under the Trusted User's credentials.
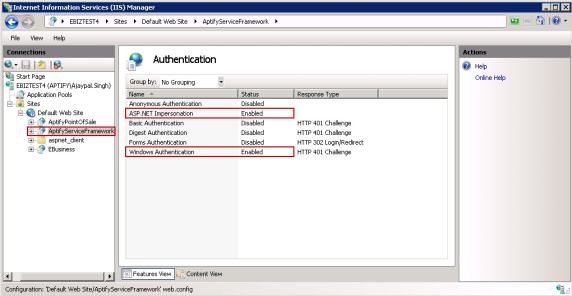
- From the center Features View pane, select Authentication.
- From the list of options available, enable Windows Authentication and ASP.NET Impersonation, and disable all other options.
Configure the Application Pool settings
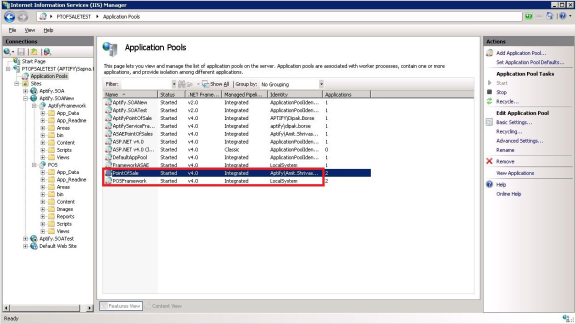
- In IIS Manager, select the Application Pools node.
- From the Application Pools list, select the application pool created for Point Of Sale and verify the identity is configured to use trusted user's credentials.
- Select the application pool created for AptifyFramework and configure the identity to run under the Local System context by selecting the advanced settings on the right hand pane.
Aptify Configurations
This section describes the configuration required in Aptify to support the Mobile Point of Sales application.
- SMTP Configuration: If you do not have a messaging system configured to send emails, see Configuring Message Systems to configure a messaging system that POS will use to send receipts.
- Update the Process flow configuration for receipt email.
- At the end of a POS Order on the app, a user has the option to send an email receipt. In order to successfully send an email and format the message appropriately, verify the configuration of the properties in the process flow as specified below.
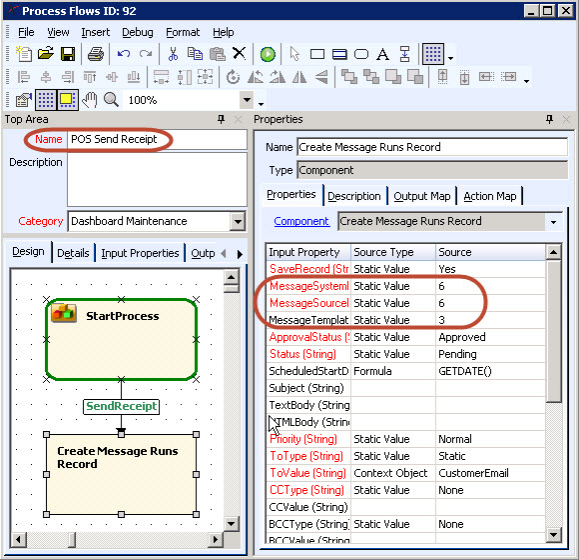
- Open the POS Send Receipt process flow in the Aptify system.
- Select the Create Message Runs Record rule block from the Process Flow designer.
- On the right hand side of the pane, select the Properties tab.
- In this tab, make sure the following properties are configured to use the appropriate record IDs from the Messaging Administration application: MessageSystemID, MessageSourceID, and MessageTemplateID. MessageSystemID should be the DotNet or SMTP DotNet messaging system that will be used for sending out emails. MessageSourceID should be the Message Source corresponding to Orders. MessageTemplateID should be set to the message template that you want to use for sending out POS Receipt emails.
- At the end of a POS Order on the app, a user has the option to send an email receipt. In order to successfully send an email and format the message appropriately, verify the configuration of the properties in the process flow as specified below.
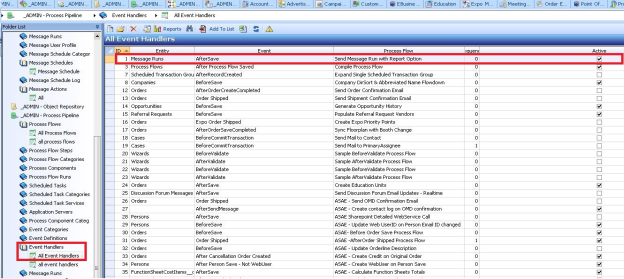
- Confirm that the Message Runs Event Handler is active.
- On the Aptify Desktop client, select the Process Pipeline application.
- Select the Event Handler service.
- Open a view with all event handlers.
- Open the Message Runs event and make sure it is set to Active status.
POS Event Setup
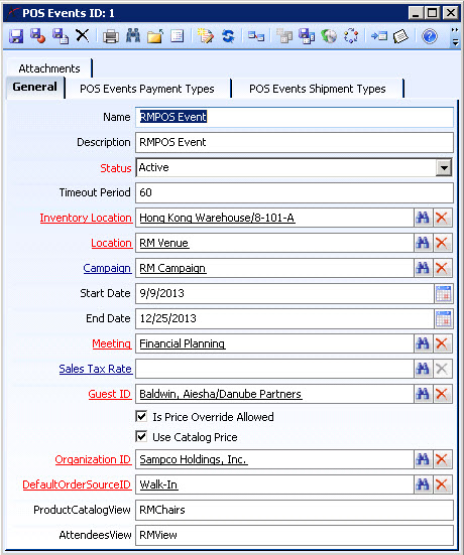
Follow these steps to create an Event in Aptify that corresponds to where your organization will use the POS iPad application:
- In the Aptify Desktop client, select the Point Of Sale application.
- Select the Events service, and open a new record to create a POS event.
- On the General tab, enter the following:
- Event Name: Enter the name of the Event where you plan to use the POS iPad application.
- POS supports the creation of multiple events.
- Events set to enabled are available on the iPad.
- Description: Enter a description of the event.
- Status: Set the status to Active for the event you want to enable.
Timeout Period: Time in minutes after which the token/session with the app will expire. This is a non-editable field on the Event form. Timeout period can be changed from the Timeout attribute of 'Database Token' record, under the Token Provider service.
Please ensure that the timeout for the POS and SOA app pools on the IIS is greater than or equal to the timeout period set for token expiration. By default, IIS sets the app pool timeout setting to 20 minutes. Follow the steps given in the Additional Information section for changing the app pool Timeout setting and Timeout attribute for Token Provider.
Inventory Location: Enter your default inventory location. This inventory location will be used for depleting inventory for all "Pay-and-Carry" Orders. If the product is not available in that inventory location then it will be depleted from its default inventory location. For To Be Shipped Orders, inventory will always be depleted from product's default inventory location.
Location: Enter the location for the event. This location determines the ship to location for all the "Pay-and-Carry" orders.
Campaign: If applicable, enter a campaign to apply to the orders placed for this event through the POS app.
Start Date: Enter the POS Event Start Date.
End Date: Enter the POS Event End Date.
Meeting: Enter the meeting associated with the Event. All the people who are registered for the meeting appear as attendees on the iPad, using the GetAttendees as the attendee view.
Sales Tax Rate: This field is reserved for future use.
Guest ID: Enter the generic Person ID to be used for customers checking out as a guest.
Organization: Enter the name of the Organization to be used for all the orders placed for this event through POS app.
Is Price Override Allowed: Check this box, to allow a POS user to override the price of the product from the iPad. POS User can only override the price of a product, if this property is checked as well as the product price override is allowed.
Use Catalog Price: Catalog Price is the highest price of the product from the price matrix. Enabling this feature will use the catalog price for every user. Uncheck this box, to disable catalog pricing and use any specified member and non-member pricing instead. Irrespective of the value of this property, the first page on the POS app will always display the catalog price. But based on the value of this property it will recalculate and select the appropriate price on the checkout page of POS app.
DefaultOrderSourceID: This field is reserved for future use. Default Order source at present can be set from the POS Orders entity's Configuration tab. Set the same value in this field as set in the POS Orders entity configuration.
ProductCatalogView: Enter the name of the view that includes all the products that will be available for sale at the event using the POS app. Verify the fields of the view entered are exactly same as that of the ProductCatalog view (This is a baseline view in the POS Products service owned by sa.) which is under POS Products service.
AttendeesView: Enter the name of the view that includes all persons available for an event on the POS app. Verify that the fields of the view are exactly same as that of the GetAttendees view (This is baseline view in the POS Attendees service owned by sa.) under the POS Attendees service. Please ensure that Product Catalog and Attendees views have unique names and no spaces.
- Event Name: Enter the name of the Event where you plan to use the POS iPad application.
Select the POS Events Payment Types tab and add the payment types that will be accepted at the event. At a minimum, one payment type must be included each for cash, check, and credit card payment methods. Payment Types supported by POS are Cash, Check, Credit Card and Credit Card Reference Transaction.
There cannot be more than one of same credit card type. If you enter multiple payment types that use the same credit card type, then the POS application will use the payment type with the lowest ID. In other words, for best results, there should not be two VISA credit card payment types or two MASTERCARD payment types.
Cash Control Batch can be set while adding Cash and Check payments. Please note that Cash Control Batch will not work for Credit Cards or Credit Card Reference Transaction payment types.
Save the record to finish creating the POS event.
- Select POS Events Shipment Types tab and add the shipment types that you want to make available for the orders that are "To-be-Shipped". POS app user will be able to select any of the available shipment types, for "To-be-Shipped" orders. To set the default shipment types for "Pay-and-Carry" orders and "To-be-Shipped" orders, please refer to the POS Order Entity configuration section.
POS Order Entity Configurations
Follow these steps to define a set of entity attributes for the POS Orders entity based on your system's configuration:
- Open the POS Orders Entities record and browse to the Attributes sub-tab under Configurations tab.
- ShipTypeID: Enter the ID of the default shipment type that will be used for orders that are "To-be-Shipped" to the customer after the event. Please note that the final selection of the Shipment Type will depend on what option of shipment type was selected by the POS app user during checkout.
- OrderSourceID: Enter the ID of the Order Source that will be used as the order source for the orders placed through the POS app. It is recommended to have a separate Order Source for all the POS Orders.
- PayAndCarryShipTypeID: Enter the ID of the shipment type that will be used for "Pay-and-Carry" orders (that is for orders where a customer will take possession of his/her purchases directly at the event).
After completing the installation and post installation configuration steps, you should have a working web service and POS service to support the POS iPad app. Follow the instructions below to install the POS app on the iPad and create profiles for using the app.
POS iPad App Installation and Configuration
Aptify requires two items for enabling POS on an iPad:
- UDID: It is a unique number for every iPad.
- Please follow the steps below to get iPad UDID, using iTunes:
- Connect your device to a computer that has iTunes.
- Click on top right hand corner of iTunes to select your iPad
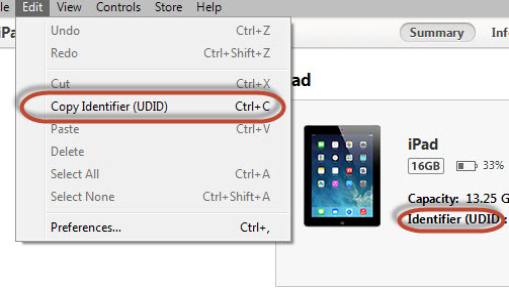
- iTunes will display the device name, serial number and other important information regarding your iPad (as shown in the image below).
- Click on the 'Serial Number' and iTunes should now display iPads UDID in place of Serial Number (as shown in the image below). User might have to click a couple of times for UDID to show up.
- Click on 'Edit' and select 'Copy Identifier (UDID)' from the drop down.
- Paste this UDID on a notepad or in the email, and send it to Aptify.
- Please follow the steps below to get iPad UDID, using iTunes:
- Email ID: Aptify will require an email ID, which will receive the POS app download link and future app update links. You can use the same email ID for all the iPads, if you have got more than one iPad.
After receiving UDID and email ID, Aptify will send a download link for the POS app to the specified email address. Follow these steps to install and configure POS app on an iPad.
- Open the email account provided to Aptify, on the iPad where you need to install POS app.
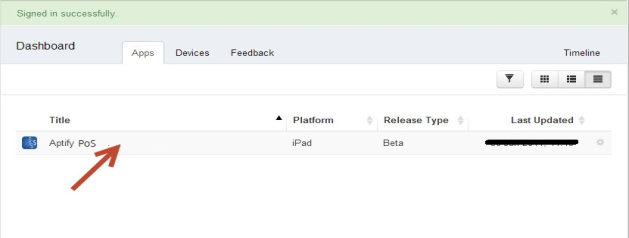
- You will receive an email from hockeyapp. Please register and create a Hockeyapp User.
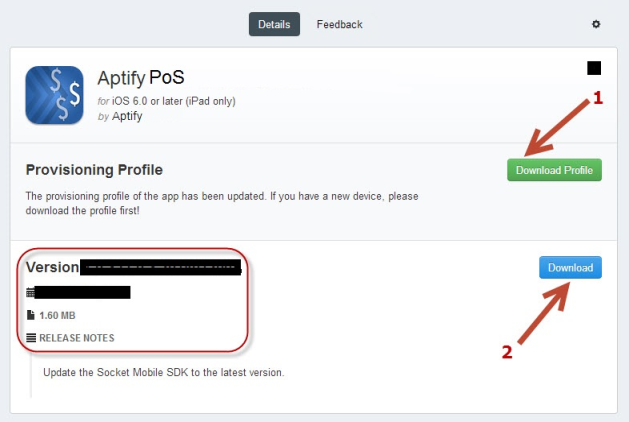
Click on the link provided in the email and follow the instructions to install the profile first and then to install the POS app. Alternatively, login to Hockeyapp.net using the User created in the last step, and go the App download page.
Both installs should be performed in the order specified. For iOS 8 or higher, there is no need to install provisioning Profile.
After the POS app is successfully installed, open the iPad settings.
- From the left pane, select the POS app settings page.
- From the right pane, under Advanced settings, select Aptify.
- Enter the Base URL. This is the URL of the POS service that you entered when installing the POS web service but without the service route name in the end. (e.g., https://ptofsaletest.aptify.com/AptifyPointOfsale/)
After completing these steps, the POS implementation process is complete. Open the POS iPad app and verify your login using the Windows Domain User (default) or SQL user depending on your setup configuration. More information on usage of Aptify Point of Sale application is available in the Aptify POS – User Guide.
If you cannot access the POS app, please refer to the troubleshooting section of this document. Contact Aptify Technical Support.
Copyright © 2014-2019 Aptify - Confidential and Proprietary
