SSO Documentation
- SANCHI BEHL (Deactivated)
- Madhuri Dange
- Sagar Alat (Deactivated)
Introduction
SAML (Security Assertion Markup Language) 2.0 SSO (Single Sign-On) minimizes the number of times a user has to login to various websites. It does this by having the user manually login to one site (called the identity provider or IDP) and then automatically logs the user into one or more other sites (called service providers or SPs), without having to provide credentials. A trust relationship must exist between the identity provider and the service providers, such that the Service providers trust that the identity provider has authenticated the user. SAML 2.0 supports two single sign-on flows:
- IDP - Initiated SSO
- SP - Initiated SSO
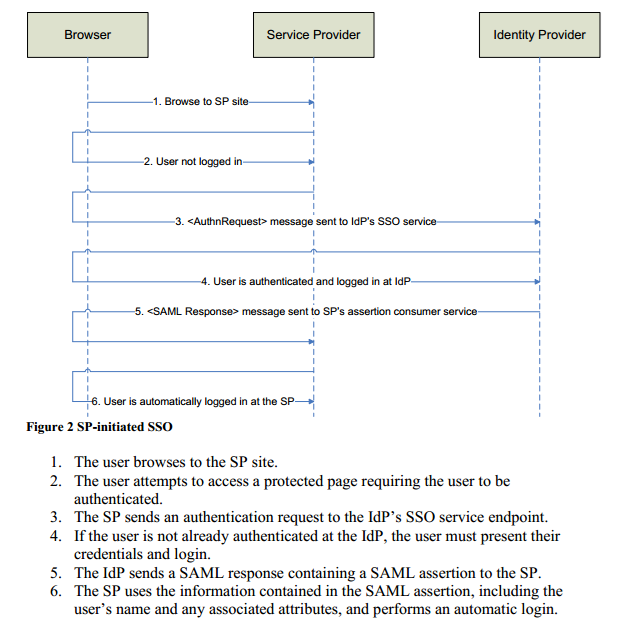
SAML SSO in e-Business 6.0 and later versions. (SP initiated SSO)
In e-Business 6.0, we have built an Identity Provider which is IDP. This can work as an IDP for any Service Provider (SP). The Service Provider can be non-CMS or CMS, like Wordpress, Sitefinity, etc. which is SAML enabled. The Service Provider needs to send SAML based requests to e-Business 6.0, and it should be able to receive SAML response, process it and log in their system with the user information embedded in the SAML response.
Given below are the steps for this:
- SP sends a SAML based Authn Request (Authorization Request) to the IDP. This request contains information like issuer, signature (If signing the request is enabled at SP).
- IDP receives this request and checks for the issuer and signature (if enabled). Also, after verification, it checks if the user is logged in.
If already logged in, the IDP delivers the assertion or SAML response to the SP at the specified SPACS URL. This response contains user information like ID, name, email, and whichever field is configured in the stored procedure.
Note
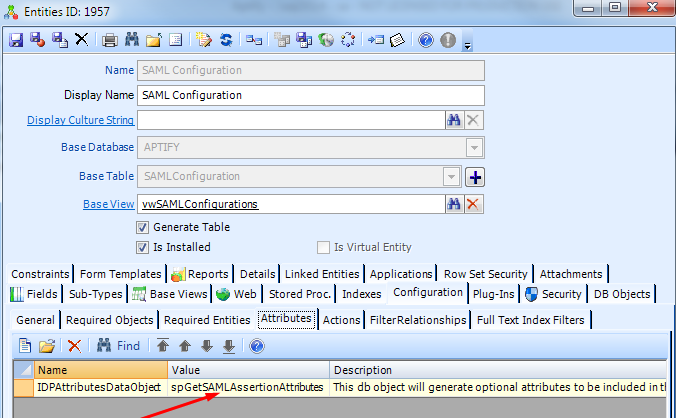
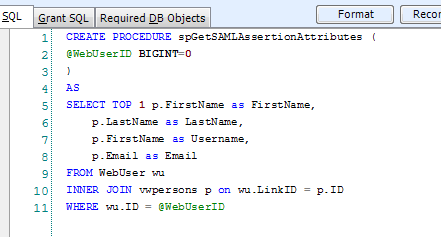
Under SAML configuration entity, we have an attribute called “IDPAttributesDataObject”. Corresponding to this, there’s a Stored Procedure, “spGetSAMLAssertionAttributes”. This SP returns some name/value pairs related to the person/web user. The result of this is embedded in the SAML Response sent by the IDP to the stored procedure. SP can utilize these field values as required. This stored procedure, as of now, returns first name, last name, and email. Also, it can be configured to return different results as per requirement.
- The SP reads SAML response, verifies signature and issuer and then logs the user in their system.
- In step 3, if the user is not already logged in, the IDP redirects to the authentication interface URL to collect user credentials. The interface submits the credentials to the IDP and upon successful authentication at the IDP, the same process follows as described in steps 3 and 4.
- If logout is configured at IDP and SP, then the SP sends a logout request to IDP and on successful logout, a logout response is delivered to SP logout URL.
Suppose there’s another Service Provider SP2, which comes to IDP with Authn Request, and if the user is already logged in the IDP, the IDP directly sends the SAML Assertion to the SP2 without asking for user credentials.
Configure SAML SSO on Smart Client
There are settings on smart client which the Administrator needs to do to configure SAML. To do this, follow the steps as given below:
- Go to Applications >> Web Services >> SAML Configuration >> New record.
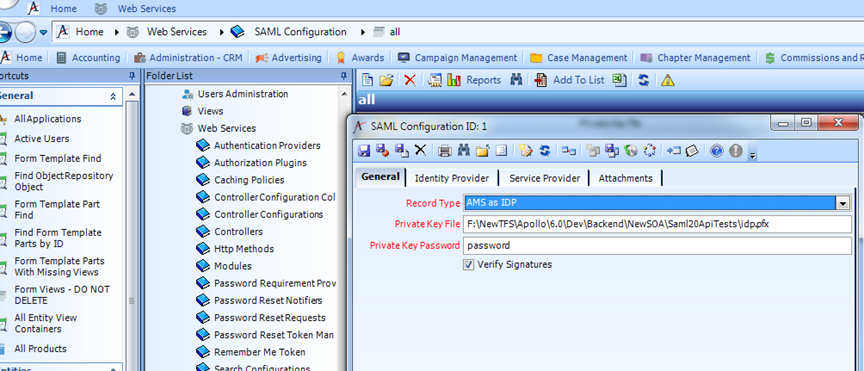
- As we are supporting our AMS as IDP, the Record Type should be set as AMS as IDP.
- We need to specify the full path of the Private Key File. This file is protected by a password which we enter in the next field. This to be placed in any local folder in IDP environment. Following are the required fields:
- PrivateKeyPassword - nvarchar(100) - required - The password for accessing the PrivateKeyFile.
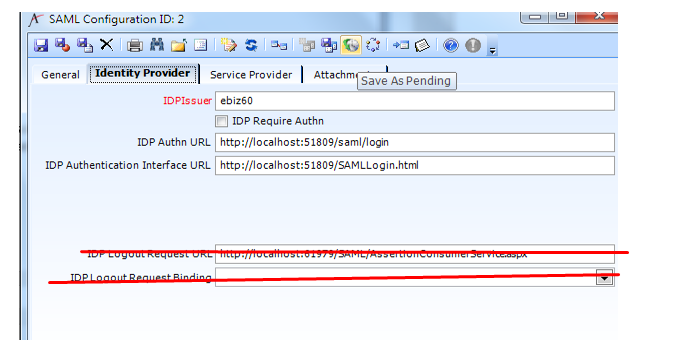
- IDPIssuer: required - The value of the Issuer element in SAML messages from the IDP. This could be any of your choice.
- IDPRequireAuthn bit - If true and this record is for the SP, the SP should generate the Authn request during redirect to the IDP. If true and this record is for the IDP, the IDP should fail if no authn is delivered.
- IDPAuthnURL - nvarchar(200) - where the authn request should be submitted to in the IDP. This is the endpoint in IDP where Authn Request from the SP is submitted to. Please refer to the “SAML” folder under SOA. In example its shown with localhost.
- IDPAuthenticationInterfaceURL - nvarchar(200) - When the recordType is AMS as IDP, this tells us where to find the interface for collecting credentials after the authn request has been processed. This is basically a dummy HTML page created by us, where the user submits the credentials to the IDP. This page can be any page, could be the Login page of the SP as well, just it needs to submit to the IDP with the user credentials.
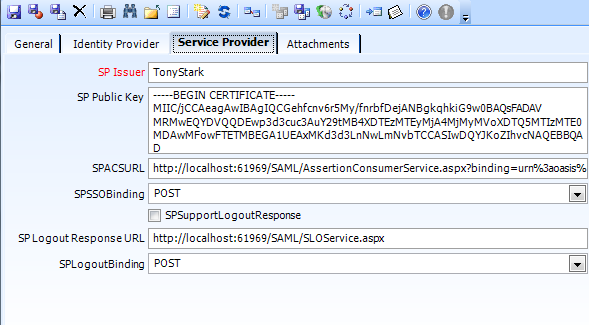
- SPIssuer - nvarchar(100) - required - The value of the Issuer element in SAML messages from the SP.
- SPPublicKey - nvarchar(max) - if this record is for an IDP, this is the X509 certificate to use for validating messages from the SP.
- SPACSURL - nvarchar(200) - if this record is for an IDP, this is the location the assertion will be delivered to when authentication is successful.
- SPSSOBinding - nvarchar(10) - POST or GET - the HTTP protocol the assertion should be delivered on.
- SPSupportLogoutResponse - bit - if true and this record is for an IDP, the IDP will generate a LogoutResponse message.
- SPLogoutResponseURL - nvarchar(200) - the location the LogoutResponse message should be delivered to
- SPLogoutBinding - nvarchar(10) - POST or GET - the HTTP protocol the LogoutResponse message should be delivered on.
Use below Public Key:
-----BEGIN CERTIFICATE-----
MIIF1zCCA7+gAwIBAgIJAO7bFs87n8vCMA0GCSqGSIb3DQEBCwUAMIGBMQswCQYDVQQGEwJVUzELMAkGA1UECAwCRkwxFzAVBgNVBAcMDlN0LiBQZXRlcnNidXJnMRgwFgYDVQQKDA9Db21tdW5pdHlCcmFuZHMxFDASBgNVBAsMC0Nyb3dkV2lzZG9tMRwwGgYDVQQDDBNDV19TQU1MX1NFTEZfU0lOR0VEMB4XDTIwMDQyMDE4MTA0N1oXDTQwMDQxNTE4MTA0N1owgYExCzAJBgNVBAYTAlVTMQswCQYDVQQIDAJGTDEXMBUGA1UEBwwOU3QuIFBldGVyc2J1cmcxGDAWBgNVBAoMD0NvbW11bml0eUJyYW5kczEUMBIGA1UECwwLQ3Jvd2RXaXNkb20xHDAaBgNVBAMME0NXX1NBTUxfU0VMRl9TSU5HRUQwggIiMA0GCSqGSIb3DQEBAQUAA4ICDwAwggIKAoICAQC/ymabmUzlziPRelAg7RuMhF/Oto7NLhm305oNK7kLlb6zYpuQv0POn0TBXJXOIL21VZIdFcDw8lfOCV1kja7WUYA7W7BUwd+4wtfDR4Kj3LNuTME3BjqU+C1sKvgFTko8wPi0iuagZkNuwDx3Zz6FGydGQxPVQZIilrT22HSp+pSxA4Ydb2ijY44waGnt2gI/NRsNx00rrWV0+H5FOd/l34ofLjm/fhuztYkiduxLjj8jXLrO41E0K0vY2V/mkhiJAnb8mg3xC+0RF2s1gamCEOyrUBK0I0pzZ1sDQEvleVrz/eA/bjUZJ9Sxa+VLqUxPjS+T5JHk9LGNAUsZEqaUmegy9RGMDQfq1cx9ZB9lmDBVRoh4i1EU39uHPWnf06sECuM3gHsBH3x9GxiQE5uX19t0fp0ZqIdcqm/eH9RYaza4lbU5ZoWTBnrMK07UEp7TDCQVDtn/c4LioBuLxB5FZXiBTYGC6dCKtjhjAP3FUCU6bteewA0xaRvdMdEUsBHtv8UDVq+duW27GGEEUGWJczAOUadaeAcj3oQFXv7Lpvmya1nwlmJx28fqkZ+AifIg6WsZBbPTLFctevOdjkzxBr9BYQC/a0AyNJbWDixqeEMU110qft/xYLeXT6vtz8043ZddzbA/1gotifurxezbgSfIT8EIX/2/qQXZZrqgLwIDAQABo1AwTjAdBgNVHQ4EFgQUtx6jFw9De0+3EAjez4McAyJfGpMwHwYDVR0jBBgwFoAUtx6jFw9De0+3EAjez4McAyJfGpMwDAYDVR0TBAUwAwEB/zANBgkqhkiG9w0BAQsFAAOCAgEAMUY6OJIzzH4C9DsZKYFkAGobFMGobK/UXA75+k9SIbU7PJ7iznoclEIu/2v31LAXVsLhrLGXs4NFt42H1ZQRAboKaXybC2/biRmkw3lYefeNL3vylbp14M54G3REayT4ZR8GVIxqW7c1eJ8Vb6Xpp5RC/UjajnwSMhnIw91Hj+d/Y3YXOMo+EfeYG5CakU8CE3oQV9csuVo2qS9rLZ8E6DiJtvO643b1HvhFrZax6waD/R+hn4IVB8jkoFSd/9zudNP6S11sj3k1Hu03Tvpd1H3npMJhFN8xMmLllenfMHM3ay2aV1szsJ18QLwz8dQTI55X1SsSxvGSrQwIeVfW9a/xRiYyc4jTR2fBmBC/Qnn8nAFNZevO8NKF3cAxKxBipuArj/qDCjcu/DSF327epayzaJbDO5OraUsYeYjqKCF74P7yw/2hbj6orWJJJKyhDaIsfzZsZX3cdlJfmc5/pqN7+SBjZRM8uo7DKFXqfkGgM152kVOz5fxW6Xz7TBKGC6dk2nm4tjpNxOItKABgpT+Lg2DhqUcmqoo4sEfdE1i1t88/CWB+W1EnenCbfE9HdR8A4ZV+wXbmYMGIfnUHUUHJ0wcIsbN8pkBNTmAsiil9tNBh4gBj7uiOcM61ZYcp321E0fU4QtJXWb6mkV9Ev3+V7xlU5iDlbmcvh1AXc5M=
-----END CERTIFICATE-----
4. Dump sp.pfx file into your website hosting path.
Not Required Fields
Following fields are not required:
- IDPPublicKey - nvarchar(max) - If this record is for a SP, this is the X509 certificate to use for validating messages from the SP. (Not Reqd for AMS as IDP)
- IDPLogoutRequestURL - nvarchar(200) - The location the LogoutRequest message should be delivered to. (Not Reqd for AMS as IDP)
- IDPLogoutRequestBinding - nvarchar(10) - POST or GET - the Http protocol the LogoutRequest message should be delivered on. (Not Reqd for AMS as IDP)
Specific Sample Wordpress SP config in smart client
Note
For using Wordpress as SP, you need to turn off Anti Forgery, as the WP plugin doesn’t send CSRF tokens along with the requests.


IDP Code Settings
JSON endpoint configuration
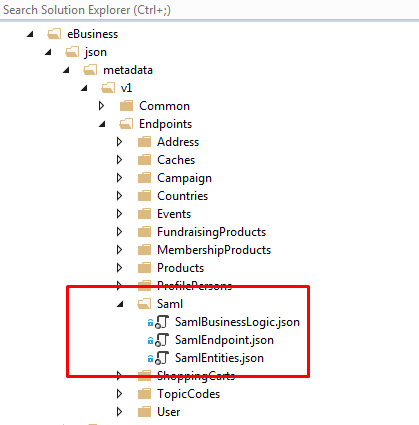
- Copy the “SAML” folder and paste under endpoints
- Copy and paste the SAMLLogin.html under SOA

- In Below Image
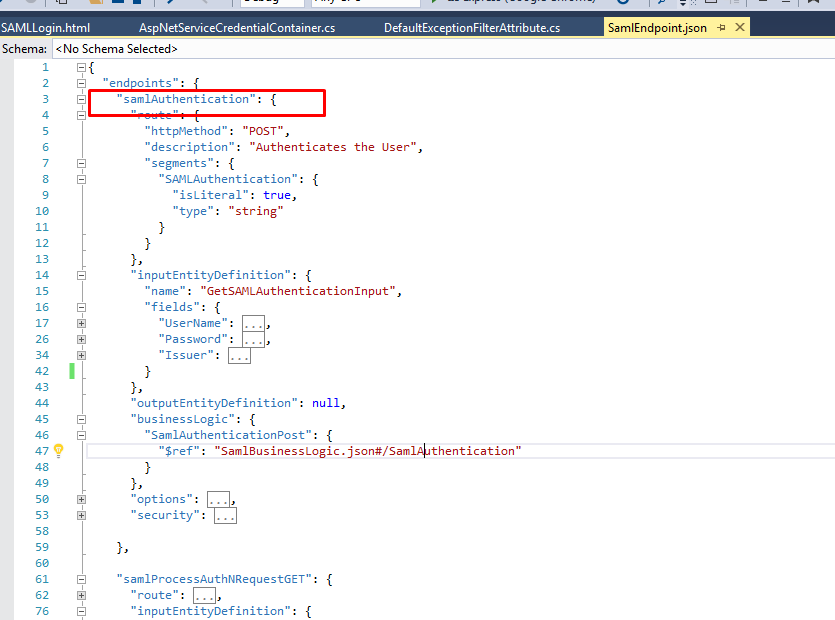
- "v1/SAMLAuthentication" is the endpoint(POST) in IDP, where Authentication Credentials are submitted.
- Username, password – required as obvious
- Issuer – It's a required field and it has to be appended to the authentication URL, so that IDP knows where this Request has come from. Accordingly, it fetches record from SAML configuration and delivers SAML response.
- Whenever an Authn Request is sent to IDP, and the user is NOT authenticated, the IDP redirects to the IDPAuthenticationInterfaceURL appending the “Issuer” value which it fetches from the incoming SAML Request. It also appends RelayState if present on the request. RelayState is the final URL where user should be redirected to by the SP after being authenticated by the IDP.
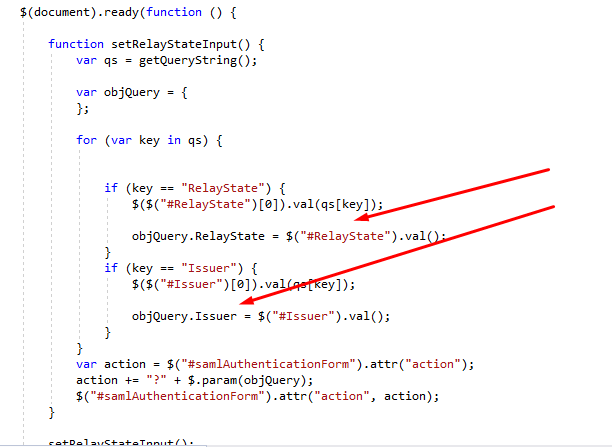
SAMLLogin.html
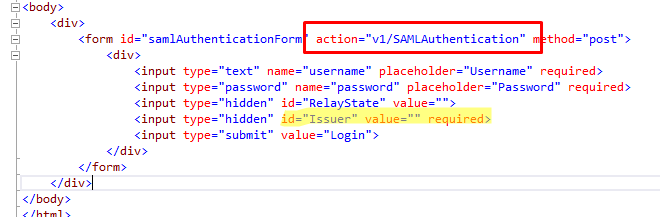
Appending of Issuer and RelayState to the Authentication URL.
Note
You do not need to maintain two login pages. SAMLLogin.html is a dummy SAML Login page shown above. You can make any other Login page (for example, Stock Login Page) SAML enabled, it just needs to submit(POST) to the SAML Endpoint which in this case is “{HostServicesURL}/v1/SAMLAuthentication” as shown in the image.
It needs to send “Username”, “Password” as Post Data Parameters (In Body of request) and “Issuer” & “RelayState” as Query Parameters. It’s all shown in images above.
So the POST URL would look as given below:
“{HostServicesURL}/v1/SAMLAuthentication?Issuer={yourIssuer}&RelayState={redirectURL}”
POST Data: {
"UserName": "username",
"Password": "pwd"
}
SAML Endpoints
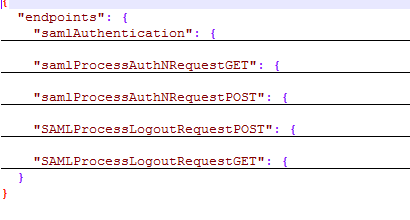
SAML Authentication End Points
SAML Authentication endpoint
This authenticates the user in IDP using the username, password and the issuer values provided in the request.
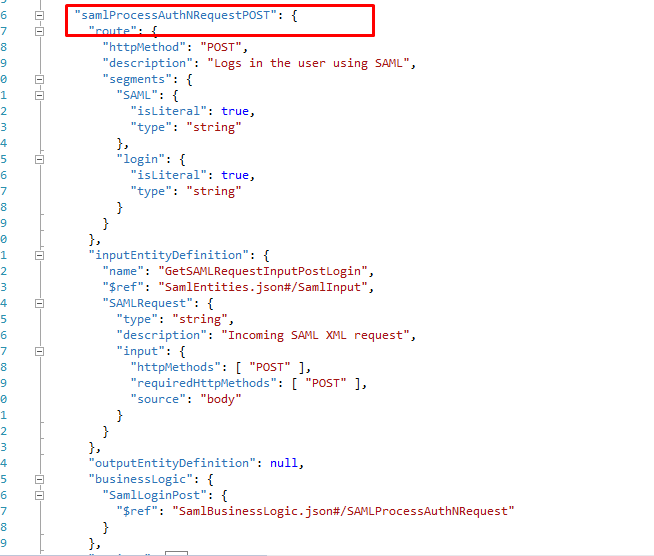
SAML Process Authentication Request using POST
This receives SAML Authn Request using HTTP POST method and processes it.
SAML Process Logout Request using POST
This is responsible for logging out the user from IDP.
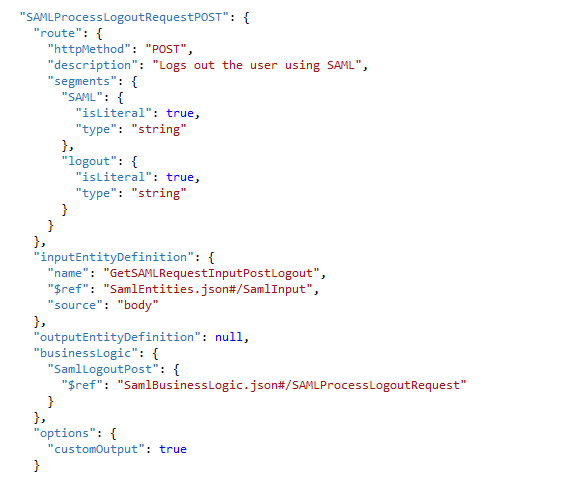
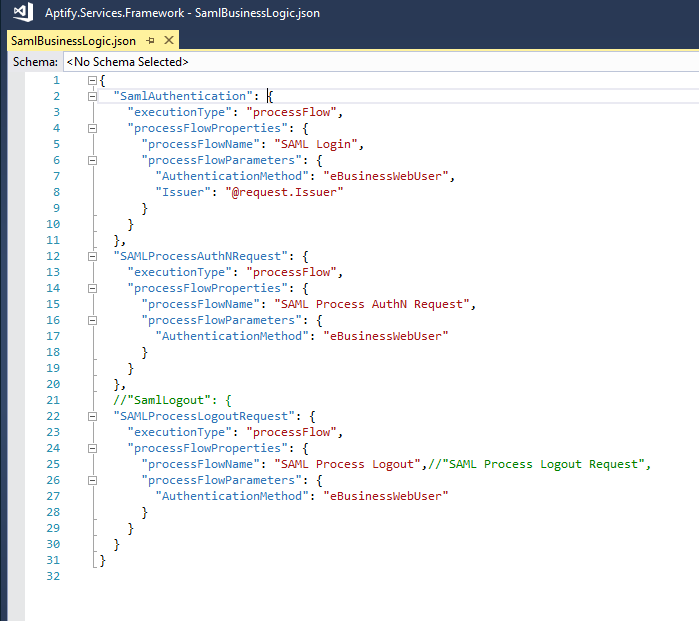
SAML Business Logic JSON
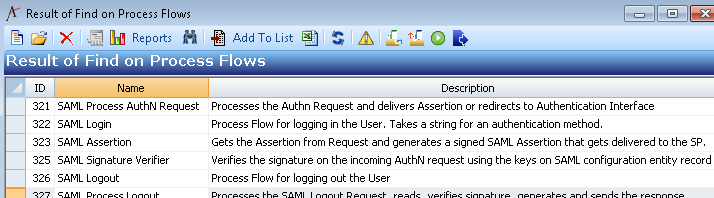
SAML Process Flows
SP Side Settings
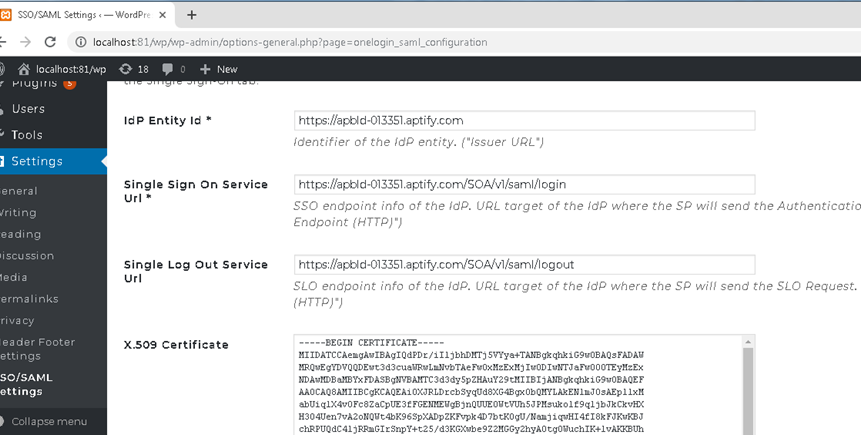
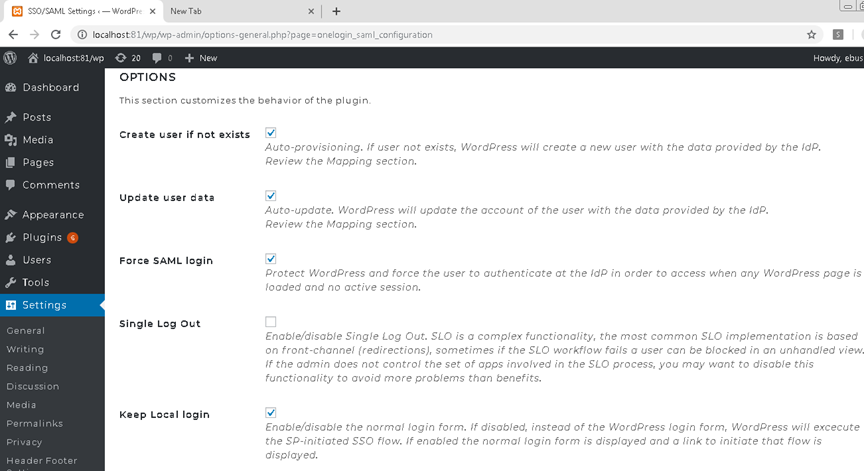
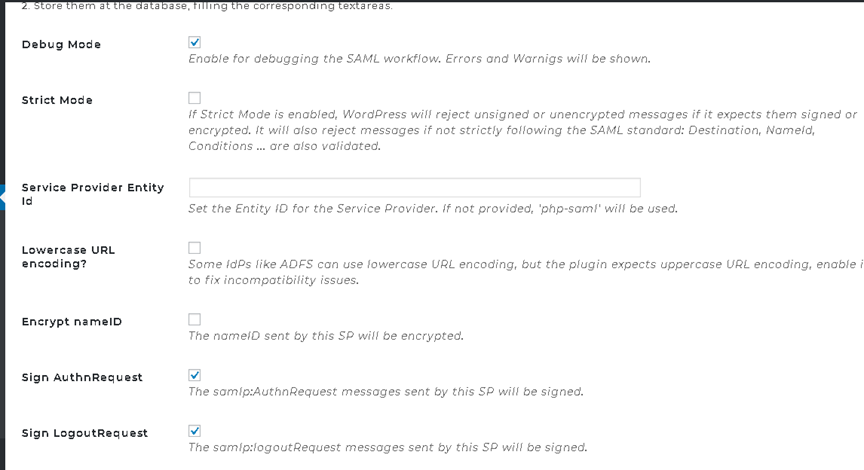
Wordpress SP Plugin Configuration (One Login SAML Wordpress Plugin – third party)
Local URL in Wordpress Environment (iw013192): http://localhost:81/wp/wp-admin/options-general.php?page=onelogin_saml_configuration

SAMPLE Service Provider .net Application
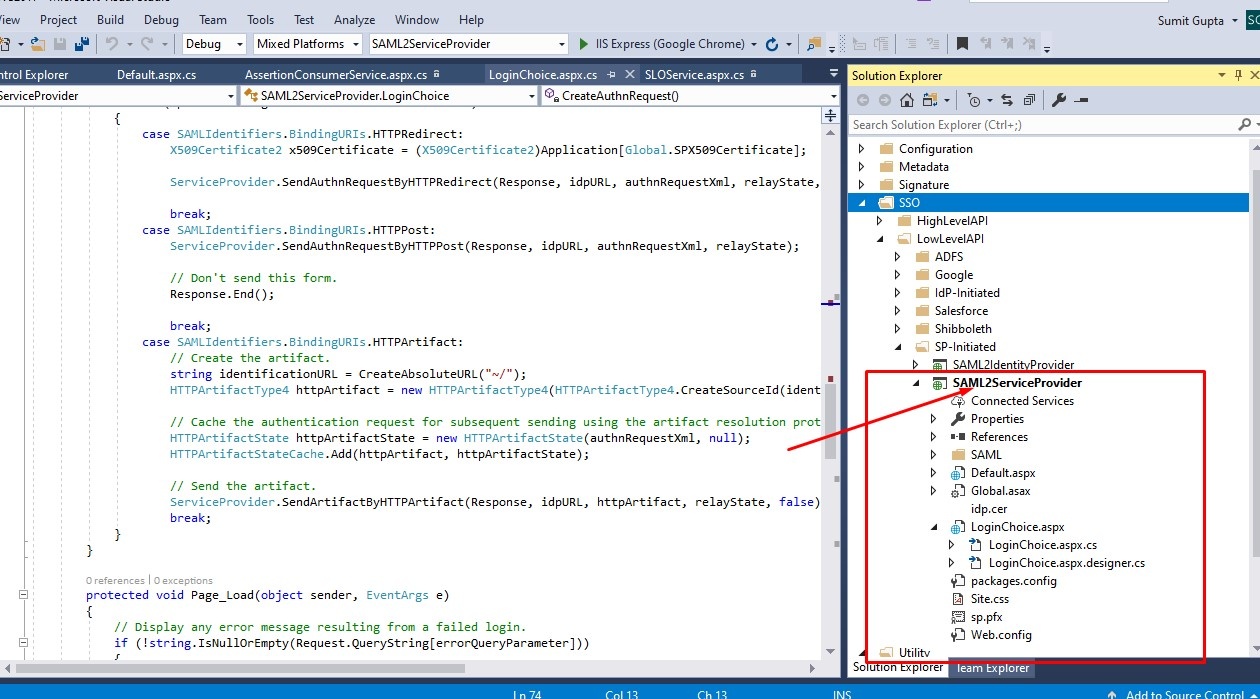
Follow the instructions given below to setup SAMPLE Service Provider .net Application for testing:
Open SAML2ServiceProvider project under ../SAML for .NET/Examples/SSO/LowLevelAPI/SP-Initiated/
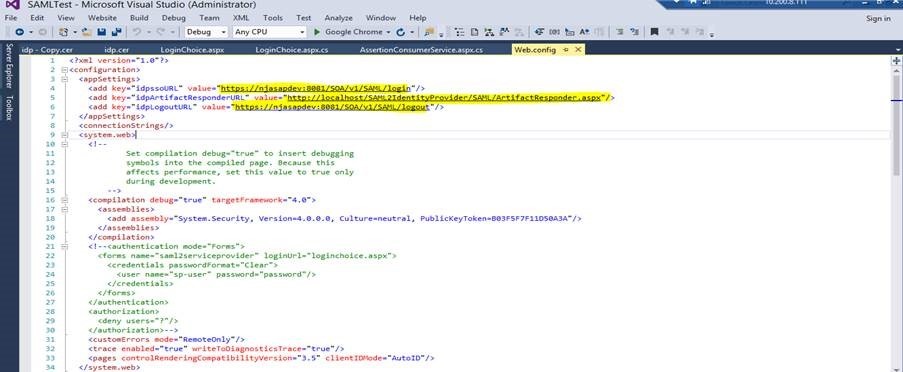
Web Config Changes
<appSettings>
<add key="idpssoURL" value="https://xxxxx/SOA/v1/SAML/login"/>
<add key="idpLogoutURL" value="https://xxxxx/SOA/v1/SAML/logout"/>
</appSettings>
<!--Added Key for relayState, need to update as per requirement, or need to fetch from URL-->
<add key="relayState" value=[Your Redirect URL here]/>
where xxxxx is the IDP site.
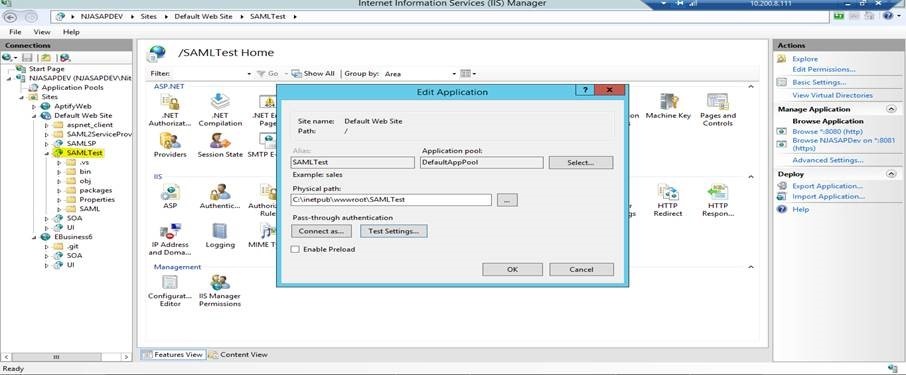
Hosting on IIS:
- Copy Paste your Project Folder under "C:\inetpub\wwwroot"
- Add an application under Default Web Site
- Navigate to the path of Project as shown in below images
- Browse the application.
Setting up Certificates/Keys
IDP Side:
Refer idp.cer certificate file and copy it into your website hosting path, specify the full path of the Private Key File in the SAML configuration record under General Tab. The corresponding password should be updated in the Private Key Password field in SAML record.
POC of SSO between Sitefinity having e-Business classic installed & e-Business 6.0 – Non SAML
Ideally, for SAML to work between e-Business 6.0 and classic controls on .net based CMS like Sitefinity, the CMS has to be SAML enabled, should be able to send/receive SAML messages. Sitefinity should use any SAML SP plugin, or we need to code for making the CMS SAML enabled. As of now, as a part of POC for SSO between classic and e-Business 6.0, we have used 2 Login, which means we login to both systems together.
Note
For Wordpress mentioned previously, we have used SAML approach using one login SAML SP plugin.
Below are points to look for, as per POC.
- Both e-Business classic & e-Business 6.0 must point to the same Aptify database instance.
- User must first land on classic and from there an ajax call to Login into e-Business 6.0 is initiated.
- On successful Login into e-Business 6.0, the login of classic is invoked.
- We can navigate to e-Business 6.0 site and see, same user is logged in at both places.
Sample Code Done on Classic Side
Javascript Code

Dummy Login button, similar to original Login button on classic page

Screenshot of CSS
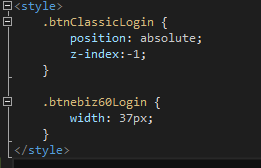
This hides the original button and new button is placed with same style and position as the original one. This new button, when clicked invokes the e-Business 6.0 login using the e-Business 6.0 Login JS code (Ajax call). On success, the original Login Button click event is fired which logs the user in classic as well.
Related content
Copyright © 2014-2019 Aptify - Confidential and Proprietary