Create a UI Part Metadata Item
When you need an arbitrary collection of information to be accessible to the client side, and the information changes rarely and is not per-user, you can create a UI Part Metadata Item. Good candidates tend to be the type of data often kept in Categories or Types entities.
Despite the name, most UI Part Metadata Items don't have much to do with the User Interface. The name is a bit more understandable if you read it as "Metadata that uses the UI Parts system for caching".
Step-by-step guide
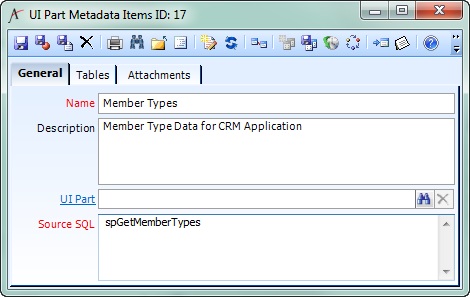
UI Part Metadata Items are found in the UI application. Begin by filling out the Name, Description, and Source SQL. The Source SQL may produce more than one table.
Rather than using complicated Source SQL, try to encapsulate complicated SQL in a Database Object and make use of that to simplify your Source SQL.
Do not fill out the UI Part. This is automatically generated (see later in the guide).
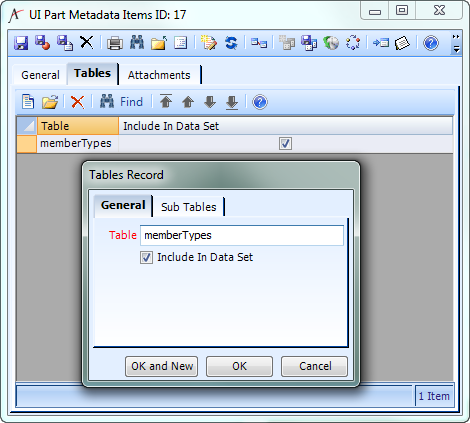
On the Tables tab, create one Tables record for each table produced by the Source SQL, in the order they are produced.
This is quite simple for simple Source SQL like spGetMemberTypes:
The Table name is the name by which you'll reference the table on the client side. Since "client side" to us mostly means JavaScript, Table names use the same naming convention as JavaScript, Camel Case beginning with a lowercase letter.
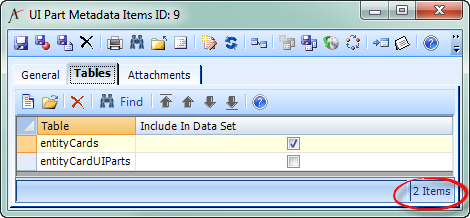
For Source SQL that produces more than one table, you can include them or not in the top-level data set produced by the UI Part Metadata Item. Uncheck Include In Data Set if you don't care about that table or if you want that table as a sub-table (see next step).You must create a Table entry for each table produced by the Source SQL, in the order they are produced, even if you don't want that table. If you do not, the code that generates UI Part Metadata Items may associate SQL result tables with UI Part Metadata Item tables incorrectly, possibly breaking any part of Aptify Web that relies on any UI Part Metadata Item, not just the one you have created.
When some tables should be sub-tables of others, you can add Sub Tables to your Tables records. This is generally useful for tables in the SQL result that provide subtype or subtype-like information, so for Sub Tables you also need to provide the names of the keys that link the parent and sub tables. Finally, a Sub Table has a Collection Name, which is the name of the JSON property that will hold the Sub Table data in the record of the parent table.
For example, the Entity Cards UI Part Metadata Item has Source SQLSource SQLspGetAllEntityCardMetadata
spGetAllEntityCardMetadata produces two tables, so there are two Tables on the UI Part Metadata Item:
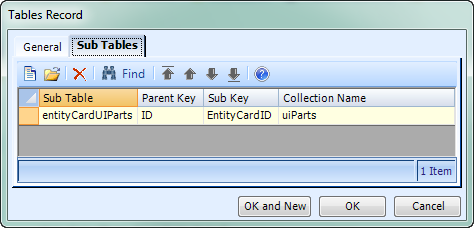
However, entityCardUIParts actually contains data that we want to access per Entity Card, not as a separate table. So it has Include in Data Set unchecked, and the entityCards Table has this setup on its Sub Tables tab:
This indicates the the sub-table information should come from the entityCardUIParts Table. The property in each entityCards entry that will hold entityCardUIPart information will be called uiParts, and each entityCards entry will get the entityCardUIParts records that have an EntityCardID value matching their ID value (see example generated JSON, below).
Run the Process Flow named "Generate HTML5 Web UI Part Metadata Items".
This process flow is never run automatically, which is why UI Part Metadata Items should only be used for data that rarely changes – you will have to manually run this process flow to update that information in the UI Part Metadata Item.
This process flow generates UI Parts for UI Part Metadata Items. The UI Parts contain JSON objects with this structure:UI Part Metadata Item JSON{ "tableName" : [ { fieldName: fieldValue, fieldName: fieldValue, ..., subTableName: [ {subTableFieldName: subTableFieldValue, ...}, {subTableFieldName: subTableFieldValue, ...}], ... }, { fieldName: fieldValue, fieldName: fieldValue, ..., subTableName: [ {subTableFieldName: subTableFieldValue, ...}, {subTableFieldName: subTableFieldValue, ...}], ... }, ... ] }For example, here is the JSON produced by the Member Types UI Part Metadata Item:
Member Types UI Part Metadata Item JSON{"memberTypes": [ {"id":"1","name":"Non-Member","description":"Non-Member","parentId":"","isMember":"False","isActive":"True","defaultType":"Persons"}, {"id":"2","name":"Member","description":"All Member Types","parentId":"","isMember":"True","isActive":"True","defaultType":""}, {"id":"3","name":"Individual Member","description":"Individual Member","parentId":"2","isMember":"True","isActive":"True","defaultType":""}, {"id":"4","name":"Corporate Member","description":"Corporate Member","parentId":"2","isMember":"True","isActive":"True","defaultType":""}, {"id":"5","name":"Student Member","description":"Student Member","parentId":"2","isMember":"True","isActive":"True","defaultType":""}, {"id":"6","name":"Former Member","description":"Former Members","parentId":"1","isMember":"False","isActive":"True","defaultType":"Persons"}, {"id":"7","name":"Member for Life","description":"Member for Life","parentId":"2","isMember":"True","isActive":"True","defaultType":"Persons"}, {"id":"8","name":"Retired Member","description":"Retired Member","parentId":"2","isMember":"True","isActive":"True","defaultType":"Persons"} ] }And here is a stripped-down version of the JSON produced by the Entity Cards UI Part Metadata Item:
Entity Cards UI Part Metadata Item JSON{"entityCards": [ {"id":"1","name":"Persons Default", ..., "uiParts": [ {"id":"1","entityCardId":"1", ...} ] }, {"id":"2","name":"Companies Default", ..., "uiParts": [ {"id":"2","entityCardId":"2", ...} ] }, ... ] }Note how the entityCardUIParts, instead of being a separate table, have been split out into subtables based on the Entity Card's id matching the Entity Card UI Part's entityCardId.
Now you're ready to use your UI Part Metadata Item in the Aptify JavaScript API.
Related articles
Related content
Copyright © 2014-2019 Aptify - Confidential and Proprietary


