Installing the Aptify LMS Module
Follow these steps to install the Aptify Learning Management System (LMS) add-on application:
If you are installing the database and web server components separately, you must install the database server components first. See the in About the Aptify LMS Setup Program Options for more information.
Confirm that your Aptify system already has the Education Management add-on application and e-Business Suite installed. These are required to use Aptify LMS.
For Aptify LMS 5.5.1 installations, your database should be running Aptify 5.5.1 and up and your e-Business installation must be running e-Business 5.5 and up. For Aptify LMS 5.5.1 for Aptify 5.5.3 installations, your e-Business installation must be running e-Business 5.5.3.
The Setup application will validate that your environment has the supported software versions installed.
- Identify/create the required user account that will to used during the LMS setup.
- This can be the same user that runs e-Business.
- If you are unable to specify a domain user for both the Database User and the LMS User, see Note Concerning Installation With A Local Trusted User or more information.
- Add/verify the designated domain account/local users has a trusted user in Aptify, with the appropriate privileges.
- Note that this user must be assigned a valid user license to successfully communicate with the database server.
- Using Microsoft SQL Server Management Studio, back up the APTIFY database before continuing.
- Log in to the web server that hosts the e-Business site as a user who has administrative privileges.
- If you are installing the database server components only, you can log into the database server, if it has the Aptify Desktop client installed, or any computer on the network that has the Aptify Desktop client installed.
- Download the installation ZIP file to a folder on the web server that is hosting the e-Business site (or database server if installing database server components only) and unzip its contents.
- Run the installation program locally on the server; do not run it over the network.
- Close the Aptify Desktop client on the computer, if currently running.
- Right-click the Setup application and select Run as administrator to launch the installation program.
- Log in toAptify as an administrative user when prompted.
- In the Server field, enter the name of the Aptify database server.
- Select the Specify a User Name and Password option, and enter the log in information for a user account that has system administrator permissions on the database server, such as the default sa account.
- Click OK. The Welcome screen displays.
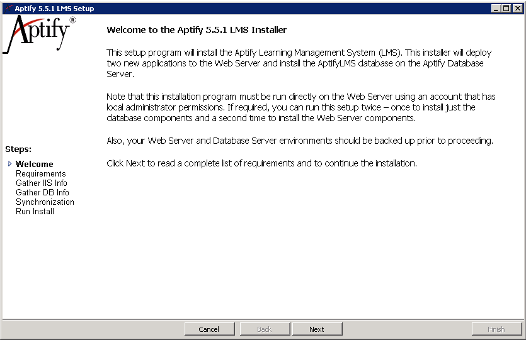
- Review the information on the Welcome screen and click Next to continue. The Requirements screen displays.
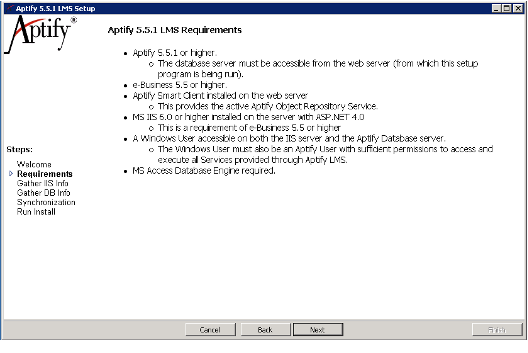
Review the installation requirements for Aptify LMS and click Next to continue.
Since Aptify LMS leverages Aptify e-Business, it has many of the same requirements as e-Business.
- The installer verifies that the objects in the setup program's Bin folder matches the objects in your Aptify system, which is one requirement to ensure a successful installation. If the installer detects that there is an object mismatch, it automatically synchronizes its Bin folder with the objects from your Aptify database. In that case, you will see a dialog that displays the progress of the synchronization process. When prompted, close the setup program and relaunch it to start over using the updated objects.
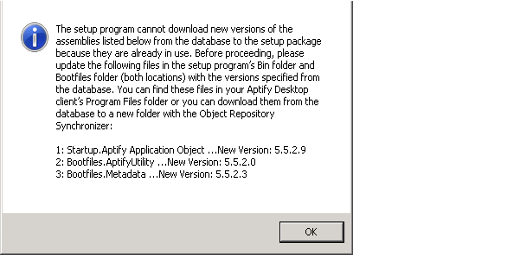
- However, in some cases, objects may already be in use by the installer so they cannot be overwritten. If this occurs, you will see a message like the one shown below:
Perform the following steps if the above dialog box displays:- Review the contents of the dialog box and write down the name and version number of any files you need to update. Then, click OK and close all relevant dialog boxes and exist from the setup program.
- On a computer that hosts your Aptify Desktop client, navigate to the Program Files > Aptify 5.0 folder on the C: drive.
- Locate the files identified in the dialog box in C:\Program Files\Aptify 5.0 and confirm that the version number of the files in the Program Files folder matches what was displayed in the dialog.
- Copy these versions of the files from C:\Program Files\Aptify 5.0 to two folders in the Aptify 5.5.1 LMS Setup program: Bin and Bin\Bootfiles.
- Restart the setup program and continue until the installer displays the IIS Installation Details screen.
- However, in some cases, objects may already be in use by the installer so they cannot be overwritten. If this occurs, you will see a message like the one shown below:
- The setup program also checks to ensure that the Microsoft Access Database Engine 2007 is installed. If you do not have the Microsoft Access Database Engine installed in your environment, a dialog box displays, asking if you want to install it now. If this dialog box displays, perform the following steps:
- In the dialog box, click Yes. A dialog box indicating that the setup is unable to proceed displays.
- In the dialog box, click OK. The Aptify LMS installation stops and the Microsoft Office Access database engine 2007 (English) Setup screen displays.
- Select the I accept the terms in the License Agreementoption, and click Next to begin the installation.
- Restart the setup program and continue until the installer displays the IIS Installation Details screen.
- If you want to install the Aptify e-Business web server components, select the Install to Web Server option and complete the following fields (If you do not wish to install the web server components at this time, continue to the next screen):
- LMS User Name: Specify the name of a trusted user account that will run the e-Business piece of Aptify LMS (this user will run an AptifyLMS application pool in IIS). This can be the same user that is already running the Aptify e-Business site or another local User created on the server where IIS is installed. Note that the user you specify must meet the following requirements:
- Have the appropriate User Licenses including e-Business, Education and LMS Module Licenses. Note that the appropriate LMS licenses should be imported and assigned prior to installation of the LMS module.
Have sufficient permissions in Aptify to access and update all services that can be modified using Aptify LMS (such as the Education Management services).
When installing LMS with a local administrative user, the same user must be available on both the Aptify e-Business web server and the Aptify database server. See Note Concerning Installation With A Local Trusted User for more information.
- LMS User Password: Enter the password for the trusted user or the local user specified in the LMS User Name field.
- Confirm Password: Re-enter the password you entered in the LMS User -Password field.
- Web Service Directory: Specify a folder location on the web server where the files for the Scorm Engine and Courses applications will be installed. This can also be the same default location where e-Business is installed.
- During installation, the installer creates two folders in the location you specify on the web server that hosts the e-Business site (the folders are named ScormEngine and Courses).
- The installer automatically converts these folders to web applications, so at least initially you should install them in a location where they can act as their own application and not add them to an existing application (like the e-Business web site). For example, if you provide a Web Services Directory path of C:\Inetpub\wwwroot, the installer will create these applications inside the server's Default Web Site.
- The installer adds the required permissions for the LMS User to those folders. Therefore, the user who is currently logged into the web server and the LMS User specified above must have Modify permissions to the target folder prior to running the installer.
- LMS User Name: Specify the name of a trusted user account that will run the e-Business piece of Aptify LMS (this user will run an AptifyLMS application pool in IIS). This can be the same user that is already running the Aptify e-Business site or another local User created on the server where IIS is installed. Note that the user you specify must meet the following requirements:
- Click Next. The Database Installation Details screen displays.
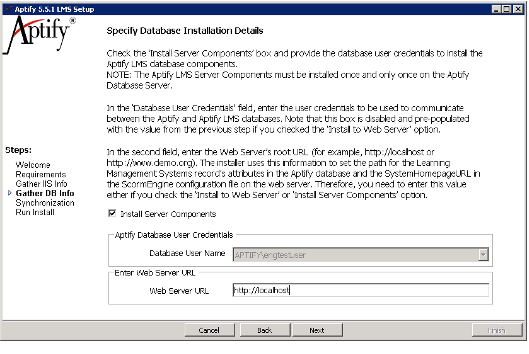
- Review the Specify Database Installation Details screen and choose one of the following options:
If this is the first time you are installing Aptify LMS for your Aptify system, select the Install Server Components option to install the components to the Aptify database server and complete the following fields.
Database User Name: If you selected the Install to Web Server option in the previous screen, the trusted user you specified appears in the Database User name field by default and cannot be changed (the field is disabled for editing as shown below). Note that if several different active user records exist in the Aptify database with the same user name, they will appear in the drop down list. If the LMS User is a local user and an equivalent user is found on the Aptify database, this field will automatically select that user as the default Database User to be used by the installer.
When installing LMS with a local administrative user, the same user must be available on both the Aptify e-Business web server and the Aptify database server. See Note Concerning Installation With A Local Trusted User for more information.
- Web Server URL: Specify the base URL for the e-Business web server (such as,http://www.mywebserver.com, or http://localhost). This will identify the location of the new ScormEngine application that the installation will add to the web server. When installing the server components, the setup program automatically uses this path to configure the Aptify LMS attributes found on the Aptify LMS record in the Learning Management Systems service within Aptify. You can manually edit the attributes later if you need to change the web server URL after completing the installation. Note that the value you enter here must begin with http://, which the setup program will validate.
If you have previously installed the Aptify LMS components on the database server during an earlier run of the Setup program and now you want to install or reinstall just the Web components for an e-Business site, make sure the Install Server Components option is cleared and continue to the next screen.
- Click Next. The Object Repository Object Synchronization screen displays.
- Aptify LMS 5.5.1 includes an update to a set of e-Business user controls to support new features and functionality. The updated controls are as follows:
- ViewClass.ascx: Updated control to refresh automatically when a user completes content. Note that this refresh occurs for SCORM content but not Tin Can content. Also, added a note to the Syllabus grid alerting the user that he/she may need to refresh the page to see updated results.
- ViewClass.ascx.vb: Updated syllabus grid to respect Course Part status so that only active, non-expired content can be launched. Also adds support for the Passed status option (which replaces Success in LMS 5.5.1).
- ViewCourse.ascx.vb: Updated syllabus grid to show content list based on Course's Course Parts even though content cannot be launched.
- LoginSF4.ascx.vb: Added support for generating a cookie that is used by the ScormEngine and Courses web applications to validate that the logged in user can access the requested LMS content. This control is specific to Sitefinity-based e-Business sites.
- Login.ascx.vb: Added support for generating a cookie that is used by the ScormEngine and Courses web applications to validate that the logged in user can access the requested LMS content. This control is for e-Business sites that do not use Sitefinity.
Profile.ascx.vb: Added support for generating a cookie that is used by the ScormEngine and Courses web applications to validate that the logged in user can access the requested LMS content.
If you have not modified these controls on your e-Business site (either e-Business 5.5 or 5.5.1), select the Deploy New User Controls to e-Business Site option and specify the file location of your e-Business site in the e-Business Installation Folder field (for example, C:\inetpub\wwwroot\ebusiness). The setup program will detect your e-Business version and update the files in the site's UserControls folder for you.When installing Aptify LMS 5.5.1 for Aptify 5.5.3, the Deploy New User Controls to e-Business Site option does not appear on the Object Repository Object Synchronization screen. The updated user controls must be installed manually if needed, but e-Business 5.5.2 and e-Business 5.5.3 already deploy user controls that include the LMS 5.5.1 updates.
Note that this option is only available if you selected the Install to Web Server option in the Specify IIS Installation Details step earlier in the setup program.
If you are installing Aptify LMS 5.5.1 for Aptify 5.5.3, have modified one or more of these User Controls, or if you are not sure, you should:
- Use a comparison tool to identify the differences between your files and the versions provided in the setup program's Include\UserControls folder.
- Manually apply the updates from the Aptify LMS 5.5.1 for Aptify 5.5.3 versions of the controls to your copy of the controls.
- Test your modified controls to confirm they operate as expected after you complete the LMS 5.5.1 installation.
- Contact Aptify Technical Support if you require assistance updating your controls so they include the latest LMS 5.5.1 updates.
Even if you do not select the Deploy New User Controls to e-Business Site option, you should still complete the e-Business Installation Folder field. During installation, the setup program runs the Object Repository Synchronization process to update the Bin folder of the site specified in this field to push the latest LMS objects to the e-Business site.
Specify the top-level folder for the site; do not specify its Bin folder.
Identify the users who should be given access to the AptifyLMS database. Select the Select All option to select all listed users, or select individual users from the group box. The list shows all Active Aptify users with a valid SQL Server Login, except sa.
Whether the fields in this screen are active depends upon whether you have decided to install the Web Server and Database updates in previous screens. The Deploy New User Controls to e-Business Site and e-Business Installation Folder options are active if you have selected to install the Web Server updates, and the option to add users to the AptifyLMS database is active if you have selected to install the Database updates.
Click Next to continue and click Finish to begin the installation. The screen will indicate the progress of the installation.
- Click OK when prompted that the installation is complete to close the wizard.
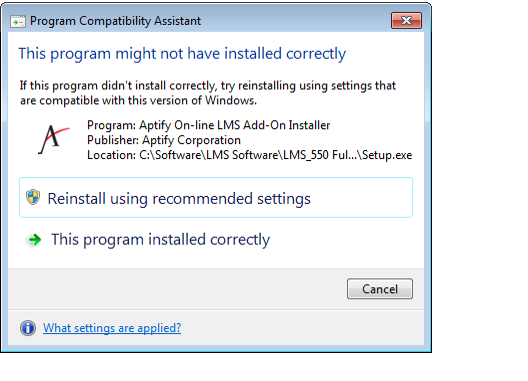
- Depending on your operating system, Windows may display a Program Compatibility Assistant message, as shown below, even though the LMS setup ran successfully. If the setup program indicated that the installation was successful but you see the Program Compatibility Assistant message, select the This program installed correctly option to close the dialog.
- Depending on your operating system, Windows may display a Program Compatibility Assistant message, as shown below, even though the LMS setup ran successfully. If the setup program indicated that the installation was successful but you see the Program Compatibility Assistant message, select the This program installed correctly option to close the dialog.
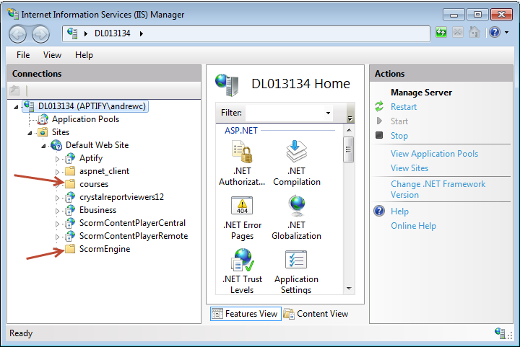
- If you installed the Web components, launch the Internet Information Services (IIS) Manager and confirm that the ScormEngine and Courses applications were added to the location you specified.
- In some cases, the setup program may not have been able to convert the courses and ScormEngine virtual directories to applications. In that case, one or both entries will appear with the folder icon in the Sites panel rather than as web applications. In the example shown below both entries are virtual folders but not applications.
- If one or both entries are not applications, you can convert them to applications manually. Follow these steps:
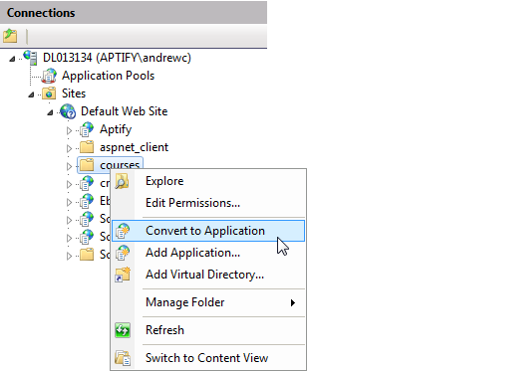
- Right-click the folder you want to convert to an application in the Sites list.
- Select Convert to Application from the context menu.
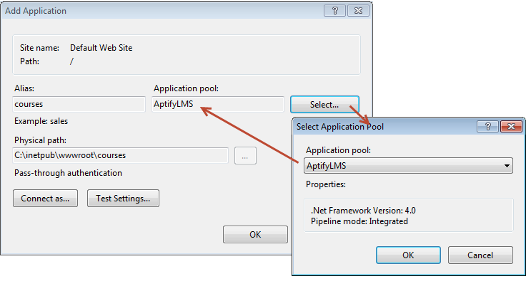
- In the Add Application dialog, click the Select... button and choose AptifyLMS from the list of available application pools. If AptifyLMS does not appear, the setup program did not create it. In this case, contact Aptify Technical Support for assistance.
- Click OK to close the dialog. The entry should now appear as an application in the Sites list.
- In some cases, the setup program may not have been able to convert the courses and ScormEngine virtual directories to applications. In that case, one or both entries will appear with the folder icon in the Sites panel rather than as web applications. In the example shown below both entries are virtual folders but not applications.
- Restart the IIS web server service.
- Although technically not required, restarting the IIS service will ensure that all existing sessions connected to the web server are terminated before the website is used.
- To restart IIS from the IIS Manager, select the top level node in the Connections pane and choose the Restart option in the Actions pane on the right side of the page.
- If you installed Aptify LMS on Aptify 5.5.2, follow the steps in Installation Note for Aptify LMS in Aptify 5.5.2.
- Begin importing SCORM or Tin Can compliant content into Aptify. See How to Use Aptify LMS and Managing Aptify LMS Content for details.
For Aptify LMS 5.5.1 for 5.5.3 - Run the Object Repository Synchronization WIzard
For Aptify LMS 5.5.1 for 5.5.3 (both full setup and the updater versions), Aptify recommends running the Object Repository Synchronization wizard after installation to ensure that all objects are updated as expected. When running the Object Repository Synchronization wizard you should select the Specify a Sync Repository Objects Record option and select the LMS entry (or your site's Sync Repository Objects record if you create one) from the drop-down list box. This option syncs the required objects only. See Running the Object Repository Synchronizer for more details about this functionality.
Related content
Copyright © 2014-2019 Aptify - Confidential and Proprietary
