/
Adding Fields to a Pivot Grid
Adding Fields to a Pivot Grid
This topic describes how to add fields to a pivot grid view.
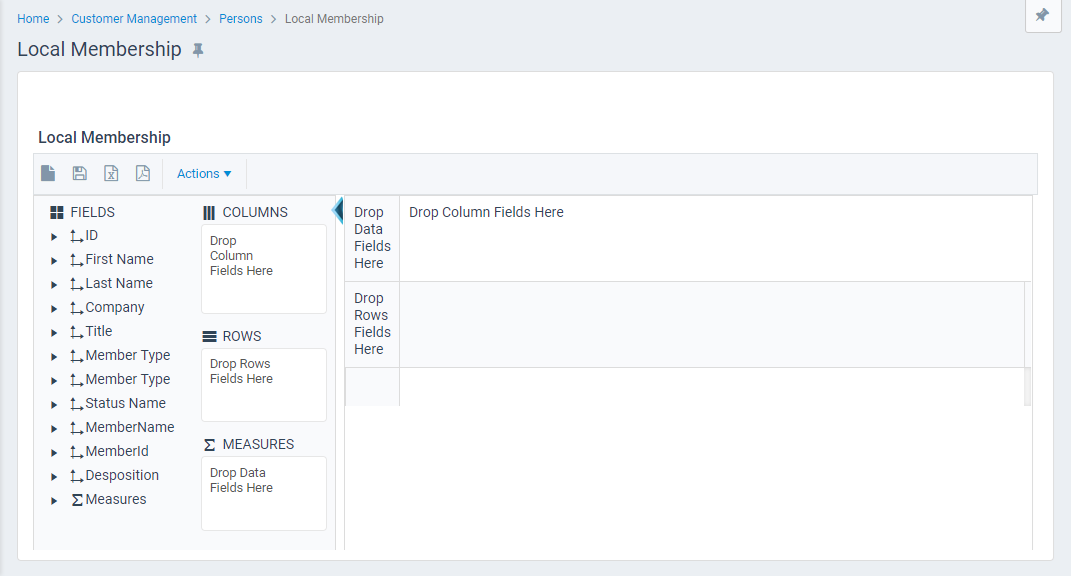
A pivot grid is blank when it loads for the first time. You need to drag and drop fields to various locations to construct the table. Follow these steps after loading a new pivot grid:
- The FIELDS section of the window lists all of the fields you specified for the view's entity as well as for any linked entities.
- See the following example:
- See the following example:
- Select fields from the FIELDS section and drag them to the various locations in the pivot grid, as desired. Note that you can stack multiple fields in the same area but you cannot add a field to more than one area of the pivot grid. The available locations include:
- COLUMNS: Drop one or more fields in this area to create columns entries for the table. You can add multiple fields to create layered columns. For example, you might want to display order data by person based on the product that appears on an order's first order line.
- ROWS: Drop one or more fields in this area to create row entries for the table. As with columns, you can add multiple fields to create layered rows. For example, you can add the Company field to the left edge of the row area and then add a Person field to the right of the company. This creates top-level rows for each company in the dataset and then sub-rows for each person at a particular company.
- Move or rearrange fields as necessary. The Fields added to the pivot grid layout can be modified in a variety of ways. For example, they can be moved to other areas of the pivot grid, removed entirely from the pivot grid, or sorted, as described below:
- To remove a field, click the X next to the field name in the various locations in the pivot grid. The field is removed from the pivot grid area but remains in the Field List and can be added again later if needed.
- Some fields can be sorted within a location, depending on their location on the pivot grid. To sort a field, select the field and move it within the location.
- Add measures to the pivot grid, as desired by dropping one or more Measures sub-fields in the MEASURES location to perform calculations in the report.
- Default data fields are Count, Sum, Min, Max, and Average.
- Calculations can be performed on certain numeric pivot grid fields by adding a measure to the Measures field list.
- Add new measures by performing the following steps:
- Click the MEASURES button in the view's toolbar.
- In the Field Name field, select the field for which you want to perform a calculation.
- In the Measure field, select the calculation you want to perform. The available calculations are Count, Sum, Min, Max, and Average.
- In the Name field, enter a name to be used to identify this measure in the Measures field list.
- A default name is automatically created in this field from the values entered in the Field Name and Measure fields.
- A default name is automatically created in this field from the values entered in the Field Name and Measure fields.
- Click ADD to add this measure to the grid on this form.
- Repeat steps a through e to add additional measures.
- When you have finished adding measures to the grid, click ADD MEASURES to add these to the Measures field list.
- Use the left arrow and down arrow icons in the table to expand and collapse items to display only specific data.
- When the view is complete, click the SAVE button in the view's toolbar.
- Export or print the pivot grid, as needed.
- See Exporting Pivot Grid Data to Microsoft Excel for export instructions.
- See Printing a View for printing instructions.
Copyright © 2014-2019 Aptify - Confidential and Proprietary
