/
Creating Gantt Views
Creating Gantt Views
The following steps describe how to create a Gantt view:
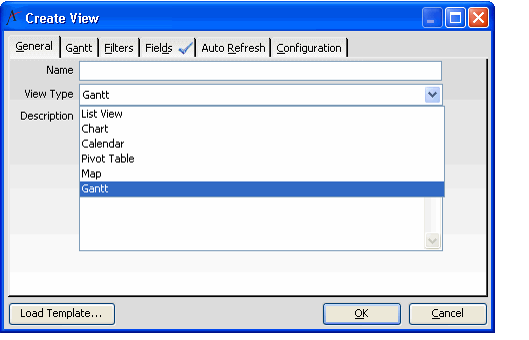
- Open a new view, enter a Name, and select Gantt from the View Type drop-down list.
- Notice that the tab layout is updated automatically: a new Gantt tab appears in the dialog and the Sorting, Format, Hierarchy, Paging, Scheduling, and Advanced (SQL) tabs are removed.
- Note that not all of the tabs shown in the figure may be available on your system, depending on how your administrator configured the Gantt View type's properties.
- If you want to use an existing template as the starting point for your view, click the Load Template... button. See Loading a View Template for details.
- Note that the Show Default Preview Pane option is only applicable to list views.
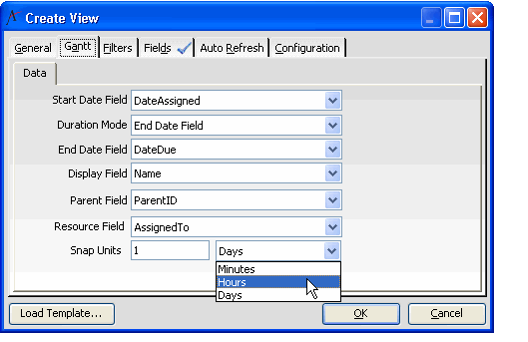
- Click the Gantt tab.
- Select the field in the service that corresponds to a record's start time from the Start Date Field drop-down list.
- Select the Duration mode. This determines the length of the items displayed on the Gantt chart. The options are:
- Duration Field: Select this option if the service has a field that specifies the length of time required for a particular item. Note that the Gantt chart assumes an 8 hour work day, so an 8 hour duration is one day, 16 hours is two days, etc.
- End Date Field: Select this option if the service has a field that specifies a concluding time for the item. Note that when a Gantt view is configured to display information based on a record's Start and End Date and a record has the same date with no time specified for both fields, then the Gantt view assumes that the item lasts the entire day. Also, note that when a chart item has an End Date with no time specified, the Gantt view displays the item as ending at the end of the specified day.
- Standard Duration: Select this option if the service has neither a duration field or an end date field. Note that the Gantt chart assumes an 8 hour work day, so an 8 hour duration is one day, 16 hours is two days, etc.
- Specify the duration of the Gantt chart items:
- If you selected Duration Field as the mode, select the field in the service that corresponds to an item's duration from the Duration Field drop-down list.
- If you selected End Date Field as the mode, select the field in the service that corresponds to an item's end time from the End Date Field drop-down list.
- If you selected Standard Duration, each item will use the same duration. Specify the number of hours in the Std. Duration (Hours) field. The default is 24 hours (or 3 days on the Gantt chart).
- Select the field in the service that you want to display as the item's name from the Display Field drop-down list.
- To display items in a relational hierarchy (such as to display sub-tasks under parent tasks), specify the field in the service that corresponds to the Parent Field from the drop-down list.
- Select the field in the service that corresponds to the resource to be tracked within the Gantt view from the Resource Field drop-down list.
- Select the Snap Units for the Gantt as shown in the figure.
- A user can define this field to determine how a Gantt chart updates an item's start and/or end dates and times when a user moves an item within a Gantt chart. For example, to update items to the next day when moving them within a Gantt chart, a user would set the Snap Units to 1 Day. Likewise, to set the Snap Units to the next 4 hour interval, a user would set the Snap Units to 4 Hours. To snap to the next 15-minute interval, a user would set this parameter to 15 Minutes.
- Note that the Gantt view will always round up to the nearest snap unit. For example, if the Snap Units is 1 Hour and a Task's start time is moved to 1:10 PM, the Gantt view will update the Task's start time to 2:00 PM (rounds up to the nearest hour).
- Click the Filters tab to specify filter criteria for the view. See Defining View Filters for instructions on creating filter statements.
- Filters are extremely important as they will determine which records will appear in the Gantt chart and the start date for the chart (based on the earliest record in the view).
- Filters are extremely important as they will determine which records will appear in the Gantt chart and the start date for the chart (based on the earliest record in the view).
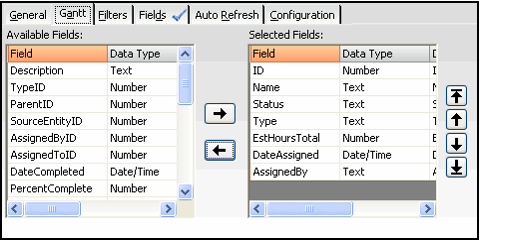
- Click the Field tab and select the fields that you want to display in the task pane on the left side of the Gantt view.
- Note that the record's ID, Display Field, Start Date Field, Duration or End Date Field and the Resource Field appear in this order in the Gantt view's Tasks list by default, even if they do not show up on the Selected Fields list in the View Properties dialog.
- To add a field to the task list, select it and use the arrows to move it from the Available Fields area to the Selected Fields area of the dialog. You can also double-click a field to move it between the areas. Then, use the up and down arrow keys to organize the Selected Fields in the desired order, keeping in mind that the ID, Display Field, Start Date Field, Duration/End Date Field, and the Resource Field will always appear first as columns in the task regardless of their position in the Selected Fields dialog.
- Click the Auto Refresh tab to configure how often the view should automatically refresh. See Specifying Form and Record Templates for a View for details.
- Click OK to load the view.
Copyright © 2014-2019 Aptify - Confidential and Proprietary


