Configuring View Output Options
There are three different Output Modes for a scheduled view:
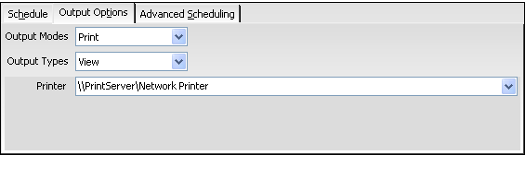
- Print: Prints out a hard copy of the view results.
- File: Saves the view results to a file in a specified location.
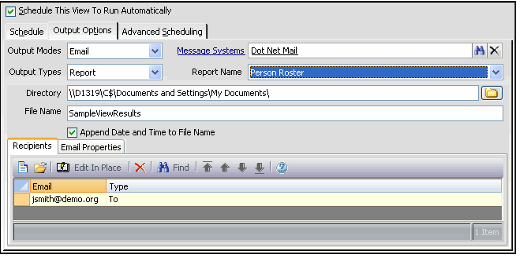
- Email: Sends the view results as an email attachment to a list of specified recipients.
Note that not all output options may not be available for a particular view, depending on the service whose records appear in the view and the type of view you are scheduling (i.e. List, Chart, or Calendar).
Configure the following settings if you selected this option:
- Output Type: Specify the format for the view's printout:
- View: Prints the view as it displays in Aptify. This option is available for all view types.
- Excel: Prints the view in a Microsoft Excel layout. This option is only available for list views.
- Report: Generates and prints a specified report using the view results. Select an available report from the Report Name drop-down list.
- Aptify supports reports created in Crystal Reports and, as of Version 5.5.4, Microsoft SQL Service Reporting Services (SSRS). See Using Reporting Tools for more information.
- The available reports will vary from service to service. If the service has no reports, then the Report option does not appear in the Output Types list.
- The same reports that appear in the Report wizard when run from a particular service are listed in the Report drop-down list. See Using the Report Wizard for more information.
- This option is only available for list views.
- Printer: Select a network printer from the drop-down list.
- All of the printers installed on your computer appear in this list.
- All of the printers installed on your computer appear in this list.
Note to Administrators
You must install all of your network printers on the Application Server for the user account who is running the Asynchronous Processor to support the Print option. See Enabling View Scheduling for more information.
File
Configure the following settings if you selected this option. Note that this option is not available for calendar views.
- Output Type: Specify the format for the view's file:
- View: Saves the view contents for a list view as a comma separated values (.csv) file. Saves the view contents for a chart view as a bitmap (.bmp) image file.
- Excel: Saves the view contents as an Excel (.xls) file. This option is only available for list views.
- Report: Generates and prints a specified report using the view results. The report is saved in Adobe PDF format. Select an available report from the Report Name drop-down list.
- Aptify supports reports created in Crystal Reports and, as of Version 5.5.4, Microsoft SQL Service Reporting Services (SSRS). See Using Reporting Tools for more information.
- The available reports will vary from service to service. If the service has no reports, then the Report option does not appear in the Output Types list.
- The same reports that appear in the Report wizard when run from a particular service are listed in the Report drop-down list. See Using the Report Wizard for more information.
- This option is only available for list views
- Directory: Click the folder icon to the right of the field to select the network location where you want to save the file or manually enter the location in the field.
- When manually entering a location, you must enter a network path location in a UNC format (i.e., \\NetworkServer\C$\Views).
- When manually entering a location, you must enter a network path location in a UNC format (i.e., \\NetworkServer\C$\Views).
Since scheduled views are executed by an Application Server, the Directory field reports the full network path for the file's location. Note that the Application Server's user must have read/write access to the specified location to successfully save the file.
- File Name: Specify a File Name for the view. Do not include an extension; the file extension is automatically added.
- Append Date and Time to File Name: Select the option to add the date and time when the file is generated to the file name.
- For a example, a SampleFile PDF file created at 12 PM on January 1, 2006, would have this file name if the Append Date and Time to File Name option is selected: SampleFile_2006_01_01__12_00_00_PM.PDF.
The Email option sends the view results as an email attachment to one or more recipients. Therefore, the system first saves the view results to a file in a specified location and then the system generates an email message that includes the file as an attachment.
Configure the following settings if you selected this option. Note that this option is not available for calendar views.
- Output Type: Specify the format for the view's file attachment:
- View: Saves the view contents for a list view as a comma separated values (.csv) file. Saves the view contents for a chart view as a bitmap (.bmp) image file.
- Excel: Saves the view contents as an Excel (.xls) file.
- This option is only available for list views.
- This option is only available for list views.
- Report: Generates and prints a specified report using the view results. The report is saved in Adobe PDF format. Select an available report from the Report Name drop-down list.
- Aptify supports reports created in Crystal Reports and, as of Version 5.5.4, Microsoft SQL Service Reporting Services (SSRS). See Using Reporting Tools for more information.
- The available reports will vary from service to service. If the service has no reports, then the Report option does not appear in the Output Types list.
- The same reports that appear in the Report wizard when run from a particular service are listed in the Report drop-down list. See Using the Report Wizard for more information.
- This option is only available for list views.
- Message Systems: Select the Message System that will be used to send the email -message, typically Dot Net SMTP Client.
- Aptify provides three default Message Systems: SMTP based Dot Net SMTP Client and Dot Net Mail, and Outlook Mail. The SMTP based systems are better suited for view -scheduling and bulk messaging than Outlook Mail.
- Aptify provides three default Message Systems: SMTP based Dot Net SMTP Client and Dot Net Mail, and Outlook Mail. The SMTP based systems are better suited for view -scheduling and bulk messaging than Outlook Mail.
If you decide to use view scheduling with Outlook, note that messages will not be sent from your Outlook account. The messages will come from another account on your network, as specified by your administrator. Contact your system administrator for assistance.
For Administrators:
Outlook messages generated by View Scheduling will come from the Application Server user's Outlook account and not from the user who originally configured the view. The Application Server user is the trusted user account who is running the asynchronous processor service. See Configuring an Application Server for details. This user account must have an active Outlook account to send Outlook messages using Application Server.
Also, Microsoft Outlook may require that no user be logged into the Application Server in order to successfully generate and send bulk messages at the appointed time.
For these reasons, Aptify strongly recommends that you use the Dot Net SMTP Client or Dot Net Mail system with view scheduling rather than Outlook Mail.
- Directory: Click the folder icon to the right of the field to select the network location where you want to save the file or manually enter the location in a UNC format (i.e., \\NetworkServer\C$\Views). The system first saves the file to this location temporarily before attaching it to an email message. After generating and sending the email, the system deletes the file.
Since scheduled views are executed by an Application Server, the Directory field reports the full network path for the file's location. Note that the Application Server's user must have read/write access to the specified location to successfully save the file.
- File Name: Specify a File Name for the view. Do not include an extension; the file extension is automatically added.
- Append Date and Time to File Name: Select the option to add the date and time when the file is generated to the file name.
- For a example, a SampleFile PDF file created at 12 PM on January 1, 2006, would have this file name if the Append Date and Time to File Name option is selected: SampleFile_2006_01_01__12_00_00_PM.PDF.
- Recipients: Specify one or more email recipients under the Recipients tab.
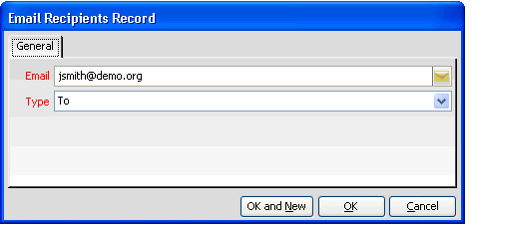
- Click the New icon to open a new Email Recipients record.
- Enter the recipient email in the Email field.
- Select the recipient type (To, CC, or BCC) from the Type drop-down list.
- Click OK to save and close the record.
- Repeat the steps above to add additional recipients as necessary.
- Email Properties: Click the Email Properties tab and specify the sender address (From Email), the subject line (Subject), and the Body of the email message.
Deleting Scheduled Views
To successfully delete a scheduled view, a user must first open the View Properties Dialog for the view and clear the Schedule This View to Run Automatically option on the Schedule tab. Note that when the Views record is deleted, all associated dependencies (Process Flow Runs, Scheduled Tasks, etc.) are also deleted.
Related content
Copyright © 2014-2017 Aptify - Confidential and Proprietary


