Enabling View Scheduling
With Aptify, a user can configure a list, chart, or calendar view to run automatically on a specific schedule to generate a report or file based on the current view results. This features uses Aptify's Application Server and Scheduled Task functionality to execute a view at the appropriate time without requiring any user intervention.
Your Aptify installation must include one or more Application Servers to use View Scheduling. See Managing Scheduled Tasks more for information.
The following is an overview of the process:
- Within the View Properties dialog's Scheduling tab, a user enables view scheduling for a particular view and specifies the view's execution schedule and output mode.
- See the Scheduling a View to Run Automatically for information on how to use the Views dialog to schedule a view.
- See the Scheduling a View to Run Automatically for information on how to use the Views dialog to schedule a view.
- When the user saves the view, Aptify creates a View Auto-Scheduler Scheduled Tasks record that contains the information specified by the user.
- This Scheduled Task uses the Remote Scheduler service (since not all users will have the appropriate permissions to create Windows Scheduled Tasks on the Application Server).
- This Scheduled Task uses the Remote Scheduler service (since not all users will have the appropriate permissions to create Windows Scheduled Tasks on the Application Server).
- The Remote Scheduler service creates a Process Flow Runs record to change the Scheduled Task's service from Remote Scheduler to Windows Scheduler.
- The Application Server executes the Process Flow Run and updates the Scheduled Task's service to Windows Scheduler. This generates a Windows Scheduled Task on the Application Server that will execute the view and generate an output document at the appropriate dates and times as specified by the user.
- Since the Application Server's user account modifies the Scheduled Tasks record, that user account, which should already have the necessary permissions, creates the Windows Scheduled Task in lieu of the user who originally saved the view.
- Since the Application Server's user account modifies the Scheduled Tasks record, that user account, which should already have the necessary permissions, creates the Windows Scheduled Task in lieu of the user who originally saved the view.
- At the specified date and time, the Scheduled Task creates a Process Flow Runs record that fires the Execute View with No UI process flow using the input values provided by the user.
- The assigned Application Server executes the Process Flow Runs record, generates the view output document as specified by the user, and sends the document via email to the list of recipients (depending on the view's configuration).
- See About View Scheduling and Email Distribution for important information.
To support this functionality, an administrator must configure the View Scheduling default options in the Views entity. An administrator also needs to install the network printers on the Application Server used by view scheduling to support the Print output option. Follow these steps to enable support for view scheduling:
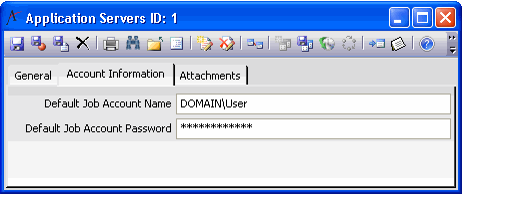
- Open the Application Servers record for the Application Server you intend to use for view scheduling.
- Click the Account Information tab.
- If not already specified, enter a Default Job Account Name and Default Job Account Password.
- These fields identify the default user account to run Windows Scheduled Tasks for this Application Server.
- This default account runs all Scheduled Tasks generated by view scheduling on this Application Server.
- The Default Job Account Password is encrypted using the Generic Entity Encryption Key. By default, the sa user and members of the supplied Accounting, Administrators, and/or Users groups have access to this key. Only users who have access to the key can enter a value in this field. Also, any user who will use View Scheduling also needs access rights to this key in order save the scheduled view's corresponding Scheduled Tasks record. Depending on the security model that your organization has implemented, you may want to create a new key to encrypt this field and allow only designated users access to that key. This is the recommended approach. Follow these steps:
- Log in to Aptify as an administrative user.
- Create a new Security Key to encrypt the Default Job Account Password, grant access to the appropriate users for this key, and then update the Default Job Account Password field in the Application Servers entity to use this new key.
- Update the Job Account Password field in the Scheduled Tasks entity to use this key, too. See Creating a Scheduled Task for more information on this field.
- See Managing Field Level Encryption for information on using Field Level Encryption.
- Users who will use view scheduling also need access to the Security Key that encrypts the Scheduled Tasks entity's Job Account Password field. See Creating a Scheduled Task for more information on this field.
- Save and close the record.
- Open the Views record from the Entities service.
- The Entities service is found under the Aptify Framework Administration application.
- The Entities service is found under the Aptify Framework Administration application.
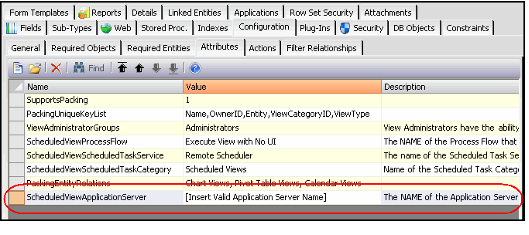
- Click the Configuration > Attributes tab.
- Configure the following attributes, as necessary :
- ScheduledViewProcessFlow: This is the name of the Process Flow that handles auto-execution of views on a scheduled basis. By default, this attribute is set to Execute View with No UI, which is the Process Flow provided by Aptify. If you have created your own Process Flow to handle View Scheduling, edit this attribute to use that Process Flow's name.
- ScheduledViewScheduledTaskService: This is the name of the Scheduled Task Service that will be used to save Scheduled Tasks records generated by view scheduling. By default, this attribute is set to Remote Scheduler, which is the Scheduled Task Service that allows users without elevated permissions to save Scheduled Tasks records. After the initial save, the Remote Scheduler creates a Process Flow Runs record to use the Application Server to convert the Scheduled Task Service to the standard Windows Scheduler and consequently create the Windows Scheduled Task on the Application Server.
- ScheduledViewScheduledTaskCategory: This is the name of the Scheduled Task Category that will be assigned to all Scheduled Tasks created by View Scheduling. By default, this attribute is set to Scheduled Views. If you have created your own Scheduled Task Categories record and want to use it as the default category for View Scheduling, enter that category's name as the attribute value.
- ScheduledViewApplicationServer: This is the name of the Application Server on your network that will execute the views based on the information stored in the Scheduled Tasks record. You must enter the name of an installed Application Server in order to support View Scheduling. This Application Server must have a default Job Account User Name and Password specified.Info: When enabling View Scheduling, you only need to specify an Application Server's name as the value for the ScheduledViewApplicationServer attribute. You can leave the other attributes at their default setting.
- Save and close the Views entity record.
- Close and reopen the Aptify client to ensure that any changes you made successfully flow down to the Views dialog.
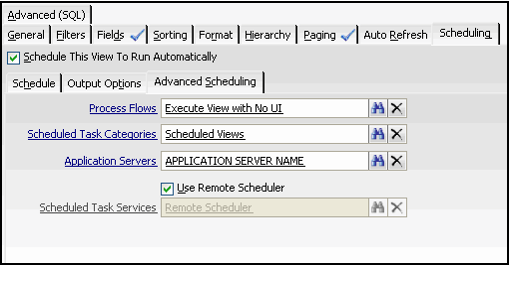
- The attribute values you specify in the Views entity flow down to the Advanced Scheduling sub-tab of the Views dialog (shown in the figure below). Advanced users can modify these default settings as needed on a view-by-view basis when setting up a view's schedule. The four fields on this tab correspond to the four attributes listed above.
- Administrators who have the necessary privileges to create Windows Scheduled Tasks on the Application Server, can clear the Use Remote Scheduler option to bypass the Remote Scheduler functionality and use the Windows Scheduler option to create the Windows Scheduled Task immediately.
- Log in to the Application Server you specified for the ScheduledViewApplicationServer attribute using the account that is running the Aptify Asynchronous Processor service.
Confirm that the network printers are installed on the Application Server for the user account that is running the Aptify Asynchronous Processor service. If not, install them.
When configuring a view's Scheduling tab, a user can specify that the view results be printed using a specified printer. The list of printers available to the user are the printers installed on the user's local computer. However, the actual print job is initiated by the Application Server. Therefore, the Application Server must have the same set of network printers installed for the Application Server user as all of the clients to ensure that a client's view will be successfully printed.
Confirm that the user account that is running the Aptify Asynchronous Processor service has read/write access to the same network locations as your users. If not, provide the account with the necessary access.
When configuring a view's Scheduling tab, a user can specify a network location to save the view results to a file. This option is required for the File and Email output modes. However, since the file will actually be created by the Application Server user, that user must have read/write access to the same network resources as all of the clients to ensure that a client's view will be successfully saved to a file.
- Log out of the Application Server.
Related content
Copyright © 2014-2019 Aptify - Confidential and Proprietary


