Performing the Initial Aptify Server Setup
After you have installed the Aptify server software, follow these general steps to configure the system:
- Launch the Aptify Windows Desktop client for the first time as the sa user.
- If you did not install the Aptify Windows Desktop client on the server, you need to install this application on another computer first. See Installing the Aptify Desktop Client.
- See Connecting to an Aptify Server Using the Desktop Client for information on how to start using the Desktop client.
- Import the appropriate set of License keys that you received from Aptify using the License Import wizard. For example, if setting up a development environment, import the development keys
- There are multiple Server Types that correspond to different Aptify installation. Aptify issues licenses for each server type, including licenses for a test environment, licenses for a development environment, and licenses for production use. Only one license server type can be installed per server. In other words, you cannot install both production and test licenses to the same server instance.
- If you cannot find your license files, contact Aptify Customer Support for assistance.
- The License Import wizard can be launched from the Licenses service, which appears in the User Management and Aptify Framework Administration applications by default.
- See Licensing Aptify Products for more information on using licenses in Aptify.
- Create one or more user accounts, as needed.
- Assign the user one or more licenses as necessary within the User Administration wizard. Each user needs one Client Access license (EndUser, Administrator, or Developer). Also, to access the standard Aptify business applications, each user needs an license to the CRM module. See Licensing Aptify Products for more information.
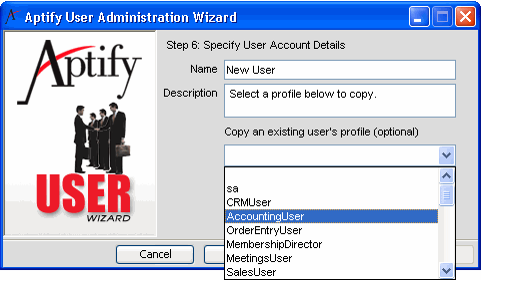
- Aptify recommends that you link these users to a Role-based Profile to provide an out-of-the-box starting point tailored to a particular type of user. Aptify includes nine Role-based Profiles, which are listed below. See About Role-based Profiles for more information on these profiles.
- Accounting User: This profile is designed for members of an organization's Accounting department.
- Customer Support User: This profile is designed for members of an organization's Customer Service department.
- Executive User: This profile is designed for a member of an organization's executive leadership team.
- IT Developer/Database Administration User: This profile is designed for members of an organization's IT department who are responsible for database design, development, and administration.
- Meetings User: This profile is designed for members of an organization's Meetings and Event Planning department.
- Membership Director: This profile is designed for members of an organization's Membership department.
- Order Entry User: This profile is designed for members of an organization's Order Entry department.
- Sales Representative: This profile is designed for members of an organization's Sales department.
- Warehouse User: This profile is designed for members of an organization's Shipping and Receiving department.
- When creating a new user, select the profile you want to copy from the Copy an existing user's profile (optional) drop-down list in Step 4 of the User Administration wizard. See Creating User Accounts for more information.
- Grant Security Key permissions to the user as needed so the user can access encrypted fields. For example, Aptify encrypts credit card numbers by default, so the user must have access to the key that encrypts credit card numbers to save orders or payments that use a credit card.
- By default, the system uses the Generic Entity Encryption Key to encrypt credit card numbers. In the baseline Aptify installation, the sa user and members of the Users, Accounting, and Administrators group have access to this key.
- See Granting Access for Credit Card Number Encryption for more information on credit card encryption.
If you manually configured your server using a database backup rather than running the Aptify setup program, you may need to manually enable Common Language Runtime (CLR) on the SQL Server. If so, run this command to enable it:
sp_configure 'clr enabled', 1
GO
RECONFIGURE
GO
Aptify includes database objects that use Common Language Runtime (CLR). Therefore, during a server installation, the Aptify Setup program enables CLR on the SQL Server.
If you installed the Aptify database server components on a Windows Server 2008 server, configure Windows Firewall to allow incoming SQL Server traffic if you have not already done so. See http://msdn.microsoft.com/en-us/library/cc646023.aspx for details.
Windows Server 2008's default Firewall settings block incoming SQL server traffic. You need to open the firewall to allow this traffic in order to communicate with the SQL server from an Aptify desktop application installed on another network computer.
Related content
Copyright © 2014-2017 Aptify - Confidential and Proprietary
