Running the Generic Import Wizard
Note About Access and Excel Imports
When using the Generic Import wizard with the Aptify Desktop interface to import a Microsoft Access/Excel 2013 or 2016 file, the import may fail if running the 64-bit version of Microsoft Office 2013 or 2016. The error that is generated is: The 'Microsoft.ACE.OLEDB.12.0' provider is not registered on the local machine. The import fails because the user's computer has the 64-bit version of Access/Excel 2013 or 2016 installed, while the Aptify shell requires the 32-bit version.
The current workaround for this issue is to install the 32-bit version of the Access Database Engine Redistributable on the user's computer. You can download the redistributable here:
https://www.microsoft.com/en-in/download/confirmation.aspx?id=23734. Once the Access Database Engine Redistributable is installed, the user's computer must be restarted.
After you have created or identified a suitable Import Source for your import file (see Creating Import Sources), you can run the Generic Import wizard.
Follow these steps:
- Select the Import Runs service.
- Click the Generic Import Wizard icon in the toolbar to launch the wizard.
- This icon is also available in the view toolbar of Import Runs list views.
- This icon is also available in the view toolbar of Import Runs list views.
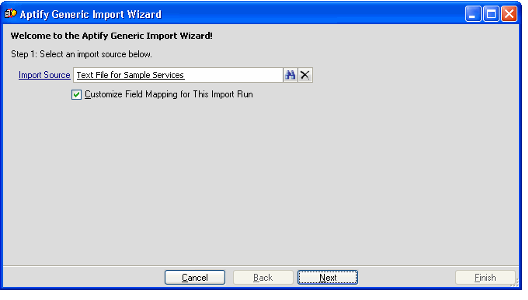
- Enter the applicable source record in the Import Source field.
- Select the Customize Field Mapping for This Import Run option to review or modify the Import Source Columns for this run.
- Click Next to continue.
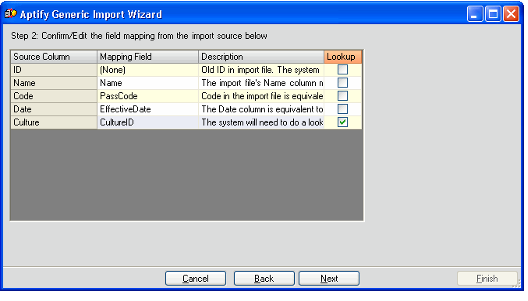
- Modify the field mappings as necessary, and then click Next to continue.
- This step is not applicable if you did not check the Customize Field Mapping for This Import Run box.
- You cannot modify the Source Column fields in this dialog.
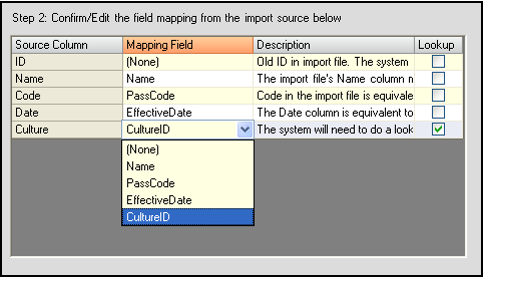
- To specify a different entity field for the Mapping Field, place your cursor in the appropriate row to enable a drop-down list that contains all of the fields in the entity. Select a different field as necessary.
- If the data in a source column corresponds to a linked field in the Mapping Entity, you can select the Lookup check box. When selected, Aptify performs a lookup in the specified entity to find the record ID that matches the text in the source column.
For example, if the data in the Culture source column is text (such as Spanish) and this column maps to a CultureID linked field, then Aptify can lookup the ID for the Cultures record whose name is Spanish and return the appropriate ID. This ID can then populate the CultureID field in the new record created from the import data.
The Lookup feature applies only to entities whose Name field is Unique (in other words, the Unique option is selected on that Entity Fields record that also has the Is Name option selected). This feature does not support entities whose records can share the same name.
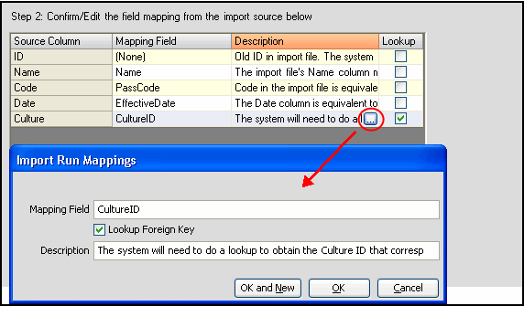
- You can also modify each row's details by opening the Import Mappings sub-type record. Click within a Description field to display an ellipsis (...) button and then click that button to open the form.
- Specify the import file details in the fields provided, and click Next.
- The fields vary depending on the import source's import source type. These fields correspond to the items on the Import Source Type's Input Properties tab.
- For tab-delimited text files, identify the name and location of the Import File.
- For Excel files, identify the name and location of the Import File and the name of the Excel file's Worksheet that contains the import data.
- For Access files, identify the name and location of the Import File and the name of the Table that contains the import data.
- Select the Has Header option if the first row of the import file contains column headings. When selected, the Generic Import wizard ignores the first row in the import file.
- Click Finish to begin the import process.
- Click OK when prompted that the file was imported successful.
- This opens the Import Runs record that the wizard created. Proceed to Matching and Posting Import Results.
Related content
Copyright © 2014-2019 Aptify - Confidential and Proprietary


