/
Creating Aptify Applications
Creating Aptify Applications
An organization's system administrator can create and modify applications and specify which applications appear in a user's Application selection dialog.
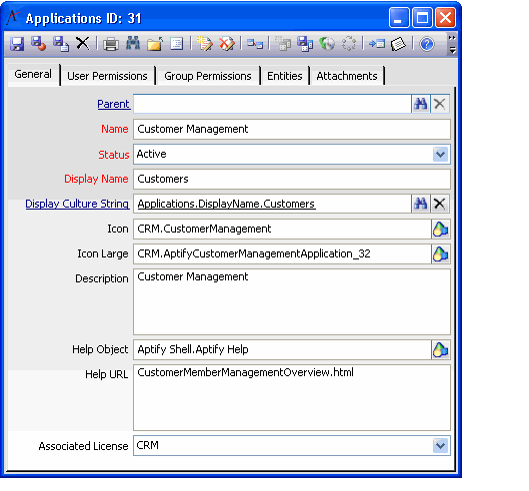
Follow these steps to create a new Application.
- Expand the Aptify Framework Administration heading in the Navigation Bar.
- Select the Applications service.
- Open a new record from the Applications service.
- On the General tab, enter a name for the new application in the Name field.
- The Parent field is not supported in this version of Aptify.
- The Parent field is not supported in this version of Aptify.
- Leave the Status set to Active.
- If set to Inactive, the Application will not appear in the Application selection dialog, Ribbon, Navigation Bar, or Folder List for any user.
- If set to Inactive, the Application will not appear in the Application selection dialog, Ribbon, Navigation Bar, or Folder List for any user.
- Enter the name that will appear in the Application selection dialog, Ribbon, Navigation Bar, and the Folder List in the Display Name field.
- If you want to localize the application's display name based on a user's assigned culture, enter the applicable culture string in the Display Culture String field. See Localization Setup Instructions for details.
- If you want to specify the icon that appear next to the application's display name, click the selection button at the right of the field to browse the Object Repository for the icon.
- If you leave this field blank, the application uses the default book icon.
- Any icon that you want to use to identify an application must be in the Object Repository. See Creating Object Repository Objects for details.
- Enter a description for the application, such as an overview of the services it contains, in the Description field. The Description field also displays in the Application selection dialog.
- If you want to configure a particular Help page to appear when a user presses F1 when this application is selected, configure the Help Object and Help URL.
- If you leave these fields blank, the standard Aptify online help file appears when a user presses F1 when this application is selected.
- These settings are typically configured by Aptify for applications that have an applicable section in the online help file. See About the Application Servers Form for more information on these fields.
- If this application pertains to functionality to which not all users will have access due to licensing restrictions, select the appropriate license type from the Associated License drop-down list.
- Assuming that the appropriate User and Group Permissions have been set, only users who have a license to the specified module will be able to access this application. See Licensing Aptify Products for more information on licensing. By setting this field, an organization can eliminate potential confusion that could occur if a user try to access functionality that is not accessible to them without a license assignment.
- If this field is blank, then all users can access the application, depending on the User and Group Permissions.
- Save the record.
- The Entities tab becomes available. See Adding Services to Aptify Applications for details.
, multiple selections available,
Related content
Use Icons on Tabs to Increase Awareness
Use Icons on Tabs to Increase Awareness
Read with this
Creating Aptify Applications
Creating Aptify Applications
More like this
About the Applications Form
About the Applications Form
More like this
Adding Services to Aptify Applications
Adding Services to Aptify Applications
More like this
Adding Services to Aptify Applications
Adding Services to Aptify Applications
More like this
Adding an Application
Adding an Application
More like this
Copyright © 2014-2019 Aptify - Confidential and Proprietary
