Adding Links to a Pivot Table View in the Desktop Client
A pivot table can display information from multiple entities. For example, you can create a pivot table of the Companies service that displays person, order, or contact log data.
Follow these steps to add a linked entity to a pivot table:
See Example Linked Entity Records for some sample Linked Entities records.
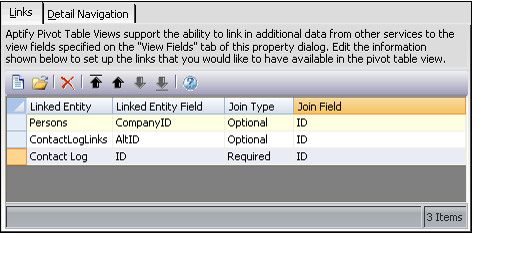
- If not already opened, click the Pivot Table > Links tab in the pivot table view's properties dialog.
- Click the New icon to open a new Linked Entities record.
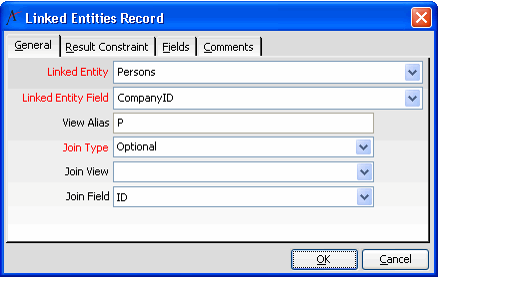
- Select the linked entity in the Linked Entity drop-down list.
- Select an entity that has a link to the entity to which you are adding the pivot table. The drop-down also displays sub-type entities.
- Select an entity that has a link to the entity to which you are adding the pivot table. The drop-down also displays sub-type entities.
- Select the field in the linked entity that links to the current entity in the Linked Entity Field drop-down list.
- The drop-down list displays all of the fields from the entity you selected in the Linked Entity field.
- The drop-down list displays all of the fields from the entity you selected in the Linked Entity field.
- Enter a View Alias for the related entity.
- Aptify uses the view alias to qualify fields in the SQL statement. Aptify recommends that you use the initials of the linked entity as the view alias.
- Note that each linked entity must have its own view alias. In other words, you cannot assign two linked entities the same view alias.
- This is not a required field; Aptify will automatically generate a View Alias if you do not provide one.
- Specify the Join Type between the linked entity and the current entity: Optional or Required.
- Optional: Select this option if the relationship between the current entity and the linked entity is optional. For example, a Persons record does not need a company assignment. Therefore, you should select Optional if adding Persons data to a Companies pivot table.
- For advanced users: The Optional setting create a Left Outer Join in the SQL statement that defines the pivot table's available data.
- For advanced users: The Optional setting create a Left Outer Join in the SQL statement that defines the pivot table's available data.
- Required: Select this option if the relationship between the current entity and the linked entity is required. For example, an Order must have a Ship To Person (which corresponds to the ShipToID field). Therefore, you should select Required if adding Orders data to a Persons pivot table.
- For advanced users: The Required setting creates an Inner Join in the SQL statement that defines the pivot table's available data. It prevent all records that do not have corresponding records in the current entity from being included in the dataset.
- For advanced users: The Required setting creates an Inner Join in the SQL statement that defines the pivot table's available data. It prevent all records that do not have corresponding records in the current entity from being included in the dataset.
- Optional: Select this option if the relationship between the current entity and the linked entity is optional. For example, a Persons record does not need a company assignment. Therefore, you should select Optional if adding Persons data to a Companies pivot table.
- If the linked entity is associated directly with the current entity, leave the Join View field blank.
- This is the setting for most Linked Entities records.
- Advanced users who are linking in data across multiple relationships may have to select a Join View from another linked entity. In this case, the Join View drop down list populates automatically with the list of available view aliases already defined as Linked Entities records.
- See Linked Entity With a Non Blank Join Table for an example of a Linked Entities record that does not have a blank Join View.
- Select the Join Field from the drop down list.
- This drop down list displays the list of fields from the selected Join View. If the Join View is blank, the drop down list displays the list of fields from the current entity.
- In the example below, The Linked Entity will add Persons data to the Companies service's pivot table based a relationship where the Person's Company ID equals a Company's ID (in SQL format, vwPersons.CompanyID = vwCompanies.ID).
- If the linked entity relationship requires an additional constraint or filter, click the Result Constraint tab and enter the constraint.
- Most Linked Entities records do not require a Result Constraint.
- See Linked Entity That Requires a Constraint for an example where a Result Constraint is necessary.
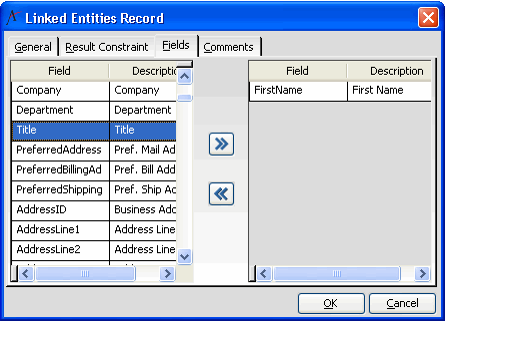
- Click the Fields tab to display the list of fields from the selected Linked Entity.
- Select a field from the Available Fields column (on the left) and press the right arrow buttons (>>) to move it to the Selected Fields column (on the right).
- The fields that appear in the Selected Fields column will appear in the Pivot Table's Field List and can be added to the pivot table as needed.
- You can also double click a field to move it between the columns.
- To select multiple fields, hold down the Ctrl or Shift key and select the fields. (Holding the Ctrl key while clicking fields highlights only those fields that you select. Holding the Shift key while clicking two fields highlights all of the fields between the two selected fields.)
- Modify the Description (that is, the Display Name) for each field in the Selected Fields column, as necessary. Follow these steps:
- Select a field in the Selected Fields column.
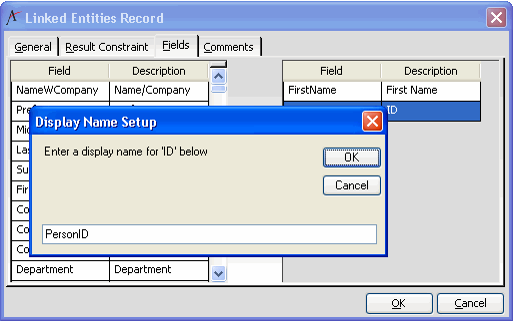
- Right click within the field to display the Display Name Setup dialog.
- Enter the new display name for the field.
- In the figure below, the display name for the FirstLast field has been changed to "Full Name" and the display name for the Persons entity's ID field has been changed to "PersonID".
- The viewing system will use the specified display name as the alias for the field within the pivot table. This is particularly important if you plan to use a non default Detail Navigation (see Specifying Detail Navigation Settings for a Pivot Table).
- Click OK to close the dialog and apply the new display name.
- If needed, click the Comments tab and enter any additional information about this Linked Entities record.
- Click OK to save and close the Linked Entities record.
- Add additional Linked Entities records as needed.
Copyright © 2014-2019 Aptify - Confidential and Proprietary


