Packing Configurations with the CM Tool
- admin (Deactivated)
Analytics
CM Tool First Release
This is first official release of the Aptify Configuration Migration (CM) Tool. If you have any questions or problems using the tool please contact Aptify Technical Support. Your feedback is appreciated!
This topic describes the process for packing configurations (entities and metadata) using the Aptify Configuration Migration (CM) Tool.
The Aptify Configuration Migration (CM) Tool must be installed on the source Aptify database server before packing configurations. See Installing the Aptify CM Tool for more details.
Best Practices for Validation CM Tool Packs
Below are things to keep in mind when validating your pack:
- Run the validation rules on the items you have selected to pack before starting the packing process. Running the validation rules reduces the chances of failure during unpacking. Testing each and every rule can identify any changes that should be made before packing
- If an entity contains a linked field that links to another entity, Aptify recommends that you determine whether those entities are already present on the destination Aptify database. If an entity is not present on the destination , include that entity in the pack to ensure that the unpacking does not fail. This is also applicable for certain metadata as well.
- The CM Tool provides the ability to remove unwanted entities or metadata (by deselecting the appropriate check box). If you remove any entities or metadata from the pack, be sure to run the validation rules to ensure the pack will unpacks successfully.
- See Understanding the CM Tool Validation Rules for more information about the validation rules provided with this version of the CM Tool.
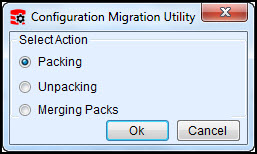
- Locate and double-click the CM Tool shortcut on the desktop of your source server. The following selection dialog will appear:
- You can also open the tool by running the AptifyConfigurationMigrationUtility executable from the Aptify directory in which you installed the tool.
- Select the Packing option and click OK.
- If the CM Tool is configured to automatically log into the source server (that is the username and password is already specified in the CM Tool configuration file), the CM Tool Packer form will display. If the CM Tool is not configured to automatically launch, the Aptify login dialog will appear and the below steps need to be followed.
- in the Server field, enter the name of the source Aptify database.
- In the User Name and Password fields, enter your user credentials for the Aptify system and click OK.
- Once logged in, the CM Tool Packer form displays. Review the Server and Database specified Configuration information to make sure it appropriate.

- Enter the Pack Name and Pack Path information.
- This is the location and the name of the pack that will be created. If a pack with the same name and location already exists, an error message will display, you must specify a unique name and path. If you instead want to update an existing pack, select the Modify Pack option.
- As you enter the name of the pack and its path, the Pack Name and Pack Path are updated in the Configuration information section.
See About the CM Tool Folder Selection Section for more information.
- Use the following procedures to configure the packing settings:
- On the Entities tab, select the entities you want to pack along with all related metadata (such as dependent sub-type entities, database objects, form templates, etc.).
- See Managing Packing from the Entities Tab for more details.
- Once you have select the appropriate entities, go to the Metadata tab and add additional metadata as needed.
- See Managing Packing from the Metadata Tab for more details.
- See Managing Packing from the Metadata Tab for more details.
- On the Entities tab, select the entities you want to pack along with all related metadata (such as dependent sub-type entities, database objects, form templates, etc.).
- If needed, you can modify the items you wish to pack using the Tree View section.
- Entities and metadata can be added to or removed from the packing list by selecting or clearing the Tree View node check box for the respective items.
- When you deselect a check box to remove an entity or metadata from the Tree View, and that entity or metadata has a parent linking to it, the user is prompted to approve removing the link with the parent. If the link to the parent is removed, that entity or metadata item is removed from the packing list. If metadata is linked to more than one parent, it cannot be removed until the links to all of its parents are removed.
- When the check box for an entity or metadata is deselected, the check boxes for its related metadata is also cleared.
- When user clears a check box to remove an entity or metadata from the Tree View, and that entity or metadata does not have a parent linking to it, the user is prompted to approve of removing the links to related metadata and entities. If these links are removed, those related metadata or entities are removed from the packing list.
- While on any tab, you can use the Tree View to review, add, and remove entities and metadata from the packing list as needed.
- Once you have selecting everything you want to pack, select the Validation Summary tab and click Validate to test selections against the common and packing specific validation rules.
- If any of the rules fail, update the packing settings to resolve the failure and re-run the validation. See About the Common Validation Rules for CM Tool and About the Validation Rules for the CM Tool Packer for more details.
- If you find that additional validation rules need to be added for testing the packing settings, see Understanding the CM Tool Validation Rules section for more information.
- You can specify which rules are run from the Select Validation Rules drop-down. However, for best results, Aptify recommends running all recommended validation rules.
- Click Pack to start the packing action.
- You can review the results of the packing process on the Pack Log tab.
- See the Pack Log for more details about what is included in the log.
- See the Pack Log for more details about what is included in the log.
Selecting Refresh
Selecting the Refresh option clears the Pack Name and Pack Path information and any selected entities and metatdata. Essentially "starting over".
Related content
Copyright © 2014-2019 Aptify - Confidential and Proprietary