Enrolling a Student with the Class Registration Wizard
An organization can register students for a class using the Class Registration wizard.The Class Registration wizard is still available for backwards compatibility purposes, however, the preferred method is to register for classes from an order.
- See Creating Class Registrations from an Order for information on the preferred method and Introduction for important information concerning how these two methods cannot be used in conjunction with each other.
- See Enabling the Class Registration Wizard for more information on making the wizard available if necessary.
The Class Registration wizard automatically creates a class registration and an order for the student upon completion of the wizard. Follow these steps to register a student using the Class Registration wizard:
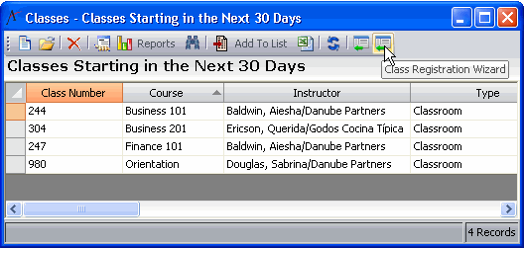
- Create or open a view of the Classes service.
- Click the Class Registration Wizard icon in the view toolbar to launch the wizard.
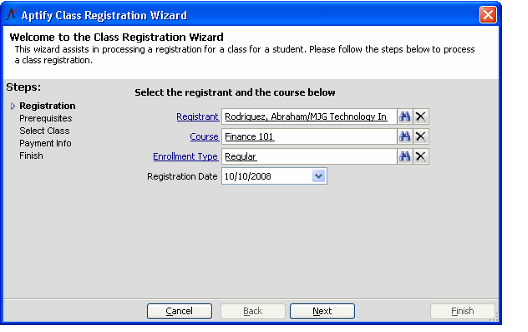
- On the first step of the wizard, specify the following information:
- Registrant: Enter the name of the applicant. This field links to the Persons service.
- Course: Enter the course for which the person is registering. You select a particular class instance later in the wizard.
To register a student for a class using this wizard, the product linked to the selected Class must have a Product Type of General. See Creating a Product to Associate with Courses and Classes for more information.
- Enrollment Type: Select an enrollment type for the student. The wizard defaults to Regular, but you change this if necessary.
- Registration Date: Enter the registration date. By default, Aptify inserts today's date but you can change it if necessary.
- Click Next to continue.
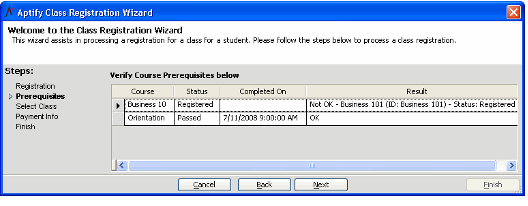
- The next step in the wizard verifies if the applicant has passed the prerequisites for this course and if the applicant is currently enrolled in any co-requisite courses.
- If the applicant has not met all of the prerequisites and co-requisites, the wizard prompts you with the details.
- If prompted that the student does not meet the prerequisites and you have the necessary privileges, click Yes to override this requirement and continue as if the student has passed the prerequisites. Click No to acknowledge the missing prerequisites and continue with the wizard.
- When you click Yes to override the prerequisites, the wizard creates a Class Registrations record with a Status of Registered and automatically creates an order to bill the student for the class. The wizard also adds information stating that the prerequisites were overridden to the Class Registrations record's Comments tab.
- If you click No to respect the prerequisites, the wizard creates a Class Registrations record with a Status of Pending (it also adds information stating that the prerequisites have not been met to the Class Registrations record's Comments tab). The wizard creates an order to bill the student for the class if the registration's status is Pending. This allows the organization to generate an order and accept a payment even while the registration is still in a Pending status. After the applicant's registration request has been approved, a user changes the Class Registration's Status from Pending to Registered.
- By default, users who have Delete access to the Class Registrations service can override the prerequisite requirements. See Determining Override Permissions for Prerequisites for details. If you do not have permissions to override the prerequisite requirement, the wizard creates the Class Registrations record with a Status of Pending.
- Note that this prerequisite check also occurs when a user creates a pending or registered class registration directly from the Class Registrations service. In this case, if the user does not have Delete permissions and the specified student has not met the prerequisites, a message box appears when the user attempts to save the record with a Status of Registered. Note that the system adds information regarding the prerequisite check to the Class Registrations record's Comments tab.
- Note that an administrator can determine whether or not the system generates an order for class registrations created by the wizard (or manually from the Class Registrations service) by modifying an entity attribute. See Determining Override Permissions for Prerequisites for details.
- Review the information on the applicant's completion of the course prerequisites and click Next to continue.
- The wizard displays the list of prerequisites, co-requisites, and optional prerequisites for the course and reports the applicant's current status for each.
- In the figure above, Business 101 and Orientation are prerequisite courses for Finance 101. Since the applicant has not yet passed Business 101, that prerequisite has not been fulfilled (even though the applicant is registered for Business 101).
- Also in the same figure, Business 201 is a co-requisite course for Finance 101. As a co-requisite, the applicant only needs to be registered for the related course and does not need to have passed the course to satisfy this requirement. Therefore, even though the applicant has not yet passed Business 201, that co-requisite has been fulfilled.
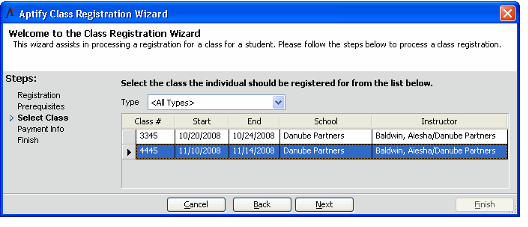
- Select the particular class in the course that the applicant is registering for and click Next to continue.
- The wizard displays all classes for a particular course where the class's Start Date is later than the Registration Date specified on the first screen of the wizard.
- Select the Type of class from the drop-down list to filter the results. Available class types are Classroom, Independent Study, Internet, and At Work. Based on the type selected the available classes for this type will appear in the class list.
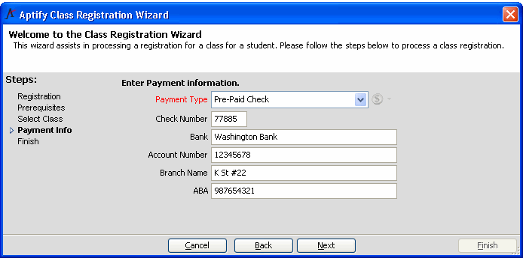
- Enter the applicant's payment information for the class.
- The wizard uses this payment information when generating an order for the class's product.
- When specifying payment information, you can specify inflow payment types, such as a pre-paid check or credit card. See Managing Payment Types for more information on the available payment types.
- Click Next and Finish to complete the Class Registration wizard.
- If the student satisfied all prerequisites or you overrode the prerequisites, the wizard creates a Class Registrations record with a Status of Registered. If the student has not satisfied all prerequisites, the wizard creates a Class Registrations record with a Status of Pending. In either case, the wizard also generates an Orders record to charge the student for the class.
- The amount of the order is based on the configured prices in the class's Products record. The wizard automatically creates an order for 1 unit of the class's Products record.
- Note that this product's Type must be General to register for classes with this method. See Creating a Product to Associate with Courses and Classes for more information.
- See Reviewing the Class Registrations Record for more information on the Class Registrations record created by the wizard.
- If the student satisfied all prerequisites or you overrode the prerequisites, the wizard creates a Class Registrations record with a Status of Registered. If the student has not satisfied all prerequisites, the wizard creates a Class Registrations record with a Status of Pending. In either case, the wizard also generates an Orders record to charge the student for the class.
- When prompted, click Yes to process another registration or click No to close the wizard.
- If you click Yes, the wizard returns to the first screen and the Course field is automatically populated with the course you previously entered. This is particularly useful for situations where you are registering multiple people for the same class in one session.
If you later need to cancel the class registration that was created by the wizard, follow these steps:
- Create a cancellation order to cancel the order linked to the Class Registrations record.
- Manually change the Class Registration record's Status from Pending or Registered to Withdrawal. When using the Class Registration wizard method, canceling the order does not update the Class Registration's Status.
Related content
Copyright © 2014-2019 Aptify - Confidential and Proprietary
