Creating List Views
Follow the below steps to create a list view:
- Select the service for which you want to create a view (using either the Navigation Bar or the Folder List).
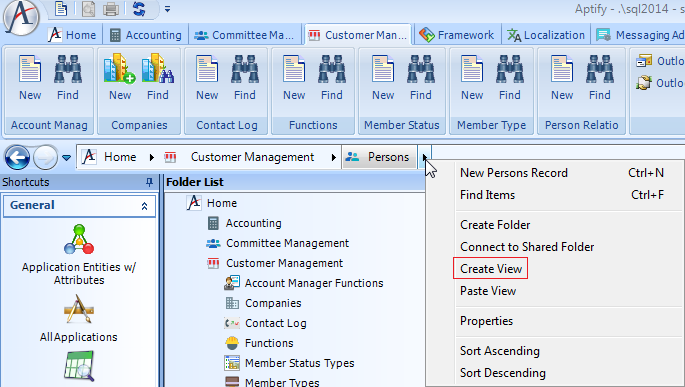
- Do one of the following to open the View Properties dialog for a new view:
- Click the service in the Navigation Bar and select Create View from the pop-up menu.
- Click the Create View icon in the Display Window.
If you want to use an existing template as the starting point for your new view, see Loading a View Template for details.
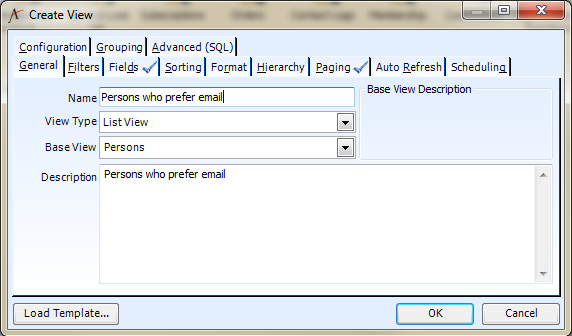
- Enter a Name for the view.
- Select List View from the View Type drop-down list.
- Enter a Description for the view.
- Click the Filters tab and define one or more filters for the view.
- See Defining View Filters for instructions on how to define view filters.
- If you do not define at least one filter, then the view will display all records in the specified service.
Aptify recommends that you avoid creating all views, particularly for services that contain a large number of records (such as Persons). Opening views that contain a large number of records can reduce overall system performance.
- Click the Fields tab and define which fields will appear in the view.
See Specifying the Fields in a View for instructions.- If you do not configure the Fields that appear in the view, then the view will display the default fields for the service (as defined by your system administrator).
- If you do not configure the Fields that appear in the view, then the view will display the default fields for the service (as defined by your system administrator).
- Click the Sorting tab and define the order in which records will appear in the view.
- See Sorting Records in a View for instructions.
- If you do not define a sort order, then the view will display the records in the order that they appear within the database. Typically, the records appear in ascending order based on record ID.
- Click the Format tab and define the format settings for the view.
- See Changing List View Format for instructions.
- If you do not configure the format of the view, then the view will display in the default format.
- Click the Hierarchy tab and define which related records will appear beneath each service record that is returned by the filter criteria.
- See Defining View Hierarchies for instructions.
- If you choose not to configure hierarchies, then the view will only display the records returned by the filter criteria; it will not display any records related to the returned records.
- Configure the Paging tab and configure the page size, as desired. See Defining List View Summary Information for details.
- Click the Auto Refresh tab and set the refresh interval, if desired. See Enabling a View to Automatically Refresh for details.
- If you want this view to run automatically on a pre-determined schedule (for example, to send out a report periodically to a defined recipient list), click the Scheduling tab and configure the available options. See Scheduling a View to Run Automatically for details.
- Click OK to save and open the view.
Aptify automatically generates a SQL statement that retrieves records from the database based on the Filters, Fields, and Sorting options specified by the user. If necessary, advanced users and administrators can manually enter a SQL statement to define the view. See Editing the SQL for Views for details.
When a view is saved, it is saved only to the profile of the user who created it. To share a view with other users, see Using Folders and Sharing Views.
Related content
Copyright © 2014-2019 Aptify - Confidential and Proprietary

