/
Creating a Chart View
Creating a Chart View
The following steps describe how to create a chart view:
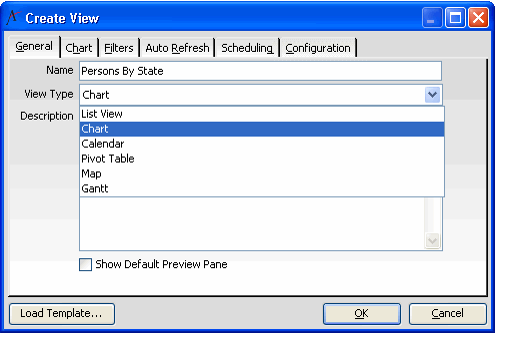
- Open a new view, enter a Name, and select Chart option from the View Type drop-down list.
- Notice that the tab layout is updated automatically: a new Chart tab appears in the dialog and the Fields, Format, Hierarchy, and Paging tabs are removed.
- Note that not all of the tabs shown in the figure may be available on your system, depending on how your administrator configured the Chart View type's properties.
- If you want to use an existing template as the starting point for your view, click the Load Template... button. See Loading a View Template for details.
- Note that the Show Default Preview Pane option is only applicable to list views.
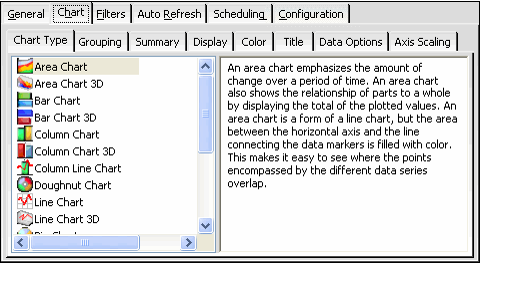
- Click the Chart tab.
- Select a Chart Type. See About the Chart View Types for information on the supported chart types.
- Click the Grouping tab and specify how the view should organize record data in the chart.
- See Configuring Grouping Properties in a Chart View for instructions.
- You must define the grouping characteristics to successfully create a chart view.
- Click the Summary tab and specify what function the chart should use to summarize the data.
- See Configuring Summary SQL Operation for Chart View for instructions.
- The default summary operation is a Count of record IDs in each group.
- Click the Display tab and configure the legend and grid lines that appear on the chart.
- See Formatting Chart View Display for instructions.
- If you accept the default settings, the chart displays all major grid lines for each of its axes. No legend is displayed.
- Click the Color tab and configure the color scheme for the chart.
- See Formatting Chart View Color for instructions.
- If you accept the default settings, the chart background is white and chart elements are randomly assigned colors.
- Click the Title tab and add one to four titles to the chart.
- See Specifying a Chart View Title for instructions.
- See Specifying a Chart View Title for instructions.
- Click the Data Options tab and configure the chart's labels and other data settings.
- See Specifying Chart View Data Options for instructions.
- See Specifying Chart View Data Options for instructions.
- Click the Axis Scaling tab to specify a scale for the chart's axes (if applicable).
- See Specifying Axis Scaling for a Chart View for instructions.
- If you accept the default settings, charts that include axes use smart scaling.
- Click the Filters tab to specify filter criteria for the view. See Defining View Filters for instructions on creating filter statements.
- Click the Auto Refresh tab to configure how often the view should automatically refresh. See Enabling a View to Automatically Refresh for details.
- If you want this view to run automatically on a pre-determined schedule (for example, to send out a report periodically to a defined recipient list), click the Scheduling tab and configure the available options. See Scheduling a View to Run Automatically for details.
- Click OK to load the view.
, multiple selections available,
Related content
Creating a Chart View
Creating a Chart View
More like this
Using Chart Views
Using Chart Views
More like this
About the Chart Views Form
About the Chart Views Form
More like this
About the Chart View Types
About the Chart View Types
More like this
About the Chart View Types
About the Chart View Types
More like this
Specifying Chart View Data Options
Specifying Chart View Data Options
More like this
Copyright © 2014-2019 Aptify - Confidential and Proprietary

