Creating a New Bulk Message
This topic describes how to create a new bulk message using Aptify's messaging tools.
- Open a view of a service that has messaging enabled. (Your system administrator must enable messaging for a service if it is not currently available.)
Select the recipients for a bulk message from the records in the view. Only the selected records are added to the message's recipient list. If no records are selected, then the system will generate messages for all records in the view.
Launching Aptify Messaging From a Record
By default, when a user selects the icon that appears next to an Email control on a form, a new mail message is opened from the user's Outlook application. However, an administrator can also configure an Email control to launch Aptify's Messaging form so that users can access message templates and other mail-related features directly from a record. Note that the Email field that appears on the standard Persons form is configured to launch the Aptify Messaging form by default. See Configuring an Email Control to Launch Aptify Messaging for more details.
- Select multiple records using the SHIFT or CTRL key.
- Note that you cannot select records across pages (when you change pages, your selections on the previous page are lost).
- Note that you cannot select records across pages (when you change pages, your selections on the previous page are lost).
- Select all records through the right-click menu Select All option.
- To clear a selection set, right-click in the view and choose the Clear Record Selection option.
- Select multiple records using the SHIFT or CTRL key.
- Click the Messaging icon in the view toolbar, or right-click in the view and select Messaging.
If prompted, select a Message Source from the drop-down list and click OK. The source containing the data extracted for the messages is determined by the Message Source selected.
The system administrator creates and manages the available Message Sources. For more information, see Defining a Message Source for more details.
If no records qualify for the message run (that is, the Message Source for this entity includes a filter that excludes all selected) a message box appears and the Aptify Messaging form is not loaded. Contact your system administrator for more assistance.
- On the Aptify Messaging form, enter a Subject and compose the message as necessary. You may compose the message on the HTML Message tab, the Plain Text Message tab, or both.
- If the message's Message System supports HTML, enter the text of the message on the HTML Message tab. You can also specify a plain text version of the message on the Plain Text Message tab to use as a fall-back option. When you specify the message on both tabs, a recipient receives the HTML version unless his or her email program does not support HTML. In that case, the recipient receives the plain text version.
- If the message's Message System does not support HTML, the HTML Message tab is unavailable; enter the text of the message in the Plain Text Message tab.
- See Inserting Parts into Messages for instructions on how to insert Message Parts into the message.
- See Inserting Fields into Messages for instructions on how to insert Message Fields into the message.
- See About the Aptify Messaging Form for an explanation of the tool bar options.
- Advanced users can edit the HTML code directly and pass in record data to a message's HTML code using Aptify's mark-up convention (the <<Field Name>> format). In addition, the Messaging Engine can format money fields with its proper currency symbol if a field uses this convention: <<Money Field:C>>. See the discussion on Message Parts and Message Templates in Configuring Message Parts and Creating Message Templates for details.
- On the Aptify Messaging form, select the Attachments tab to add attachments to the message as necessary.
- For more information on Attachments see Adding Attachments to a Message.
- For more information on Attachments see Adding Attachments to a Message.
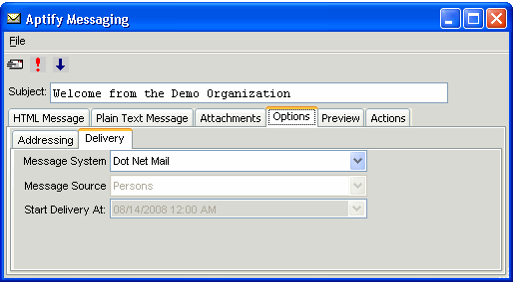
- On the Options > Delivery tab, select Dot Net SMTP Client, Dot Net Mail or Outlook Mail from the Message System drop-down list.
- Select the Dot Net Mail or Dot Net SMTP Client option if you are using an SMTP (Simple Mail Transfer Protocol) messaging system to send the message.
- Your administrator needs to configure the Dot Net Mail or Dot Net SMTP Client message system before it can be used. See Configuring Dot Net Mail Attributes or Configuring Dot Net SMTP Client Attributes for details.
- Select the Outlook Mail option if you are using an Outlook messaging system to send the message.
In the Start Delivery At field, enter a date and time in the future if you do not want to send the message immediately.
The selected Message System must support Scheduling in order to specify a future delivery time for a message. The Start Delivery At field is grayed out if this option is not available. See Scheduling Messages for Future Delivery for information on how to enable the Scheduling functionality.
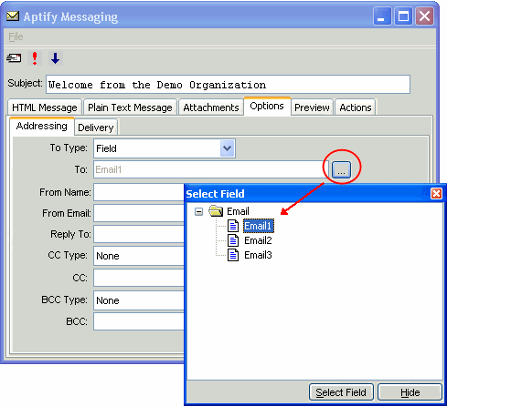
- On the Options > Addressing tab, click the ellipsis (...) next to the To: field and select a Message Field from the dialog. The contents of this field will appear in the To: field on the Preview tab.
- See Addressing Sub-Tab for more information about the other fields on this tab.
- See Addressing Sub-Tab for more information about the other fields on this tab.
- If applicable, click the Actions tab to specify any additional actions that should take place after the message is sent.
By default, when sending a message from the Persons or Organizations record, Aptify creates and links a Contact Logs record to the corresponding record automatically (the contact log is linked to the Message Runs record as well). See Configuring Message Actions for more details.
Message Actions utilize Aptify's process flow functionality to execute the specified action. See Managing Process Flows for more information about creating process flows. Also, your administrator may only give certain users and groups permission to modify all or some of the information on the Actions tab. If you do not have permissions to modify this information, see Administering Users and Groups or contact your administrator for assistance.
You can remove any existing actions by selecting the Message Run Actions record you want to delete and clicking the Delete icon.
- You can add a new action record by selecting the New icon.
- Enter an existing action by clicking the Find option.
- Note that by default only administrators have the proper permissions to create new Message Actions records. See Configuring Message Actions for more information or contact your administrator for assistance.
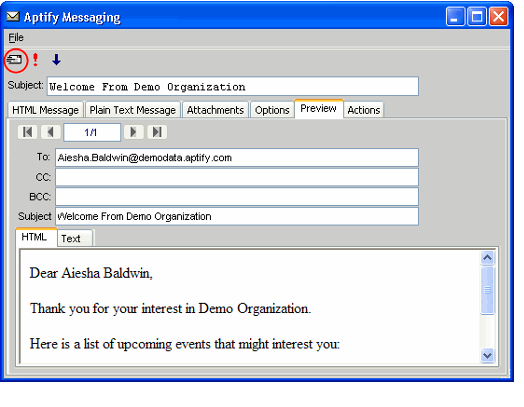
- Click the Preview tab to preview the message before sending it. Each message generated by Aptify Messaging may be individually reviewed by using the arrow buttons to scan through the messages.
- Click the Send Messages button on the form's toolbar to send the messages.
- You can also send the message by opening the File menu and clicking Send.
- If your administrator has configured the message system to require approval before sending a bulk message, the messages will not be sent until the Message Run has been approved. See Requiring Approval to Send Messages for more information on requiring approval before sending bulk messages.
- Click Yes to confirm sending the message.
- You can choose to disable this confirmation dialog by placing a check mark in the box labeled Don't Show this Message Again.
- If this confirmation has been disabled and you would like this feature re-enabled, please contact your Administrator. See Configuring the Message System Confirmation for details.
- Any actions specified on the Actions tab will be executed automatically once the message is sent.
- Note that after clicking Send, a progress bar is displayed to let you know that your request is processing.
Related content
Copyright © 2014-2019 Aptify - Confidential and Proprietary


