Merging Records
Duplicate data causes serious problems in many systems. Often, the same company or person is entered into the database multiple times. One way to manage duplicate data is to clean up the data after it has been entered. In general, this should be done before any dependencies are developed, such as Orders or Contact Log entries, to minimize the number of records involved in the merging process. Aptify provides a Merging Tool so users and administrators can combine duplicate records into one record while relinking all the dependent records to the surviving record.
Follow these steps to merge two or more records in a service:
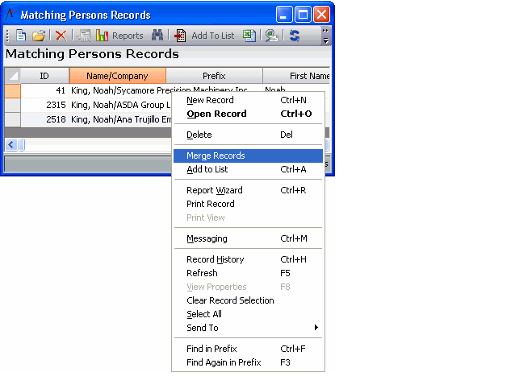
- Open a view and select the records to merge by holding the Ctrl key and clicking on each record.
- When all records have been selected, right-click in the view and select Merge Records from the pop-up menu.
You may not have the Merge Records option when you click within a view. Your administrator determines who has merging privileges for a particular service.
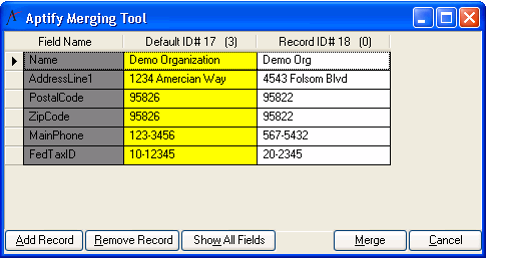
- The Aptify Merging Tool dialog appears.
- The left column displays the names of the fields that differ between the two records. The remaining columns display a record's value for each of the listed fields. By default, the tool only displays those fields that contain different data for the selected records.
- The number that appears in parentheses after the record's ID indicates the number of dependent links for that record.
- If desired, click the Show All Fields button to display show all fields for the specified records.If the Show All Fields button is selected, it is replaced with a button labeled Show Differences.
- If you want to add additional records to merge operation, click Add Record to open the Find dialog for the current service so you can search for the additional record(s).
- If you want to remove a record from the merge operation, highlight the column heading for the record and click Remove Record.
- Select the default record.
- The column heading for the default record reads Default ID#x.
- The system automatically selects the record with the greatest number of dependencies as the default record to keep. Keeping this record as the default allows the merge operation to complete in the least amount of time because there are fewer dependencies to relink.
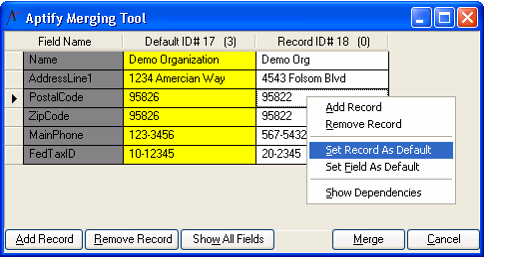
- To choose another record as the default, select within the field list for that record. Then, right-click and select Set Record As Default from the pop-up menu.
- Specify fields to retain from the non-surviving record as necessary.
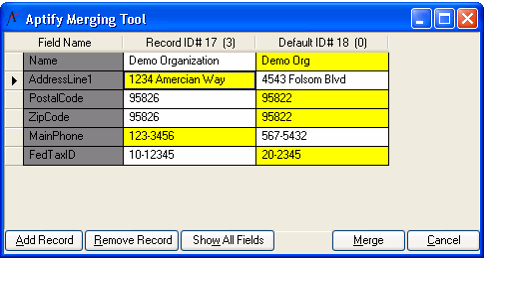
- Individual fields from other records may hold the desired resulting value. To select a particular field in the non-default record, select that field. Then, right-click within the record's column heading and select Set Fields As Default from the pop-up menu.
- Default fields appear in yellow.
- When all the fields to keep have been selected, click Merge.
- The dependency information for all records is gathered and a confirmation message displays. If the message is correct, click Yes and the merge begins to process. The duplicate records are deleted and the selected values are written to the remaining record.
- The dependency information for all records is gathered and a confirmation message displays. If the message is correct, click Yes and the merge begins to process. The duplicate records are deleted and the selected values are written to the remaining record.
- When the merge is complete a confirmation message displays. Click OK to close the completed confirmation message. If the changes should not be saved, click Cancel and the Merge operation is undone.
- Review the information that has been consolidated into the surviving record and make updates as necessary.
The process is not necessarily complete when the Merge dialog finishes merging records. Since all dependent records from the deleted records have been associated to the surviving record, a close review of the surviving record is required. For example, in some cases, the surviving record could have duplicate subscriptions, functions, or other related information. If that is the case you will need to determine if the surviving dependent records need to be merged, deleted, or altered to reflect the surviving records data correctly as if all activity had been initially entered associated to only one record.
Note for Administrators
In some cases, the merge process may fail when the surviving record in the merge process contains one or more fields whose data value violates a validation rule. While the existence of incorrect data is very rare, there are situation where this can occur, such as following the migration of data from a legacy system, if the validation logic was implemented after the data was created or imported, or if the validation logic is conditional in nature and has been imposed as a result of the merge operation.
To allow a merge process to succeed in situations like the one described above, Aptify provides an entity attribute, called ValidateMerge, which can disable the system’s Generic Entity (GE) validation during a merge process.
This attribute supports two values: Always and Never. When set to Always (the default setting), the system performs GE validation during a merge process. However, if the situation calls for it, an administrator can set this attribute to Never to disable GE validation during a merge process.
This attribute appears in the Entities entity’s Configuration > Attributes tab and is set to Always. This attribute affects all entities in the system so Aptify strongly recommends that an administrator leave it set to Always. To disable validation on an entity-by-entity basis, an administrator can add this attribute to other Entities records as necessary.
For example, if an organization wants to disable GE validation when merging Persons only, an administrator can add the ValidateMerge attribute to the Persons entity with a value of Never while leaving the Entities entity’s attribute set to Always. In this case, GE validation will occur when merging all records except Persons records.
Related content
Copyright © 2014-2019 Aptify - Confidential and Proprietary


