Configuring the Data Control Bar
You can modify the appearance of your data control bar, including hiding buttons that you do not plan to use, hiding tool tips, and setting up shortcut keys to perform button actions without having to click an icon.
Adding or Removing Buttons
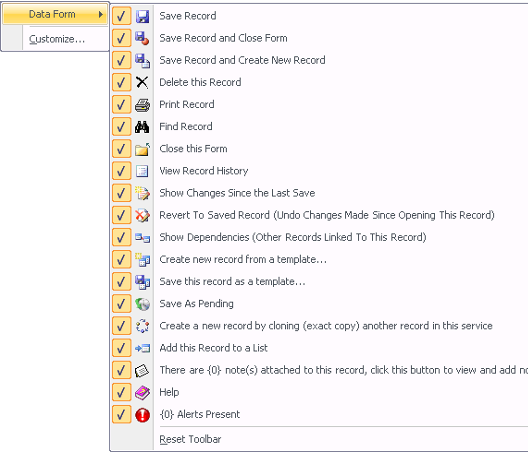
You can edit the list of buttons that appear on the Data Control Bar by using the Add or Remove Buttons option, which becomes visible when you select the down arrow to the right of the buttons.
Follow these steps to add or remove buttons from the Data Control Bar:
- In the Add or Remove Buttons drop-down menu, select Data Form.
- A list of available buttons displays.
- A list of available buttons displays.
- Toggle the check box for a button to add or remove it from the toolbar.
- To hide a button on the toolbar, clear the check box that appears next to it.
- To add a button to the toolbar, select the check box next to its item in the list.
- Select the Reset Toolbar option if you want to restore the default settings for the Data Control Bar (show all buttons).
If you remove a button, you can still activate that button's operation by using the appropriate keyboard shortcut (if applicable).
When you modify the buttons that appear in the Data Control Bar, the change applies to all forms that you open in Aptify. However, your selections apply only to you, other users will continue to use the default button layout (or whatever layout they have configured for themselves).
Customizing the Toolbar
In the Add or Remove Buttons drop-down menu, when you select Customize, a new window appears with three tabs: Toolbars, Commands, and Options. However, the Toolbars and Commands tabs are currently not supported.
The Customize option allows users to use a variety of advanced options to hide tooltips, and edit keyboard shortcuts that are described in the following sections:
- Options Tab
- Keyboard Shortcuts
Options Tab
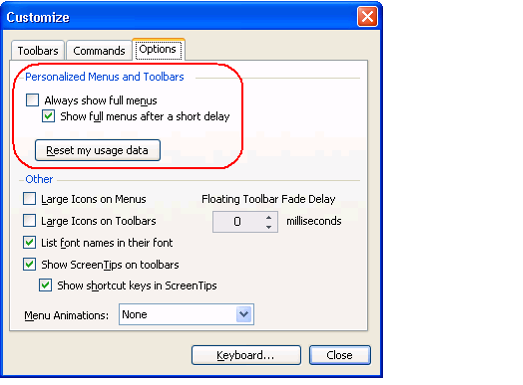
You can configure the following settings on the Customize dialog's Options tab:
Personalized Menus and Toolbars Section
- Always show full menus: Displays full toolbar menu. Note that this feature isreserved for future use.
- Show full menus after a short delay: When selected, the full menu is displayed after a short delay. This option is not available if Always show full menus is selected. Note that this feature is reserved for future use.
- Reset Usage Data: Reserved for future use.
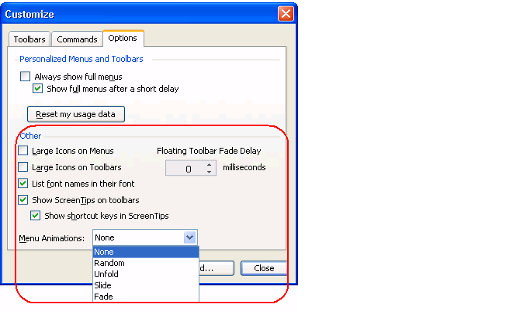
Other Section
- Large Icons on Menus: This option is reserved for future use.
- Large Icons on Toolbars: Selecting this option increases the size of the icons on the toolbar.
- List font names in their font: Selecting this option lists font names in their respective fonts. This feature is reserved for future use.
- Show ScreenTips on Toolbars: When selected, a tooltip appears when you select a button in the Data Control Bar.
- Show shortcut keys in ScreenTips: When selected, the corresponding button's keyboard shortcut is included in the tooltip.
- Menu Animations: Selecting this option controls the manner in which the Add or Remove Buttons drop-down menu appears when you click the down arrow in the Data Control Bar. The options are Random, Unfold, Slide, or Fade.
- Floating Toolbar Fade Delay: This option is reserved for future use.
Keyboard Shortcuts
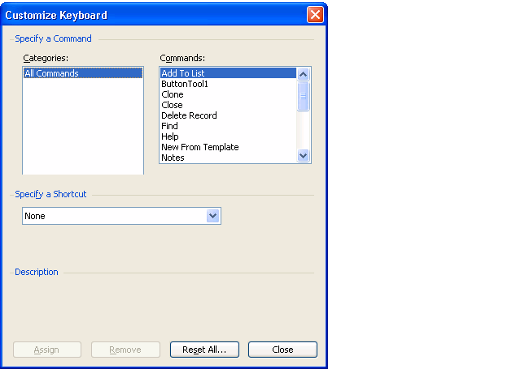
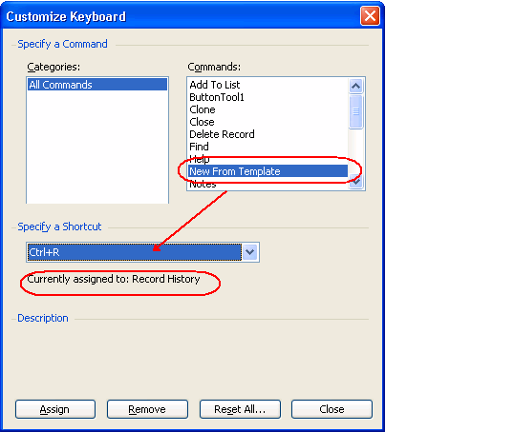
The Customize dialog includes a Keyboard... option so you can assign a shortcut key combination to activate a button when pressed.
The commands screen lists available commands within the application. Use the Specify a Shortcut drop-down box to assign shortcut values to a command. If the shortcut key you are trying to use has already been assigned to another command, a Currently Assigned to prompt will appear beneath the drop-down box.
To assign a keyboard shortcut to a Command, follow these steps:
- In the Add or Remove Buttons drop-down menu, select Customize.
- Click the Keyboards... button to open the Customize Keyboard dialog.
- Select a Command button from the commands list.
- Click the Specify a Shortcut drop-down list and select a shortcut key combination.
- If the shortcut selected is currently assigned to another button, a Currently assigned to: prompt will appear beneath the drop-down list.
- If the shortcut selected is currently assigned to another button, a Currently assigned to: prompt will appear beneath the drop-down list.
- To assign the selected shortcut to a button, click the Assign button.
- If the keyboard shortcut is already assigned to another button, the original button loses its keyboard assignment.
- If the keyboard shortcut is already assigned to another button, the original button loses its keyboard assignment.
- To remove a shortcut, click the Remove button.
- To reset all shortcuts to the default values, click the Reset All... button.
- Close the Customize Keyboard dialog.
Related content
Copyright © 2014-2019 Aptify - Confidential and Proprietary

