Working with Attachment Categories
Users or system administrators can create attachment categories to group related attachments together. Categories are particularly useful to organize attachments in a record that has a large number of attachments. In addition to it a user can secure attachment categories and the attachments in those categories so that they are visible only to authorized users. A user's ability to create, edit, delete, and see attachment categories depend upon the user's specific attachment security permissions. See Modifying Security Settings for Attachments for details.
The following sections describe how to work with attachment categories:
- Creating a New Category
- Deleting a Category
- Renaming a Category
- Opening an Attachment Categories Record
- Moving Attachments Between Categories
Creating a New Category
In general, an administrator will create categories and sub-categories for you. However, advanced users can create their own categories, following these instructions:
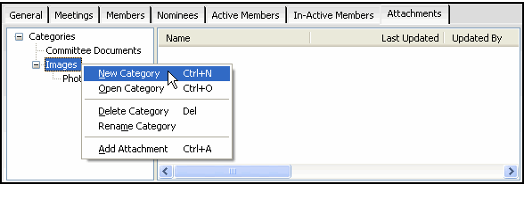
- Right-click within the category tree and select New Category from the pop-up menu to open a new Attachment Categories record.
- To create a new top-level category, right-click the Categories heading at the top of the tree.
- To create a new sub-category, right-click the category that will be the new category's parent.
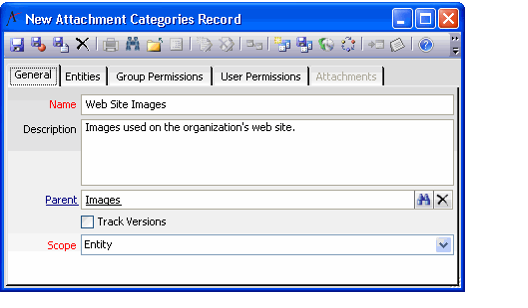
- Enter a Name and a Description for the category.
- Modify the Parent field, if necessary.
- If you opened this new Attachment Categories form by right-clicking on an existing category, the Parent field fills in automatically with that existing category's name. This means that the new category will appear as a sub-category of that existing category.
- To create a top-level category, leave the Parent field blank.
- Select the Scope for the category.
- If you want this category to appear in the Attachments tab for all forms, change the Scope set to Global.
- If you want this category to appear in the Attachments tab for only certain -services, leave the Scope to Entity and follow these steps:
- Make a list of the services whose forms should include this category in the Attachments tab.
- Click the Entities tab.
- Click the New icon or right-click in the gray area and select New from the pop-up menu to open a new sub-type record.
- Enter a service from your list in the Entity field. This category will appear in the Attachments tab for all records in the service you specify. Enter comments, if desired, and click OK.
Create additional sub-type records for the rest of the services on your list.
The Track Versions field is reserved for future use.
- Set the category's security as desired. Users who do not have access to the category will not see the category on the Attachments tab and will not have access to the attachments contained in that category. See Modifying Security Settings for Attachments for details.
- To apply the service's standard attachments security (based on a user's access to the service to which the attachment applies), leave the Group Permissions and User Permissions tabs blank. For example, if a user does not have delete access to the entity, then the user will not be able to delete attachments in the category or delete the category.
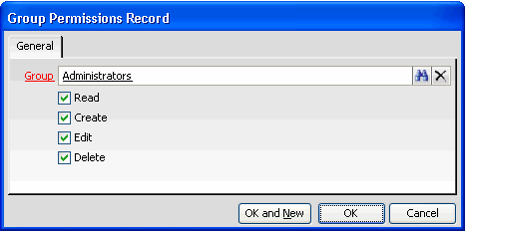
- To apply specific security to the category, specify the groups and/or users who should have access to this category on the Group Permissions and User Permissions tabs. For each user or group, specify the access rights to grant for attachment categories:
- Read: The ability to see the category and its attachments.
- Create: The ability to create sub-categories and add attachments to the category.
- Edit: The ability to edit the attachments in the category or edit the category itself.
- Delete: The ability to delete attachments in the category or delete the category itself.
If adding multiple Group Permissions and/or User Permissions, you can utilize the OK and New button to save the record and open a new Group/User Permissions record in one step.
To prevent a user or group from accessing the category and its attachments, do not add a Group Permissions or User Permissions record for that party (or you can create a record without selecting any of the options).
- Click Save and Close to save the new category and close the form.
Deleting a Category
To delete a category, do one of the following:
- Select the category in the category tree and press the Delete key.
- Right-click the category and select Delete Category from the pop-up menu.
When prompted, click Yes to confirm the deletion.
Note that you cannot delete categories that contain sub-categories or attachments. You need to delete or modify these sub-categories or attachments first before you can delete a parent category.
Renaming a Category
To rename a category, do one of the following:
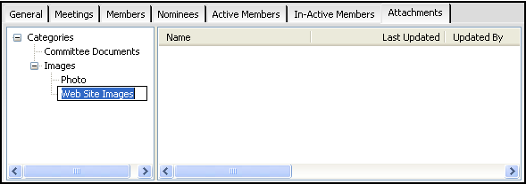
- Select the category in the category tree. Then, wait a moment and select it again.
- Right-click the category and select Rename Category from the pop-up menu.
When the cursor appears in the category's name field, enter the new name and then click the Enter key to apply the change.
Opening an Attachment Categories Record
To open a category's Attachment Categories record, right-click the category and select Open Category from the pop-up menu.
Moving Attachments Between Categories
If you want to move an existing attachment to a new category, you can delete the attachment from the first category and then add it as a new attachment to the second category.
Alternatively, advanced users can open the attachment's record in the Attachments service and modify the Category field to specify a different category. Contact your system administrator if you need assistance with this task.
Related content
Copyright © 2014-2019 Aptify - Confidential and Proprietary


